You’ve opened a sequencing result expecting a clear answer, but the chromatogram has overlapping peaks, a broad fluorescent blob, or a signal that disappears before the region you need. Repeating the reaction is tempting. Without a written record of the inputs, cycling program, and cleanup, though, another run may produce a different trace without explaining the failure.
A useful cycle sequencing protocol sets quality checkpoints before loading and defines how you’ll interpret the result afterward. This is a laboratory DNA-sequencing workflow, not a peptide dosing cycle. The shared planning principle is narrower: record what you intend to do, document deviations, and decide in advance what counts as an acceptable result.
Table of Contents
- Template and Primer Inputs
- Reaction Setup and Thermal Program
- Purifying and Loading the Cycled Product
- Diagnosing a Failed Run
- Validating Difficult Sequences
- Run Record and Final Checklist
Template and Primer Inputs
Start with a template you can identify and measure confidently. For PCR products, inspect an agarose gel for a single band at the expected size. A second band or smear is a reason to resolve the preparation before spending sequencing reagents, not something to explain away after mixed peaks appear.
Plasmid preparations need a different interpretation. Don’t apply the PCR single-band rule mechanically to a plasmid gel. Record the preparation’s identity and assess its suitability under your laboratory’s plasmid quality-control procedure.

Measure usable DNA before calculating volume
Use fluorescence-based DNA measurement rather than relying on absorbance alone. Contaminants or RNA can make a spectrophotometer reading misleading, so the apparent concentration may not represent usable sequencing template. The UBC Sanger sequencing troubleshooting guidance supports checking template quality and concentration before changing the reaction chemistry.
Build the input record in a deliberate order:
- Confirm identity. Match the tube label, sample request, and expected target before opening the reaction worksheet.
- Record the measurement. Save the concentration, measurement method, and any dilution used during quantification.
- Calculate the transfer. Divide the template mass required by the selected recipe by the measured concentration. Keep units visible so mass and volume aren’t confused.
- Check the primer. Confirm its sequence against the intended template and record its binding site and reading direction.
- Review compatibility. Check the primer-to-template relationship before adding premix, rather than assuming every sample needs the same template volume.
Separate an input failure from a sequencing failure
A questionable preparation shouldn’t enter the batch as an ordinary sample. Mark it as held for purification, remeasurement, or identity review, with a named action required before release.
Practical rule: An unresolved input problem belongs on the run sheet before it becomes an unexplained chromatogram.
Primer selection also deserves an explicit checkpoint. Record whether the primer is established for that template or newly designed, and flag any uncertainty about its binding site. That distinction makes a later weak read easier to investigate without reconstructing the setup from memory.
Reaction Setup and Thermal Program
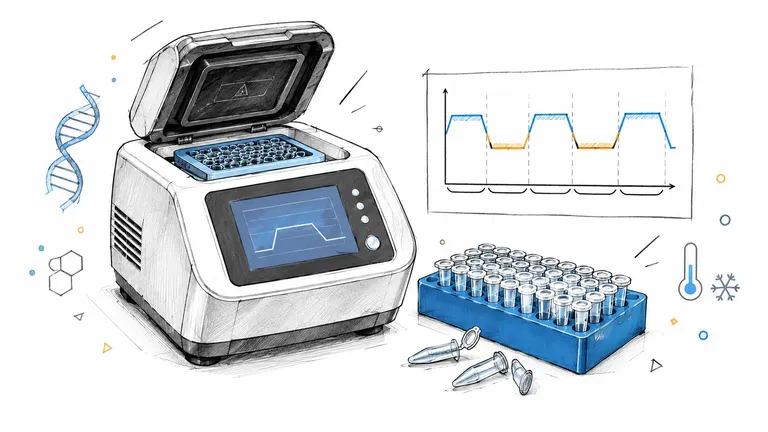
Cycle sequencing adapts Sanger’s chain-termination chemistry to repeated denaturation, primer annealing, and extension. Fluorescently labeled dideoxynucleotides terminate extension, producing fragments that can be separated and displayed as a chromatogram. The Cornell ready-to-load Sanger handbook describes this workflow and illustrates why laboratories may use different validated thermal programs.
Choose a complete recipe, not a collection of convenient settings. Combining a reduced-volume reaction from one method with cycling conditions from another creates a new method that needs its own evaluation.
Reaction components and thermal program
The following representative recipe and conditions follow the Cornell full-service Sanger sequencing handbook.
| Component or step | Amount or condition |
|---|---|
| Template, plasmid | 100–400 ng per 20 µL reaction |
| Template, purified PCR product | 50–200 ng per 20 µL reaction |
| Sequencing primer | About 5 pmol |
| BigDye Terminator v3.1 premix | 8 µL |
| Total reaction volume | 20 µL |
| Initial denaturation | 96°C for 30 seconds |
| Cycling, 25–30 cycles | 96°C 30 s; 50°C 15 s; 60°C 2 min |
Use the applicable template row, not both. Calculate water from the actual template and primer transfer volumes so the final mixture matches the selected reaction volume.
Make the plate map part of the protocol
Prepare a plate map that identifies sample, primer, direction, and controls before pipetting. Follow the reagent handling instructions, mix components consistently, and use a fixed addition order in your local procedure. Adding the template last is a practical organizational choice because it makes sample identity the final deliberate transfer.
Plate processing isn’t a reason to relax sample-level records. The published batch-sequencing protocol in Nucleic Acids Research demonstrates that standardized reactions and parallel processing can coexist.
Before starting the cycler, check:
- Program identity. Confirm the saved program matches the approved worksheet.
- Reaction mapping. Reconcile occupied wells with the sample list.
- Version control. Give any intentional program change a distinct version and rationale.
- Next action. Plan cleanup and any intervening storage according to the validated workflow.
The general habit of separating planned actions from recorded actions also applies to written protocol planning. For sequencing, the laboratory’s validated method remains the authority.
Purifying and Loading the Cycled Product
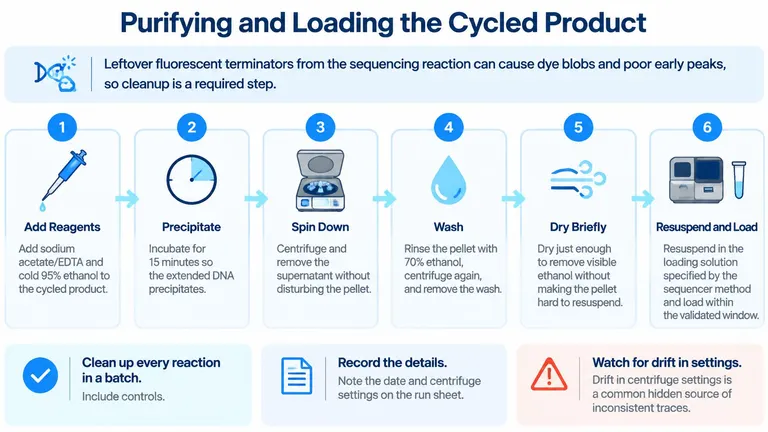
Cleanup is part of the reaction workflow, not an optional cosmetic step. Unincorporated fluorescent terminators can interfere with trace interpretation, including the early portion of the chromatogram. The cleanup procedure in the Cornell full-service handbook cited above uses ethanol precipitation to remove those remaining reagents.
The sequence of operations matters as much as completing them. Treat precipitation, pellet recovery, washing, drying, and resuspension as separate checkpoints rather than a single box labeled “cleaned.”
Preserve the pellet through every transfer
Follow the handbook’s ethanol-precipitation method for reagent amounts, incubation, and wash conditions. Use your approved local procedure for centrifugation and instrument-specific loading requirements rather than supplying missing settings from memory.
- Add precipitation reagents. Combine the cycled product with sodium acetate/EDTA and ethanol as specified by the selected method.
- Allow precipitation. Complete the prescribed incubation before centrifugation.
- Recover the pellet. Remove the supernatant carefully, keeping track of where the pellet should be.
- Wash consistently. Complete the ethanol wash and remove the wash without disturbing the recovered material.
- Dry briefly. Remove residual ethanol without unnecessarily prolonging drying.
- Resuspend and load. Use the loading solution and handling window specified by the sequencer method.
Record handling that could explain a batch pattern
Process controls through cleanup alongside the samples. Otherwise, a control may demonstrate that the sequencing chemistry worked without testing whether the sample-handling sequence worked.
Record the cleanup date, centrifuge settings, method version, and any difficulty recovering or resuspending a pellet. If a step was interrupted, document the interruption when it occurs. A later reviewer needs the actual handling history, not merely the intended procedure.
A clean result should be traceable to a reproducible cleanup procedure, not to a technician’s unrecorded workaround.
Before loading, reconcile the cleaned-product positions with the original plate map. Keep sample identity visible through transfers, especially when moving from reaction tubes to a loading plate. If a pellet was lost or a transfer is uncertain, flag that well before analysis so the result isn’t interpreted as an ordinary chemistry failure.
Diagnosing a Failed Run
Name the trace pattern before changing the protocol. Low signal, noisy peaks, dye blobs, mixed traces, early termination, and signal decay aren’t interchangeable descriptions. Each gives you a different starting point for investigation.
Use the raw electropherogram alongside the run record. A base-called sequence alone won’t show whether the software struggled with background, overlapping peaks, or a disappearing signal. The input-quality checks described earlier remain the starting point, but they should now answer a specific diagnostic question.

Electropherogram symptoms and first checks
Treat these causes as working hypotheses, not diagnoses established by appearance alone.
| Pattern | Likely cause | First check |
|---|---|---|
| Low or absent signal | Unsuitable template, inaccurate concentration, or ineffective priming | Review the amplicon gel and fluorescence measurement, then verify primer identity |
| Dye blobs | Residual unincorporated fluorescent terminator | Review cleanup completion and repeat the validated cleanup if justified |
| Noisy peaks | Inappropriate template amount or contaminated preparation | Compare template input and primer amount with the run sheet |
| Mixed trace | Heterogeneous template or a primer-related interpretation problem | Inspect raw peaks and compare the opposite-direction read |
| Early termination | Difficult sequence, including a GC-rich or structured region | Review where signal stops and investigate from the reverse direction |
| Signal decay | A reaction or loading problem requiring further investigation | Review reagent handling, template input, and controls before selecting a repeat |
Signal decay alone doesn’t establish that premix is aged or that the product was overloaded. Those possibilities require supporting evidence from the handling record and batch comparison.
Choose a repeat that tests an explanation
Use a short decision sequence:
- Compare the batch. Determine whether the pattern affects an isolated sample, a preparation group, or the controls as well.
- Locate the suspected stage. Separate input preparation, reaction setup, cleanup, and loading questions.
- Choose a discriminating change. Re-purify when the evidence points to contamination, adjust input when measurement supports it, or change reading direction when the obstruction is localized.
- Preserve the comparison. Assign the repeat a new run identifier and record the hypothesis before starting it.
Changing template volume, primer, cycling, and cleanup together may rescue a sample, but it won’t identify which change mattered. When urgent recovery requires several changes, label the attempt accordingly rather than presenting it as a controlled diagnostic repeat.
Validating Difficult Sequences
A readable text file isn’t the same as a validated sequence. Homopolymers, dinucleotide repeats, GC-rich regions, primer-binding polymorphisms, and heterogeneous templates can complicate interpretation even when part of the trace looks convincing. The ACGS Sanger sequencing best-practice guidance supports raw-trace review, appropriate controls, and careful confirmation of difficult regions.
Review each strand before assembling a conclusion. Agreement between assembled text files can conceal weaknesses that are visible in the underlying traces. Keep the distinction between a software base call and an analyst’s accepted interpretation explicit.
Judge the evidence at the disputed position
Inspect the region in context rather than isolating the apparent variant. Evaluate peak balance, background, neighboring peak separation, and whether the signal remains interpretable through the position.
- Secondary peaks. Consider whether they represent a mixed template, a genuine mixed population, or an unresolved technical artifact. Similar peak heights alone don’t settle that question.
- Repeated sequence. Look for loss of alignment or ambiguity associated with slippage rather than accepting the first plausible base call.
- Primer proximity. Confirm that the disputed position lies within usable sequence, not merely within the exported file.
- Direction-specific disagreement. Keep the result unresolved until you understand why the strands differ.
The following video can accompany the practical review of sequencing output.
Define confirmation before reviewing the result
Write your confirmation rule before the run. When ambiguity or slippage occurs, obtain opposite-direction evidence and consider a custom primer outside the difficult region. If a primer-binding problem is plausible, reusing the same primer doesn’t address it.
Acceptance standard: Preserve uncertainty when the evidence doesn’t support a defensible call.
Some unresolved samples need cloning or an orthogonal method rather than another identical sequencing attempt. Record why additional testing is needed and what question it should answer.
For readers working with peptides, peptide purity testing concerns a different analytical question. Don’t treat a DNA sequence result as evidence of peptide purity, preparation suitability, or safety for personal use. Keep the identity of the material, the method used, and the conclusion supported by that method separate.
Run Record and Final Checklist
A useful run record lets another person reconstruct what happened without interviewing the operator. It should connect the sample, the planned procedure, the actual handling, and the accepted interpretation. A folder containing only sequence files can’t do that.
Complete the worksheet before setup, then amend it as work proceeds. Retrospective reconstruction invites uncertainty about which concentration, primer, or program was used. Keep corrections visible rather than quietly replacing an earlier entry.
Keep the record compact but complete
| Record group | Information to retain |
|---|---|
| Sample identity | Template identifier, preparation identity, and plate or tube position |
| Input evidence | Concentration, measurement method, calculation, and preparation assessment |
| Primer information | Name, sequence reference, binding site, and reading direction |
| Reaction execution | Recipe version, thermal-program version, and deviations |
| Cleanup and loading | Date, centrifuge settings, handling notes, and instrument |
| Result evidence | Raw trace location, base-called sequence, and analyst review |
| Decision | Accepted, repeated with a named change, or flagged for review |
Store the raw trace and base-called output together under a consistent identifier. Preserve separate strand assessments and link repeat attempts to their original run. Don’t overwrite an unsuccessful attempt just because the replacement looks better.
The organizational distinction between a planned event and a completed entry is also relevant to how logging works. A sequencing record needs the laboratory-specific evidence in the table above, not just a timestamp showing that an action occurred.
Close the batch deliberately
Use a final review rather than assuming that every exported file is ready for release:
- Inputs checked. Confirm that preparation and measurement checkpoints were completed or that exceptions were documented.
- Execution reconciled. Resolve mismatches between the worksheet, plate map, and instrument output.
- Controls reviewed. Investigate unexpected control results before accepting associated samples.
- Flagged regions resolved. Retain the supporting strand evidence or clearly mark the remaining limitation.
- Repeats linked. Record the changed variable and whether the repeat supported the original explanation.
- Files archived. Verify that a reviewer can locate both the evidence and the final decision.
The final decision should describe what the result supports, not just whether the instrument returned data. That’s the difference between completing a run and producing a result someone else can review.
PepFlow offers a dosage calculator, personal cycled-protocol planning, reminders, and dose logs for organizing peptide schedules, not laboratory sequencing. Visit PepFlow if you need those planning and tracking tools, and check every recorded calculation and schedule for accuracy. Use it for tracking and reference, not as a substitute for professional medical advice.