You open a peptide vial, unfold the Certificate of Analysis, and spot the line everyone looks for first: purity. Maybe it says 98%, maybe 99%+, and it feels reassuring. But the next question usually lands fast. Does that number tell you how much active peptide is in the vial, or just how clean the main signal looked on one lab test?
That confusion is common, and it matters more than most buyers realize. A peptide can look excellent on a chromatogram and still deliver less target material by weight than you expected. If you’re planning doses from the label alone, that gap can throw off consistency, reproducibility, and your margin for error.
Table of Contents
- Your First Look at a Peptide Purity Report
- What Is Peptide Purity and Why It Matters
- Common Methods for Peptide Purity Testing
- How to Read a Certificate of Analysis CoA
- How to Calculate Your Dose Using Purity Data
- Sending Peptides for Third-Party Testing
- Beyond Purity What Standard Tests Don’t Tell You
Your First Look at a Peptide Purity Report
A typical first reaction to a peptide CoA is confidence mixed with uncertainty. You see a product name, a batch number, maybe a chromatogram with one big peak, and a purity value that sounds strong. But unless you work around analytical testing, it’s not obvious what that figure proves.
Say your vial arrives with a claim like “98.5% purity.” Many people read that as “98.5% of this powder is active peptide.” That’s not what the number usually means. In most peptide purity testing workflows, that value describes how large the main peptide peak is compared with other detected peaks in the chromatographic run. It’s about the relative composition of detected species, not automatically the usable amount in the vial.
That distinction is where clients usually get tripped up. The CoA may tell you the target peptide was the dominant detected component under the test conditions. It doesn’t automatically tell you whether the powder includes water, counterions, residual salts, or other non-peptide mass that still affects dosing by weight.
Practical rule: A purity number is a useful quality signal, but it isn’t a complete answer to “How much active peptide am I actually measuring out?”
When I explain this to clients, I compare the CoA to a car dashboard. The fuel gauge matters. The engine light matters. But neither one alone tells you everything about how the car will perform. A peptide report works the same way. You need the purity result, the identity check, and some understanding of peptide content before you can dose with confidence.
What Is Peptide Purity and Why It Matters
A client weighs out a vial labeled 10 mg and assumes they have 10 mg of active peptide to work with. That assumption is where dosing errors often begin.
Peptide purity sounds straightforward, but the lab meaning is narrower than many buyers expect. It describes how much of the detected peptide-related material matches the intended sequence, compared with closely related by-products formed during synthesis and cleanup. That matters because a strong purity percentage can still leave an open question: how much active peptide is present by weight in the vial?

What purity actually describes
A sorting tray works as a useful comparison here. If a technician spreads out a batch of nearly identical parts, the question is how many are the correct part and how many are close, but wrong in ways that still matter. Peptide testing asks a similar question. The target sequence may be present alongside truncated sequences, incompletely processed material, or other peptide-related impurities from the same production run.
In routine quality control, analysts estimate purity by comparing the main peptide signal with the other detected signals in the sample. If the main component dominates, the purity number rises. If extra peptide-related species show up, the reported purity falls.
That answer is helpful, but it is still only one answer.
A purity result usually tells you the target peptide is the largest detected peptide component under the test conditions. It does not automatically tell you how much of the vial’s total powder mass is active peptide. Water, residual solvents, salts, and counterions can add weight without contributing active peptide content. For anyone calculating a dose from the label weight alone, that gap is practical, not academic.
Why small impurities matter
Small impurities can change outcomes in two different ways.
First, a related impurity may behave differently from the intended peptide. A shortened sequence or altered chemical form can bind weakly, act unpredictably, or do nothing at all. If your goal is consistent research results, that inconsistency matters immediately.
Second, inactive material still occupies mass. If part of the powder is impurity or non-peptide material, the amount you weigh out may overstate the amount of active peptide you are using. That is the part many clients miss. HPLC purity and net peptide content are connected, but they are not the same measurement.
A simple way to frame it is this: purity tells you how clean the peptide portion looks, while net peptide content tells you how much real peptide you have to dose with. You need both ideas in mind to judge safety, interpret results, and avoid underdosing or overdosing based on label weight alone.
High purity improves confidence that the main detected peptide is the intended one. It still does not answer sterility, biological potency, or exact active peptide content by weight.
Common Methods for Peptide Purity Testing
A peptide report usually relies on two lab tools that answer two different questions. HPLC asks, “How clean does this sample look once the mixture is separated?” Mass spectrometry asks, “Does the main material have the mass we expect for this peptide?”
That distinction matters because a high purity percentage can sound more complete than it is. A sample can show one dominant HPLC peak and still leave open a practical question for dosing: how much of the vial’s total powder is active peptide rather than water, salts, or other non-peptide mass?

How HPLC separates the mixture
HPLC works like sending a mixed crowd through a long hallway with checkpoints. Some molecules move through quickly. Others interact more with the column and come out later. By the time they reach the detector, the mixture has been spread into separate signals.
For peptides, labs often use reverse-phase HPLC with a C18 column and UV detection near the peptide bond absorption range. In plain terms, that setup is designed to make peptides and related byproducts visible as separate peaks on a graph.
The graph is called a chromatogram. Each peak represents detected material under those test conditions. If one peak dominates, the sample appears relatively clean from a chromatographic standpoint.
Here is the part that often causes confusion. HPLC purity is a relative signal measurement, not a direct measurement of net peptide content by weight. It tells you how much of the detected chromatographic signal belongs to the main peak compared with other detected peaks. It does not tell you how much extra mass in the vial comes from moisture, residual solvents, acetate or trifluoroacetate salts, or other non-active material. That gap is why a peptide can look highly pure on paper while still delivering less active peptide per milligram than a buyer expects.
Why mass spectrometry gets paired with HPLC
A clean-looking chromatogram still needs an identity check.
Mass spectrometry, often reported as LC-MS, UPLC-MS, or MALDI-TOF, measures molecular mass. It works like a very precise scale for molecules. If the target peptide should have a certain mass, MS checks whether the main detected component matches it and whether nearby mass signals suggest common problems such as truncations, oxidation, or incomplete synthesis.
That makes MS a useful partner to HPLC. HPLC separates the mixture and estimates relative purity. MS helps confirm that the main peak is likely the intended peptide, not a similarly behaving impurity with a different mass.
For safety and research consistency, this pairing matters. If HPLC says the sample is clean but MS does not support the expected identity, the purity number alone is not enough to trust the material.
Comparison of Peptide Analysis Methods
| Method | What It Measures | Primary Purpose |
|---|---|---|
| RP-HPLC | Relative peak areas of the main peptide and detected impurities | Estimate chromatographic purity |
| Mass Spectrometry | Molecular weight and mass pattern | Confirm identity and flag mass-related impurities |
| Amino Acid Analysis | Amino acid composition or content estimate | Help estimate peptide content |
Amino acid analysis is less common on routine seller paperwork, but it matters for a reason that HPLC does not fully cover. If you want a better estimate of how much peptide material is present overall, this method can help anchor content more directly than a purity percentage alone.
A simple way to read the table is this:
- HPLC shows how crowded the mixture is.
- MS checks whether the main component matches the expected peptide mass.
- Amino acid analysis can help estimate peptide content, which is closer to the dosing question clients often care about.
If a CoA shows only HPLC purity, read it as one piece of the quality picture. It may suggest the peptide portion is fairly clean, but it does not fully answer identity, and it does not fully answer how much active peptide mass is present in the vial for dose calculations.
How to Read a Certificate of Analysis CoA
You have a vial labeled 10 mg, and the CoA says 98% purity. It is easy to read that as “almost 10 mg of active peptide.” A CoA does not say that unless it also reports content. That gap is where many dosing mistakes begin.

A good first pass is simple. Check four items in this order: the sample details, the chromatogram, the identity result, and any mention of content, moisture, or counterions. Reading them in that sequence helps you avoid the common mistake of stopping at the purity percentage and assuming it answers the dosing question.
Start with the sample details
Before looking at any graph, confirm the boring but important fields: peptide name, lot number, batch number, and test date. Those details answer a basic question. Does this report belong to the vial in your hand?
If the lot numbers do not match, the rest of the document loses value fast.
Read the chromatogram like a mixture profile
The chromatogram is the graph that usually gets the most attention. It works like a separation snapshot. Each peak represents material detected as the sample moved through the system, and the main peak is usually the target peptide.
A clean trace often shows one dominant peak with smaller neighboring peaks. A busy trace with several noticeable peaks suggests more detectable byproducts or related compounds. The purity percentage usually comes from the area of the main peak compared with the total detected peak area.
That is helpful, but it has a limit. HPLC purity answers, “How much of the detected signal came from the main peptide peak?” It does not answer, “How many milligrams of active peptide are in the vial?”
Those are different questions.
Find the identity result
Next, look for MS, LC-MS, UPLC-MS, or MALDI-TOF. This part checks whether the main material matches the expected molecular weight. A large clean peak is reassuring only if the mass matches the peptide you intended to buy.
If identity data is missing, read the CoA more cautiously. You may still have a dominant HPLC peak, but you have less confirmation that the peak belongs to the correct peptide rather than a closely related product.
A short explainer can help if you want to see a lab-style walk-through of the document structure:
Look for the part many buyers skip
Now check whether the report mentions net peptide content, peptide content, water content, acetate, TFA, or other counterions. This is the section that connects lab testing to real dosing.
Here is the practical reason. A vial can show high HPLC purity and still contain non-peptide mass. Water and counterions add weight, but they are not active peptide. So a vial can be “very pure” in the chromatographic sense while containing less target peptide by mass than the label makes you assume.
A kitchen analogy helps. If a bag of flour is 98% free of debris, that tells you the flour is clean. It does not tell you how much moisture the bag absorbed or whether the full labeled weight is dry usable flour. CoA purity works in a similar way. It describes cleanliness of the detected peptide mixture, not automatically the net amount of active peptide available for dosing.
Use this quick scan
When you review a CoA, ask these questions:
- Does the peptide name and lot match the vial?
- Is there one clearly dominant HPLC peak?
- Is there mass data confirming identity?
- Does the report list net peptide content or only purity?
- Are water, salts, or counterions mentioned anywhere?
If the CoA gives purity but says nothing about content, treat the purity number as a partial answer. It supports mixture quality. It does not finish the dosing calculation.
That distinction matters even more when you start converting label amounts into injection volumes or unit-based measurements. If you need help with the arithmetic side, this guide to mg to mcg conversion for peptide dosing makes the unit step easier to check before you calculate a final dose.
A clean-looking CoA can support confidence in identity and purity. Safe, accurate dosing depends on one more question: how much of the vial is actually target peptide by mass?
How to Calculate Your Dose Using Purity Data
This is the part that changes how people interpret peptide purity testing. HPLC purity tells you what fraction of the detected chromatographic signal belonged to the main peptide. Net peptide content tells you how much of the vial’s total mass is target peptide. Those are related, but they are not interchangeable.

Purity and net peptide content are not the same
Many dosing errors begin at this stage. A vial can be chromatographically very pure and still contain meaningful non-peptide mass. That extra mass often comes from water, counterions such as TFA or acetate, and residual salts.
GenScript addresses this directly in its explanation of peptide quality, noting that peptide purity should not be confused with peptide content and recommending a mass-balance approach where target peptide + impurities + counterion + water ≈ 100% in the vial. Their write-up on HPLC purity versus actual peptide content is one of the clearest explanations of why dosing by label weight alone can be misleading.
If you dose from vial weight as though every milligram were active peptide, you can end up taking less target compound than intended. In repeated protocols, that creates inconsistency even when you think your math is solid.
A practical way to estimate real peptide amount
When a supplier provides Net Peptide Content (NPC), use that figure for dosing calculations. If the CoA gives only HPLC purity and nothing about content, treat that as incomplete information rather than filling the gap with assumptions.
A simple concept works here:
- Start with the labeled mass in the vial.
- Find the net peptide content if it’s provided.
- Estimate active peptide mass from NPC, not from HPLC purity alone.
- Prepare concentration and dose from the active peptide estimate.
Worked example, qualitative by design:
- You want a target dose of 100 mcg.
- Your chromatographic purity looks strong.
- But the actual vial contains non-peptide mass from water and counterions.
- If the net peptide content is lower than the purity figure, you’ll need a slightly larger withdrawal than you’d calculate from purity alone to deliver the intended amount of target peptide.
That’s the practical gap. Two vials can both show high HPLC purity and still deliver different amounts of real peptide per measured mass.
Dosing tip: Use HPLC purity to judge composition. Use NPC to judge how much target peptide you’re actually weighing or reconstituting.
If you need help converting between units when setting up the final dose volume, this mg to mcg conversion guide is a useful companion for the arithmetic.
A simple dosing workflow
A cautious workflow looks like this:
| Step | What to use | Why it matters |
|---|---|---|
| Check identity | MS result | Confirms the peptide matches the expected mass |
| Check purity | HPLC result | Shows whether the sample is dominated by the main peptide |
| Check content | NPC or mass-balance data | Helps estimate the true amount of target peptide |
| Build concentration | Active peptide amount, not just label mass | Improves dosing consistency |
If NPC isn’t listed, ask the supplier directly. Ask whether the vial mass includes significant water or counterion content, and whether they can provide content testing or mass-balance information. That one question often tells you a lot about how seriously the supplier handles analytical transparency.
Sending Peptides for Third-Party Testing
Some peptide buyers don’t get a CoA at all. Others get one but want an independent check, especially when trying a new supplier or comparing batches that behave differently in practice. Third-party testing is the cleanest way to move from trust to verification.
When outside testing makes sense
Independent testing is worth considering when the paperwork is thin, the chromatogram looks questionable, or the supplier’s reporting style changes from lot to lot. It also helps when you’re trying to verify consistency over time rather than just review a single vial.
You don’t need to approach this like a large manufacturer. A private buyer or small clinic can still contact an analytical lab and ask whether they accept peptide samples for characterization. Search terms like peptide analysis services, peptide HPLC testing, or peptide LC-MS testing usually surface the right kinds of providers.
What to ask the lab for
At minimum, ask about HPLC and mass spectrometry. That combination gives you a practical read on purity and identity. If your use case demands tighter control over actual content, ask whether the lab offers amino acid analysis or another approach to peptide content estimation.
Before shipping anything, confirm these details:
- Sample handling requirements. Labs may want the peptide kept cold, dry, or protected from light.
- Submission amount. Ask how much material they need for the requested panel.
- Reporting format. Request a chromatogram, numerical purity result, and mass confirmation.
- Storage guidance after receipt. Keep any retained sample stable. If you need a refresher on handling once a vial has been mixed, this guide on how to store reconstituted peptides covers the practical basics.
A good outside lab should also tell you what their testing doesn’t cover. That honesty matters. A strong chromatogram and correct mass are useful, but they still don’t answer every safety question.
Beyond Purity What Standard Tests Don’t Tell You
A high purity figure often gets treated like a universal stamp of quality. That’s too generous. Peptide purity testing is powerful, but routine purity testing does not capture every risk that matters in real use.
What routine purity testing can miss
A peptide can be reported as “>98% pure” and still be unsuitable for sensitive applications. As JPT notes in its discussion of peptide purity and analytical workflows, routine HPLC purity testing can miss hidden contaminants such as heavy metals, endotoxins, solvents, and microbial contamination. The same source also points out that HPLC-MS is now a standard analytical tool for identity and purity, while orthogonal methods may still be needed to assess the full risk profile.
Buyers are often lulled into a false sense of certainty here. A single purity line on a CoA sounds complete, but it’s only one slice of quality.
Some examples of what may sit outside a standard purity result:
- Endotoxins can trigger inflammatory reactions even when the peptide profile looks clean.
- Residual solvents may come from synthesis or purification steps and require separate testing.
- Heavy metals won’t show up as ordinary peptide impurity peaks on a routine chromatogram.
- Microbial issues are a different question from peptide identity and peptide-related by-products.
Questions worth asking a supplier
Instead of asking only “What’s the purity?” ask better questions:
- What methods were used besides HPLC?
- Was identity confirmed by MS?
- Do you test for endotoxins, residual solvents, or microbial contamination when relevant?
- Can you distinguish HPLC purity from actual peptide content?
That broader view also helps when you’re trying to interpret tolerance or reaction issues. If someone assumes a side effect must come from the peptide itself, they may miss a quality variable in the sample. This overview of possible peptide side effects is useful background when you’re thinking about how product quality and user response can get confused.
High purity is a good sign. It is not the same thing as complete safety screening, and it is not a substitute for proper sourcing standards.
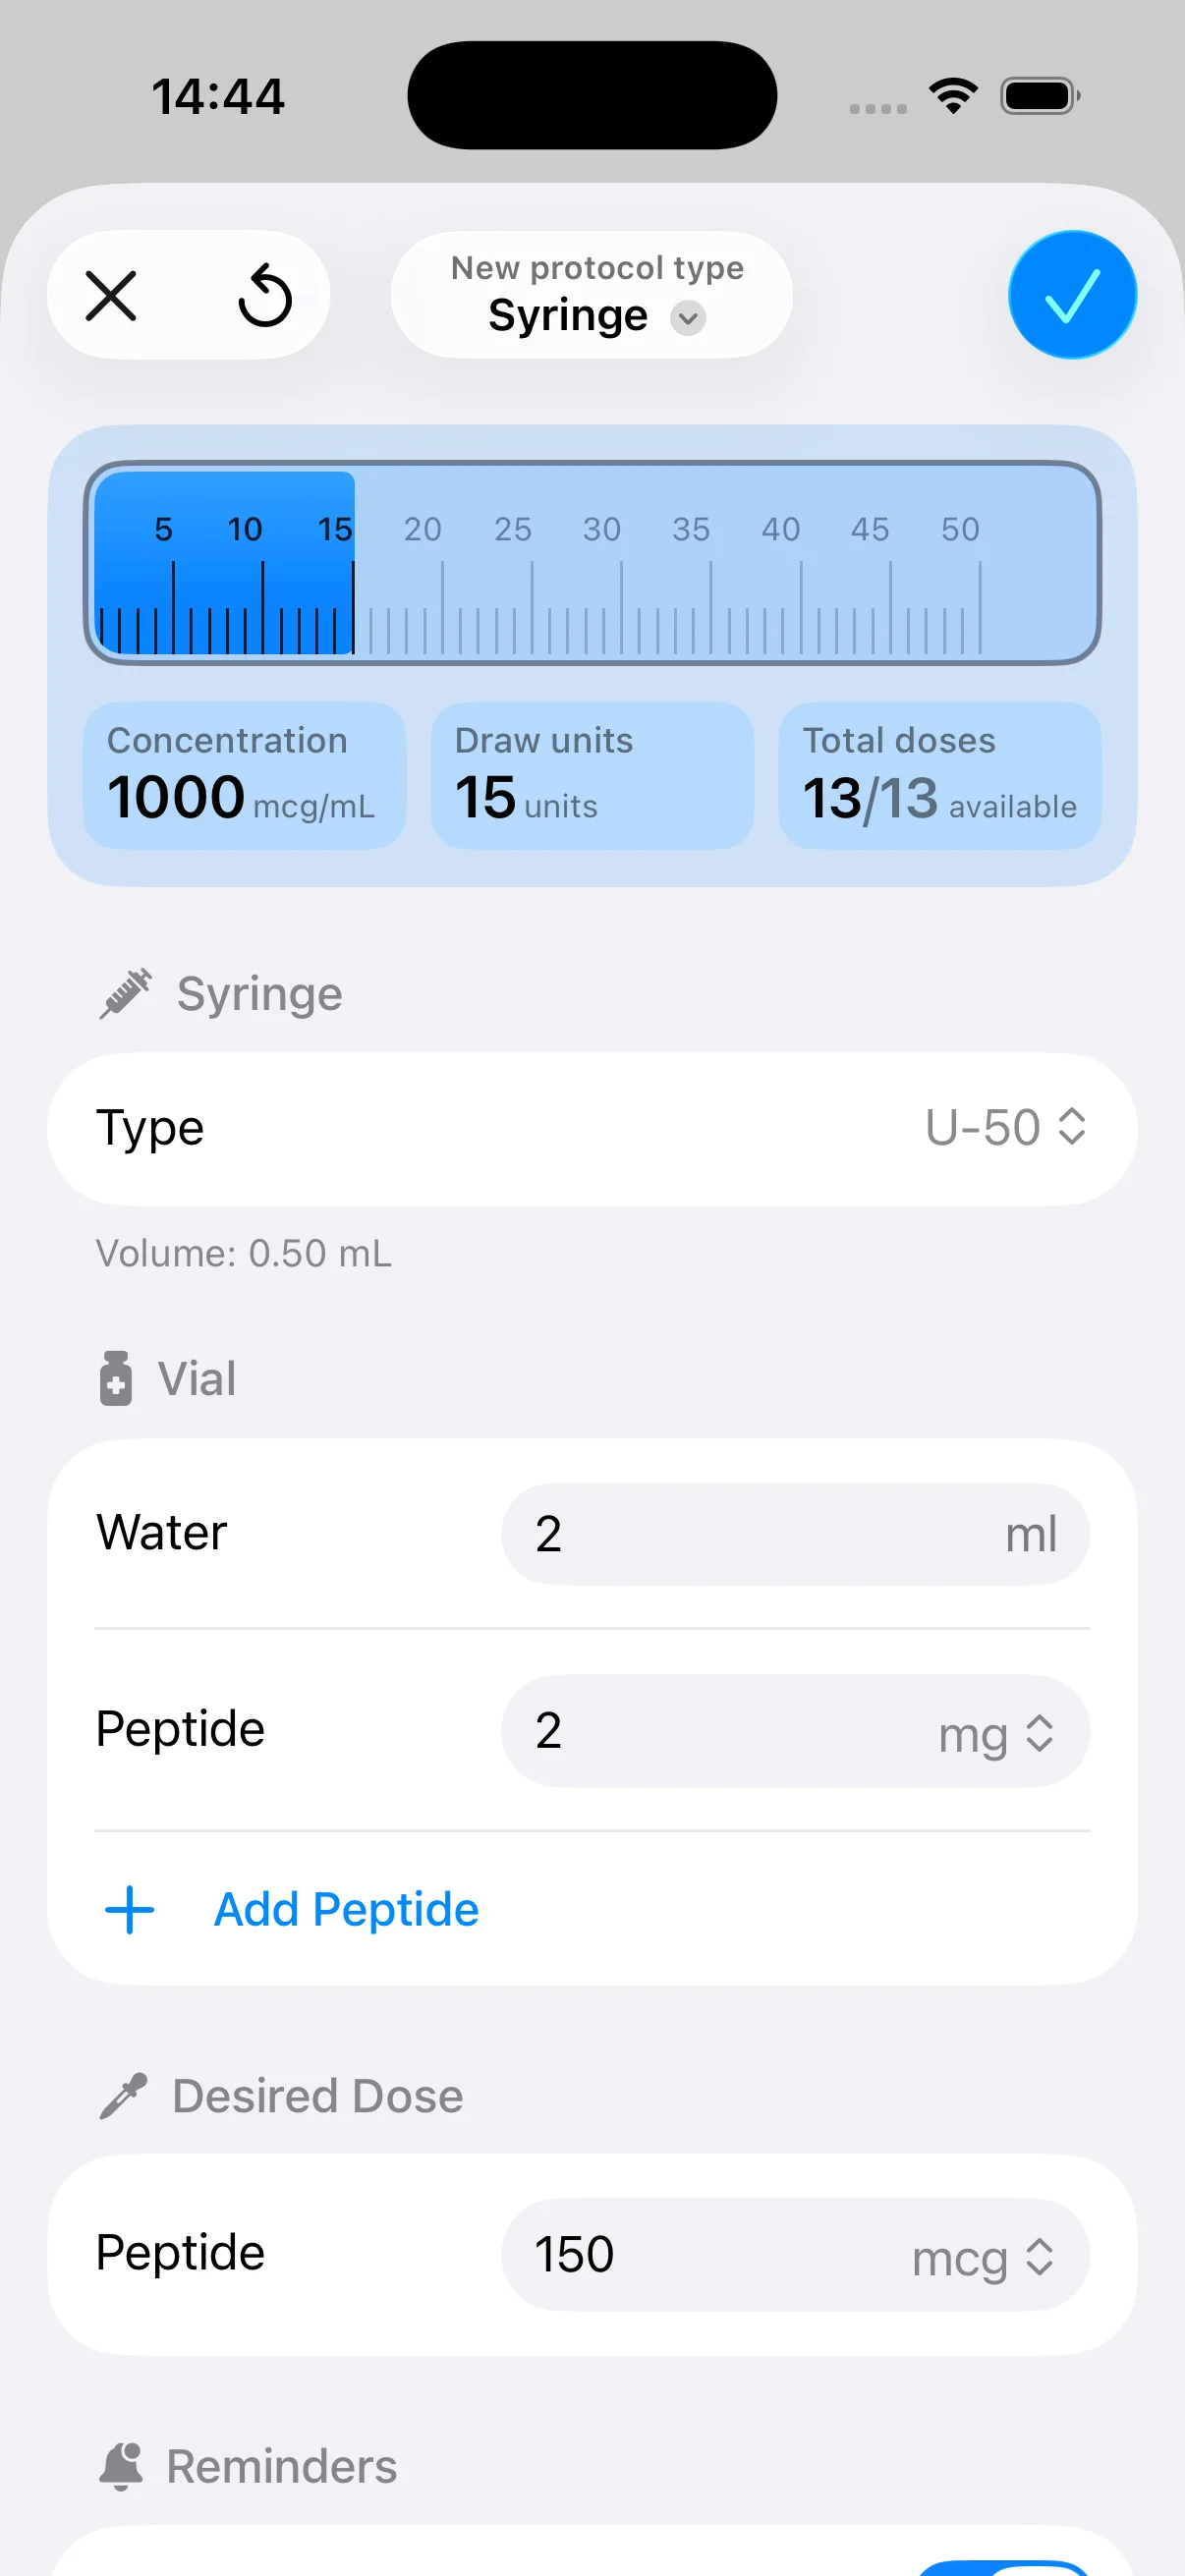
If you’re trying to turn lab numbers into a usable dosing routine, PepFlow can help with the practical side. It’s a lightweight iOS app built for peptide dose calculations, vial setup, scheduling, reminders, and tracking, so you can spend less time rechecking math and more time staying consistent.