You’re probably looking at a small vial of lyophilized IGF-1 LR3 and thinking the hard part is over. It isn’t. The next few minutes decide whether you end up with a clean, usable solution or a compromised batch that looks fine at first glance but has already taken avoidable damage.
Reconstituting IGF 1 LR3 isn’t just “add water and swirl.” This peptide punishes rough handling, bad solvent choices, rushed mixing, and sloppy math. Most failures happen in ordinary moments: the needle goes in too fast, the stream hits the powder directly, the stopper is still wet with alcohol, or someone starts swirling before the cake has had time to hydrate.
If you approach it like a delicate lab procedure instead of a casual prep step, your odds improve immediately. That means setting up the workspace first, choosing the solvent deliberately, handling the vial gently, and checking clarity before you trust the result. It also means getting the dose math right after reconstitution, because a perfectly dissolved vial can still be used incorrectly if the concentration is misread.
Table of Contents
- Why Precision Matters for IGF-1 LR3
- Assembling Your Reconstitution Toolkit
- The Core Reconstitution Protocol Step by Step
- Mastering Dosing Calculations and Vial Configuration
- Troubleshooting Common Reconstitution Problems
- Proper Storage and Handling for Maximum Potency
Why Precision Matters for IGF-1 LR3
When you’re reconstituting IGF 1 LR3, the risk isn’t only contamination. The bigger issue is that the peptide can lose integrity during the process itself. Mechanical stress, foam, repeated agitation, and a poor solvent environment can all push the solution in the wrong direction before you ever draw the first dose.
That’s why experienced researchers handle this vial differently from simpler compounds. You’re preserving structure, not just creating liquid volume. The right technique reduces stress on the peptide while it transitions from dry powder to solution.
Small mistakes create expensive failures
Most users don’t ruin a vial with one dramatic error. They ruin it with a chain of minor ones. A rushed injection stream hits the cake directly. The vial gets shaken because powder is still visible. The user assumes “mostly dissolved” is good enough and moves on.
Practical rule: If you feel tempted to speed up the process, that’s usually the moment you’re most likely to damage the batch.
This mindset matters because the signs of failure aren’t always obvious at the exact moment you make the mistake. Potency loss doesn’t announce itself. You often only notice a problem when the solution turns cloudy, throws visible particulates, or behaves inconsistently from one draw to the next.
Treat it like a controlled procedure
A good reconstitution workflow has four jobs:
- Protect sterility: Every surface and puncture point matters.
- Protect structure: Gentle handling prevents shear, bubbles, and aggregation.
- Protect concentration accuracy: The amount of diluent you add determines every later dose.
- Protect usability: The final solution must look right before you trust it.
That’s also why I tell new trainees not to improvise midway through the process. Have the supplies ready, know your vial configuration before opening anything, and decide on your solvent in advance. If you stop halfway to search for a syringe or recalculate the concentration on the fly, errors pile up fast.
Assembling Your Reconstitution Toolkit
A bad setup usually shows itself at the worst point in the procedure. The stopper is clean, the syringe is in hand, and then someone realizes they still have not settled on a solvent, a target volume, or a safe place to discard the needle. That is how sterile work turns sloppy.
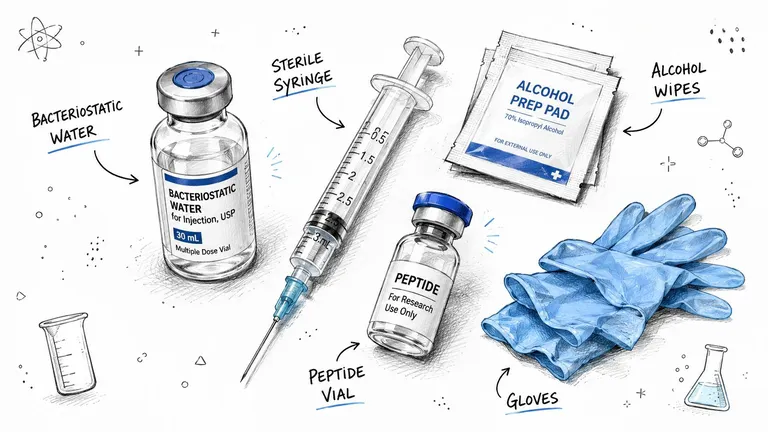
Set the bench before you touch the vial. For lyophilized compounds, the handling rules start before any liquid is introduced. If you need a quick refresher on why dry peptide cakes behave differently from already dissolved materials, this overview of freeze-dried peptide handling basics gives useful context.
What to place on the bench
Use a deliberate checklist, not memory:
- Lyophilized IGF-1 LR3 vial: Check the label, stopper, crimp, and powder appearance. If the cake looks collapsed, damp, discolored, or uneven in a way that suggests prior moisture exposure, stop there.
- Chosen diluent: Decide this before drawing anything up. If your protocol calls for bacteriostatic water, use a sterile, research-appropriate source such as premium Bac Water for research. The wrong solvent choice is one of the easiest ways to create avoidable stability problems.
- Sterile syringe and needle: Use a fresh setup so the volume is measured cleanly and the fluid can be introduced with control.
- Alcohol prep pads: Wipe the stopper once, thoroughly, then let it dry. Do not keep re-wetting the surface.
- Gloves: Clean gloves help limit contamination from skin oils and bench contact.
- Sharps container: Keep it beside the work area so disposal happens immediately.
- Clean workspace: Clear enough space to work without reaching over open materials or bumping the vial.
Why the toolkit matters
Each item supports either sterility, concentration accuracy, or peptide integrity. If one part is improvised, the rest of the procedure gets harder to control.
The solvent decision deserves extra attention. Bacteriostatic water is common because it is practical for multi-use handling, but convenience is not the only factor. The wrong diluent, poor source quality, or casual substitutions can change how the powder wets, dissolves, and holds up after reconstitution. That kind of error often gets blamed on the peptide when the actual cause was the liquid.
Timing matters too. After the stopper is wiped, let the alcohol evaporate fully before puncturing. A wet stopper is not cleaner. It just adds another variable.
Make the math part of the setup
Set your final concentration before the syringe ever touches the diluent vial. I tell trainees to write down three things first: total vial amount, planned reconstitution volume, and target dose per draw. If those numbers are not fixed in advance, people start doing arithmetic mid-procedure, and that is where bad assumptions creep in.
Use a dosing app or peptide calculator if that helps reduce unit errors. There is no prize for doing the math in your head while handling a sensitive vial.
One more nuance gets missed often. Once the diluent is added in the next stage, do not judge the batch too quickly. Passive hydration time matters. A vial that still shows faint undissolved material right after gentle introduction is not a signal to shake it. It is usually a signal to wait.
The Core Reconstitution Protocol Step by Step
A vial is easiest to damage right after the needle goes in. The powder looks stable, but this is the point where rough handling, a rushed solvent addition, or impatience during hydration can cost you potency.
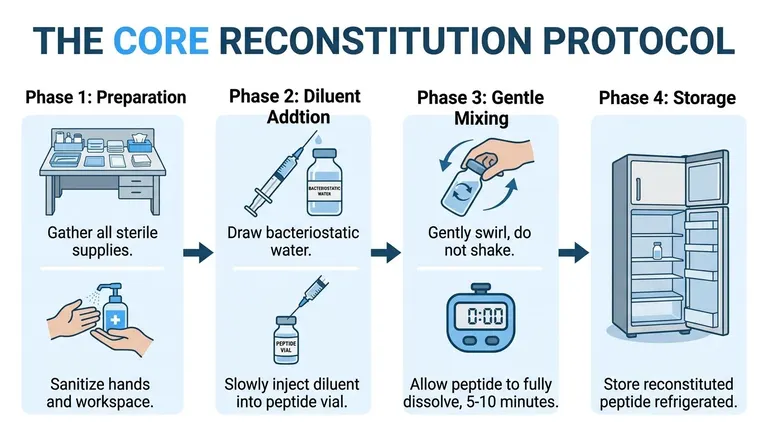
Preparing Your Sterile Field
Set up enough space to work without reaching across open supplies. Keep the vial, diluent, syringe, alcohol pads, and sharps container in a simple left-to-right order that matches your hand movements. That small bit of planning reduces fumbles.
Wipe the stopper and let the alcohol evaporate fully before puncturing. A wet stopper can carry alcohol into the vial, and there is no upside to adding another variable to a sensitive reconstitution.
For broader context on how lyophilized material behaves before reconstitution, this guide to freeze-dried peptides explains why dry peptide handling needs a lighter touch than handling compounds that are already in solution.
Introducing the Diluent Correctly
Use the solvent you selected during setup. Do not swap in a different liquid at the bench because it is convenient. Solvent choice affects how the cake wets, how fast it hydrates, and how well the finished solution holds up after reconstitution.
Insert the needle with the bevel aimed toward the inner glass wall. Then add the diluent slowly so it runs down the side of the vial instead of striking the lyophilized cake directly. Real Peptides describes the same wall-injection approach and stresses a slow addition rate to avoid blasting the powder with a concentrated stream (Real Peptides protocol).
That detail gets missed often. A direct jet into the cake can break it apart unevenly, create bubbles, and leave you chasing clumps later with unnecessary motion.
The liquid should run down the glass and pool gently. If the powder splashes, the addition is too fast.
A quick visual walk-through helps here:
Achieving Full Dissolution
Once the diluent is in, stop handling the vial.
Passive hydration matters. Many reconstitution problems start when someone sees a few dry areas and tries to fix them immediately by shaking or swirling hard. That usually makes the vial look worse, not better.
Give the liquid time to penetrate the cake on its own. If you still see residual material after an initial rest, inspect the vial without flicking or shaking it. PeptidesLab UK notes the same general handling principle for IGF-1 LR3. Let the cake hydrate first, then use only gentle motion if needed (PeptidesLab UK handling note).
Use this sequence:
- Let the diluent settle and wet the powder naturally.
- Wait before making any adjustment.
- Check for remaining particles with the vial held still.
- If needed, roll the vial gently between the palms.
- Do not shake, vortex, or whip air into the solution.
Foam and microbubbles are handling errors, not signs of better mixing. They make inspection harder and add stress to a peptide that dissolves best with patience.
The endpoint is simple. The solution should appear clear and uniform, without visible flakes, stubborn clumps, or repeated swirling to keep material suspended.
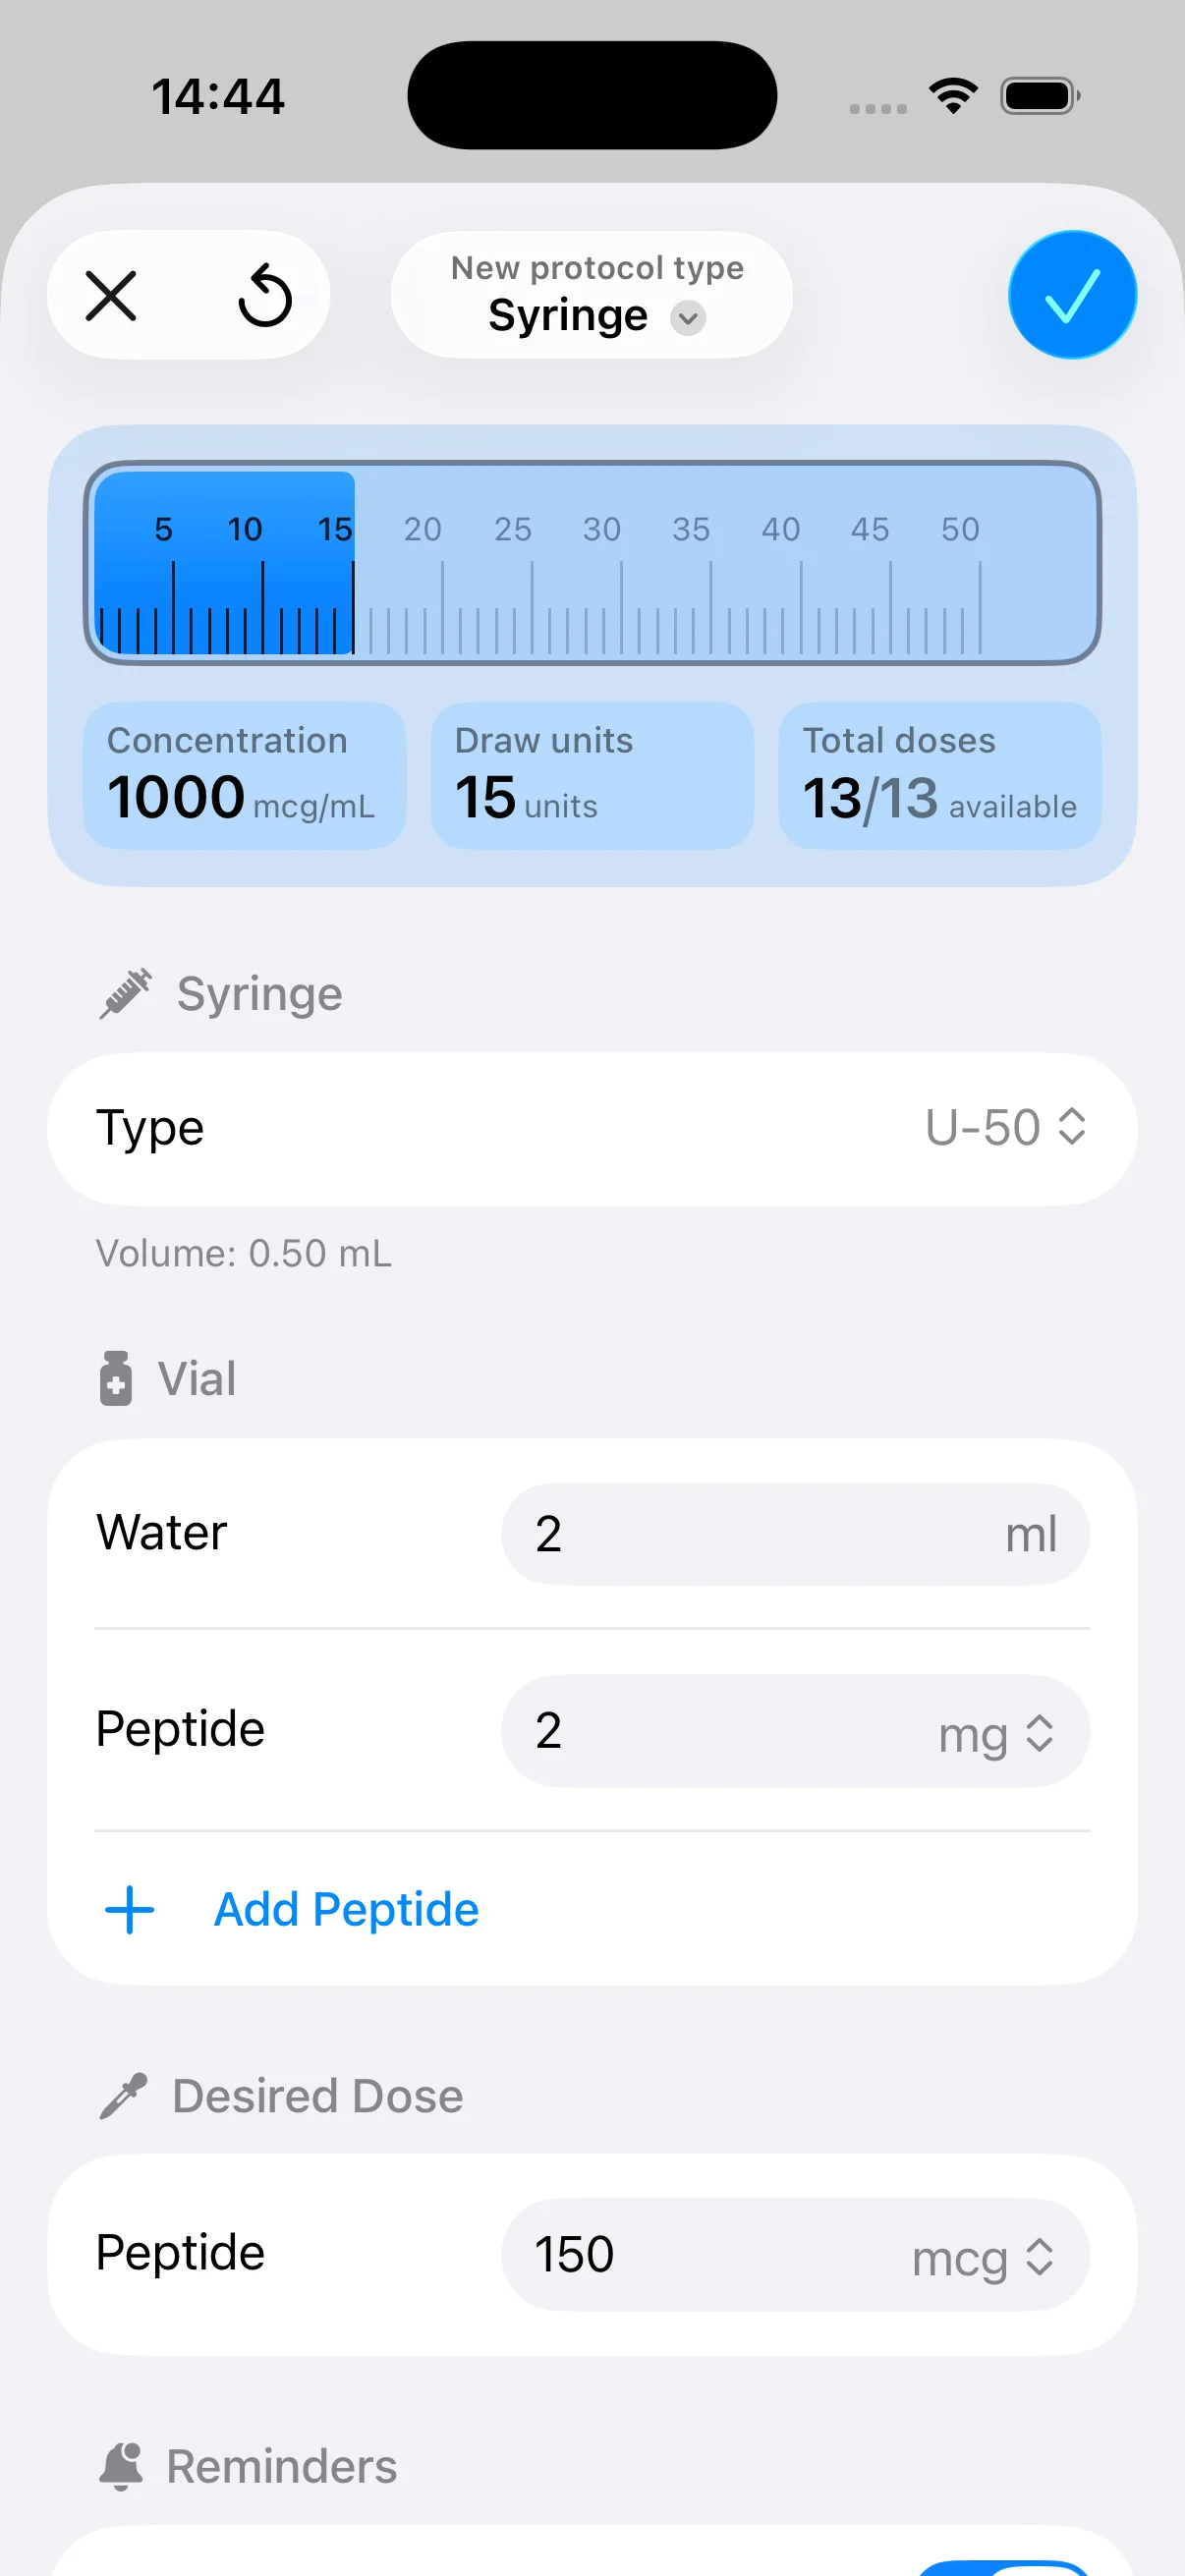
If you want one modern safeguard here, use a dosing app before you start the reconstitution, not halfway through it. Locking in your target concentration ahead of time prevents a second round of math while you are holding an open vial and trying to judge whether the solution is fully dissolved.
Mastering Dosing Calculations and Vial Configuration
Good reconstitution can still lead to bad use if the math is sloppy. Consequently, many users drift into guessing with syringe units, especially after changing diluent volume from one vial to the next.

Use the concentration formula first
The core formula is straightforward:
Concentration = total peptide amount ÷ total diluent volume
Then:
Injection volume = desired dose ÷ concentration
To keep the units clean, convert milligrams to micrograms before calculating. Since vial labels are often given in mg and dose targets are often discussed in mcg, unit confusion is the usual source of mistakes.
A practical example helps.
If a vial contains 1 mg, that equals 1000 mcg.
If you add 1 mL of diluent, the concentration becomes 1000 mcg/mL.
If you want a 50 mcg dose, the injection volume is:
50 ÷ 1000 = 0.05 mL
On a standard U-100 insulin syringe, 1 mL = 100 units, so 0.05 mL = 5 units.
Change the diluent volume and the syringe units change too.
If the same 1 mg vial is reconstituted with 2 mL, the concentration becomes 500 mcg/mL.
A 50 mcg dose would then require:
50 ÷ 500 = 0.1 mL
That equals 10 units on a U-100 insulin syringe.
Example IGF-1 LR3 dosing calculations
| Vial Size (mg) | Diluent Volume (mL) | Concentration (mcg/mL) | Desired Dose (mcg) | Injection Volume (Units on U-100 Syringe) |
|---|---|---|---|---|
| 1 | 1 | 1000 | 50 | 5 |
| 1 | 2 | 500 | 50 | 10 |
These examples aren’t exotic. They’re the exact kind of configuration shift that causes errors when someone remembers the old unit mark from a prior vial and assumes it still applies.
Where dosing apps help
Manual math isn’t hard, but repeated manual math is where people slip. That’s especially true when changing vial size, changing diluent volume, or translating mL into insulin syringe units while in a hurry.
A calculator built for peptide workflows can remove that friction. If you want a broader explanation of how diluent volume changes concentration across peptide setups, this guide on how much bacteriostatic water to mix with peptides is a practical reference.
Write the final concentration on the vial or in your log immediately after mixing. Don’t trust memory once multiple vials are in rotation.
The main point is simple. Decide the vial configuration once, calculate it clearly, and use the same recorded concentration every time you draw from that batch.
Troubleshooting Common Reconstitution Problems
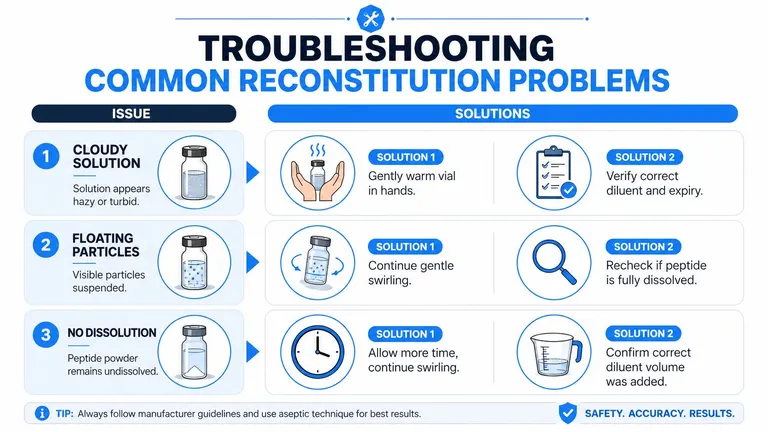
You finish the mix, hold the vial to the light, and see haze instead of a clear solution. That is the moment to slow down, not rationalize it away. With IGF-1 LR3, small mistakes during reconstitution can cost clarity, stability, and confidence in the final concentration.
When cloudiness means stop
The first check is visual. A properly reconstituted vial should look clear and colorless. Persistent cloudiness, suspended particles, or visible flecks point to incomplete dissolution, aggregation, contamination, or a poor solvent fit.
Do not grade on a curve here. “Slightly hazy” is still hazy.
If the vial looks off right after adding diluent, give it quiet time before making the call. In many cases, the missed step is passive hydration. Let the vial sit undisturbed in the refrigerator briefly, then inspect again under good light. If the haze clears, the peptide may have needed time to fully wet and dissolve. If it stays cloudy, discard the batch rather than trying to force it back with extra motion.
Solvent problems are often mistaken for technique problems
A careful hand does not fix the wrong solvent environment. IGF-1 LR3 can be sensitive to how it is prepared, and some setups hold clarity better with an acidified solvent system than with bacteriostatic water alone. Pinnacle Peptides discusses this issue in its IGF-1 LR3 laboratory preparation guide.
That does not mean every preparation with bacteriostatic water will fail. It means solvent choice belongs on the troubleshooting list early, especially if your mixing technique was gentle and the vial still turned cloudy. Newer staff often blame their hands first. Sometimes the chemistry is the problem.
What to check before you give up on a vial
Audit the process in order. The failure point is usually obvious once you look for it.
- Injection speed: Fast diluent entry can disturb the powder and promote foaming.
- Needle placement: A direct jet into the peptide cake can create local stress instead of gentle wetting along the vial wall.
- Passive hydration time: If the vial was swirled too soon, the powder may not have had enough time to hydrate evenly.
- Agitation: Shaking and aggressive swirling can leave foam, microbubbles, and a misleading appearance of poor dissolution.
- Solvent selection: If technique was clean but the solution still will not clear, reassess the diluent used.
One more failure point deserves attention. Calculation errors and reconstitution errors often happen together. A mislabeled concentration can send someone back into the vial to “correct” a problem that never existed in the liquid itself. Use a dosing calculator or peptide app to confirm the configuration before you remake anything. That one step prevents a surprising number of unnecessary redraws and wasted vials.
If a vial remains questionable after a proper wait and a careful visual check, treat it as unusable. Then review your notes, storage habits, and handling practices for reconstituted peptides before preparing the next batch.
Proper Storage and Handling for Maximum Potency
A well-reconstituted vial still needs disciplined handling afterward. Most losses after mixing come from repeated stopper contamination, unnecessary motion, and poor storage habits during routine use.
Daily handling habits that protect the vial
Every withdrawal should be done the same way. Swab the stopper before puncture, let it dry, use a clean sterile needle, and return the vial to proper storage promptly after drawing.
Keep the vial protected from unnecessary light and unnecessary bench time. The longer it sits out while you prepare other items, the more chances you create for contamination, warming, or accidental disturbance.
If you want a broader storage framework for mixed peptides, this guide on how to store reconstituted peptides is a helpful reference.
What to avoid after reconstitution
Avoid rough transport. Avoid repeated warming and cooling if you can help it. Avoid treating the vial like something that can be tossed into a drawer, pocket, or gym bag between uses.
Most of all, avoid “rescuing” a questionable solution with more agitation. If a vial already looks wrong, extra shaking won’t restore quality. It usually makes the problem worse.
The best long-term habit is boring consistency. Same storage location. Same sterile routine. Same written concentration record. That’s what keeps one clean preparation from turning into a sloppy multi-use vial a few days later.
PepFlow helps take the arithmetic and scheduling friction out of peptide routines. If you want a simple way to convert vial strength and diluent volume into practical syringe units, then track doses with reminders and logs, PepFlow is built for exactly that kind of precision-focused workflow.