You’ve got a small vial in front of you, a syringe in hand, and a label that makes perfect sense until you try to turn powder into an exact dose. That’s the moment you realize peptide reconstitution isn’t hard because it’s advanced chemistry. It’s hard because small mistakes compound fast.
The good news is that how to reconstitute peptides follows a repeatable logic. Once you understand why the powder is freeze-dried, why the solvent choice matters, and how concentration translates into syringe units, the process gets much less intimidating. The math can still trip people up, but the physical technique is straightforward when you know what matters and what doesn’t.
Table of Contents
- Your First Peptide Reconstitution
- Gathering Your Supplies and Key Terminology
- The Core Reconstitution Process and Formula
- Worked Examples for Common Peptide Vials
- Proper Storage for Maximum Potency
- Automating Accuracy with a Peptide Calculator
Your First Peptide Reconstitution
The first time someone handles a lyophilized peptide vial, they usually make the same assumption. The powder looks simple, so the process must be simple too. Then they hit the first practical question. How much water goes in, and how do you know the final dose is right?
That hesitation is reasonable. Peptides are commonly shipped as freeze-dried powder because that form is more stable for storage and transport. The roots of this practice go back to major advances in peptide chemistry, especially the invention of solid-phase peptide synthesis in 1963 by Robert Bruce Merrifield, which changed how peptides could be produced and handled in practical settings, as described in JPT’s peptide reconstitution overview.
Reconstitution means dissolving that dry peptide into a sterile liquid so it can be measured and used accurately. You’re not changing the peptide into something else. You’re creating a solution with a known concentration.
A newcomer often worries about the wrong things first. They focus on whether they need advanced equipment or lab-level technique. In practice, the key issues are more ordinary than that:
- Clean handling matters because you’ll be piercing vial tops and storing a liquid afterward.
- Correct volume matters because concentration determines every later dose.
- Gentle mixing matters because peptides don’t respond well to rough treatment.
Practical rule: Reconstitution is mostly a concentration problem. If you control the volume and protect the peptide while mixing, the rest gets much easier.
The process feels unforgiving because dosage errors can start with one bad calculation or one rushed movement. But once you stop treating it like mysterious chemistry and start treating it like a careful measuring task, confidence builds quickly.
Successfully performing this task doesn’t demand courage. It requires a clean setup, a clear formula, and a way to convert milligrams and micrograms into something visible on a syringe.
Gathering Your Supplies and Key Terminology
You can avoid most early mistakes before you draw a single milliliter. A mislabeled vial, the wrong solvent, or a shaky grasp of units causes more trouble than the mixing step itself.
Why peptides arrive as powder
Peptides are commonly shipped as lyophilized powder because dry material is easier to store and transport than a pre-mixed solution. Reconstitution turns that powder into a liquid with a known concentration, but only when you are ready to use it. That timing matters for stability, dosing accuracy, and storage.
The essential supply list
A clean setup does not need to be complicated. It needs to be deliberate.

Use this checklist:
- Lyophilized peptide vial. Verify the label and confirm the total amount in the vial before doing any math.
- Bacteriostatic water. This is the standard choice for multi-dose use because it contains a preservative.
- Sterile syringe and needle. Use a fresh one for drawing solvent and mixing.
- Alcohol prep pads. Swab both vial stoppers before each puncture.
- A written dosing plan. Write down your target concentration and intended dose before you start.
- A calculator or mixing guide. If unit conversions slow you down, use a step-by-step reference like this guide on how to mix peptides with bacteriostatic water.
The biggest choice here is the solvent. Bacteriostatic water is usually preferred for vials that will be punctured more than once because the preservative helps reduce contamination risk during repeated use. Sterile water can still be used, but it makes less sense for a vial you plan to return to over several days.
That trade-off is practical, not theoretical. If you expect one-time use, sterile water may fit the plan. If you expect multiple draws, bacteriostatic water gives you more margin for safe handling.
Terms you need before touching a syringe
Most dosing errors start with unit confusion.
Here’s the quick language map:
| Term | What it means |
|---|---|
| mg | milligram, used for the amount of peptide in the vial |
| mcg | microgram, often used for smaller target doses |
| mL | milliliter, the liquid volume you add |
| Units | markings on an insulin syringe, used to measure liquid volume |
A few anchors make the rest easier:
- 1 mg = 1000 mcg
- Concentration tells you how much peptide is present per mL
- Syringe units do not tell you peptide amount on their own. They only show volume
If you remember one rule, make it this one. Syringe units only become meaningful after you calculate the concentration.
Copying a dose like “10 units” or “20 units” from another person’s protocol is how beginners misdose. Those unit markings only match the intended peptide amount if the vial strength and added solvent volume are identical. That is the gap between guessing and getting it right. Manual math teaches you what the numbers mean, and a dedicated tool like PepFlow helps you check that math before a simple unit conversion turns into a bad dose.
The Core Reconstitution Process and Formula
A beginner usually gets stuck at the same point. The powder is in the vial, the water is ready, and the primary question is how much to add so the later dose is easy to measure without second-guessing every syringe mark.
That decision starts with concentration.
The concentration formula
Use this formula first:
Total Peptide (mg) / Volume of Solvent (mL) = Concentration (mg/mL)
That number determines everything that follows. It tells you how strong the final solution is, how much volume matches your target dose, and whether the syringe markings will be convenient or awkward in daily use.
For example, a 10 mg vial mixed with 2 mL of bacteriostatic water gives a concentration of 5 mg/mL. At that concentration, a 1 mg dose equals 0.2 mL, which is 20 units on a standard insulin syringe.
That is the practical reason to plan before mixing. A peptide can dissolve perfectly and still be annoying to dose if the final concentration forces tiny, error-prone draws. Manual math helps you understand the setup. A calculator like PepFlow helps you confirm it before you put a needle into the vial.

The physical mixing steps that protect the peptide
Once you know the target concentration, the handling should be controlled and boring. That is a good outcome.
-
Confirm the vial amount
Read the label carefully and decide the solvent volume before drawing anything up. -
Swab both vial tops
Clean the peptide vial stopper and the bacteriostatic water stopper with alcohol, then let both dry fully. -
Draw the planned volume of solvent
Pull the exact amount of bacteriostatic water into the syringe. Accuracy here matters more than speed. -
Inject along the inside wall
Let the solvent run down the glass instead of firing it straight into the powder. This reduces foaming and physical stress on the material. -
Mix gently
Swirl or roll the vial softly and give it time to dissolve.
The side-wall injection step prevents a lot of beginner mistakes. People often focus on the math, then rush the actual mixing. If you want a closer look at the handling details, this guide on mixing peptides with bacteriostatic water shows the technique clearly.
What usually goes wrong
Community reports and lab discussions suggest that first-time user error is common, especially with solvent volume and agitation. In practice, the two problems show up together. Someone adds the wrong amount of liquid, gets impatient when the powder does not dissolve immediately, then shakes the vial and assumes the result is fine.
Two habits cause most dosing problems:
- Using the wrong solvent volume. The peptide may still dissolve, but the concentration no longer matches the intended dose.
- Shaking the vial. Many peptides tolerate gentle handling better than aggressive mixing.
Gentle swirling protects the solution. Vigorous shaking increases the chance of foam, bubbles, and avoidable handling stress.
If the powder does not dissolve right away, wait. I would much rather see a newcomer take an extra few minutes than force the process and lose confidence in every dose that comes after.
Worked Examples for Common Peptide Vials
Math gets easier when you stop looking at formulas and start looking at actual vials. These examples are the kind people use repeatedly because they translate directly into syringe markings.

Example one 5 mg vial with a 250 mcg target
Take a 5 mg vial and add 2 mL of bacteriostatic water.
The concentration becomes:
5 mg / 2 mL = 2.5 mg/mL
Convert that to micrograms:
2.5 mg/mL = 2500 mcg/mL
Now assume the target dose is 250 mcg.
To find the volume needed:
250 mcg ÷ 2500 mcg/mL = 0.1 mL
On a typical insulin syringe, 0.1 mL corresponds to 10 units.
This is why people like round concentrations. The dose becomes easy to visualize. A quarter-milligram dose doesn’t require mental gymnastics every time you draw it.
Common-sense check: If your target dose is one-tenth of the total mcg per mL, you should be drawing one-tenth of a milliliter.
Example two 10 mg vial with a 1 mg target
This one is a common practical setup. A 10 mg vial with 2 mL of bacteriostatic water yields 5 mg/mL, which is the same concentration benchmark noted earlier in JPT’s example of common vial mixing.
Now the target is 1 mg.
Use the formula:
1 mg ÷ 5 mg/mL = 0.2 mL
On an insulin syringe, 0.2 mL is 20 units.
That matches the practical shorthand many people memorize. But the safer approach is to understand why it works, not just repeat the number.
A visual walk-through can help if you want to see the dosing logic in motion:
How to think about units without panicking
People often freeze at the syringe stage because “units” sounds like a separate dosing system. It isn’t. It’s just volume.
Use this sequence every time:
- Start with the vial amount
- Choose the solvent volume
- Calculate concentration
- Convert your target dose into a volume
- Match that volume to syringe units
Here’s a compact reference:
| Vial setup | Final concentration | Example target dose | Volume to draw |
|---|---|---|---|
| 5 mg + 2 mL | 2.5 mg/mL | 250 mcg | 0.1 mL |
| 10 mg + 2 mL | 5 mg/mL | 1 mg | 0.2 mL |
When someone says the math is “easy,” what they usually mean is that it becomes easy after you’ve built a system. Without a system, even simple conversions can become error-prone under pressure.
Proper Storage for Maximum Potency
You can do the math correctly, mix the vial cleanly, and still shorten its useful life with sloppy storage. I see this mistake all the time. The failure point is usually not reconstitution itself. It is what happens over the next few days each time the vial comes out, warms up, and gets handled again.
Temperature control matters because peptides in solution are generally less stable than they were in lyophilized form. After reconstitution, store the vial in the refrigerator at a steady 2 to 8°C, protected from light, and keep handling to a minimum. According to guidance from vendors like PeptideFox, solutions made with bacteriostatic water are typically kept longer under refrigeration than those prepared with plain sterile water. The exact lifespan still depends on the specific peptide, concentration, and how cleanly the vial is handled.
Freezing sounds protective, but for a mixed vial it often creates avoidable stress. Repeated freeze-thaw cycles can degrade the solution and make consistency harder to trust. If long-term storage is the goal, dry peptide usually tolerates it better than reconstituted peptide.
Day-to-day handling makes a bigger difference than many beginners expect.
Keep the routine tight:
- Swab the stopper before every puncture. One clean prep is not enough for the life of the vial.
- Use a new sterile syringe each time. Reuse adds contamination risk and makes accurate measurement less reliable.
- Check the solution before drawing. Cloudiness, particles, or a color change are reasons to stop and reassess.
- Label the vial clearly. Write the peptide name, concentration, solvent used, and reconstitution date.
- Limit temperature swings. Take the vial out, draw what you need, and return it promptly.
This is one place where understanding the “why” helps more than memorizing a rule. If a vial is opened often, stored inconsistently, or labeled poorly, even correct reconstitution math will not save the outcome. The process has to hold together from first mix to last draw.
For a practical outside reference, Canada Peptide Shop peptide storage tips outline how research settings approach storage discipline. For a more detailed walkthrough on refrigeration, light protection, and handling after mixing, keep this guide to storing reconstituted peptides handy.
Good storage protects the work you already did.
Automating Accuracy with a Peptide Calculator
Manual calculation teaches you what the numbers mean. That’s valuable. It also exposes where people slip.
Why manual math breaks down
Most reconstitution mistakes aren’t dramatic. They’re ordinary. Someone uses the wrong conversion, copies a syringe-unit number from a different concentration, or forgets whether the target was in mg or mcg.
That’s exactly why calculators have become so useful in this space. As noted earlier from vendor and user-report summaries, miscalculations are common when people handle concentration math on their own. The issue isn’t intelligence. It’s repetition, fatigue, and too many small numbers that look similar.
A calculator helps because it removes the parts people misread:
- Vial amount
- Added solvent
- Desired dose
- Output in syringe-friendly volume or units

What a calculator should do for you
A good peptide calculator shouldn’t just spit out one number. It should help you think clearly about the whole setup.
Look for a tool that lets you:
- Enter the peptide amount in the vial
- Set the amount of bacteriostatic water added
- Choose your target dose in mg or mcg
- See the corresponding syringe volume or units
- Save the setup so you don’t recalculate every time
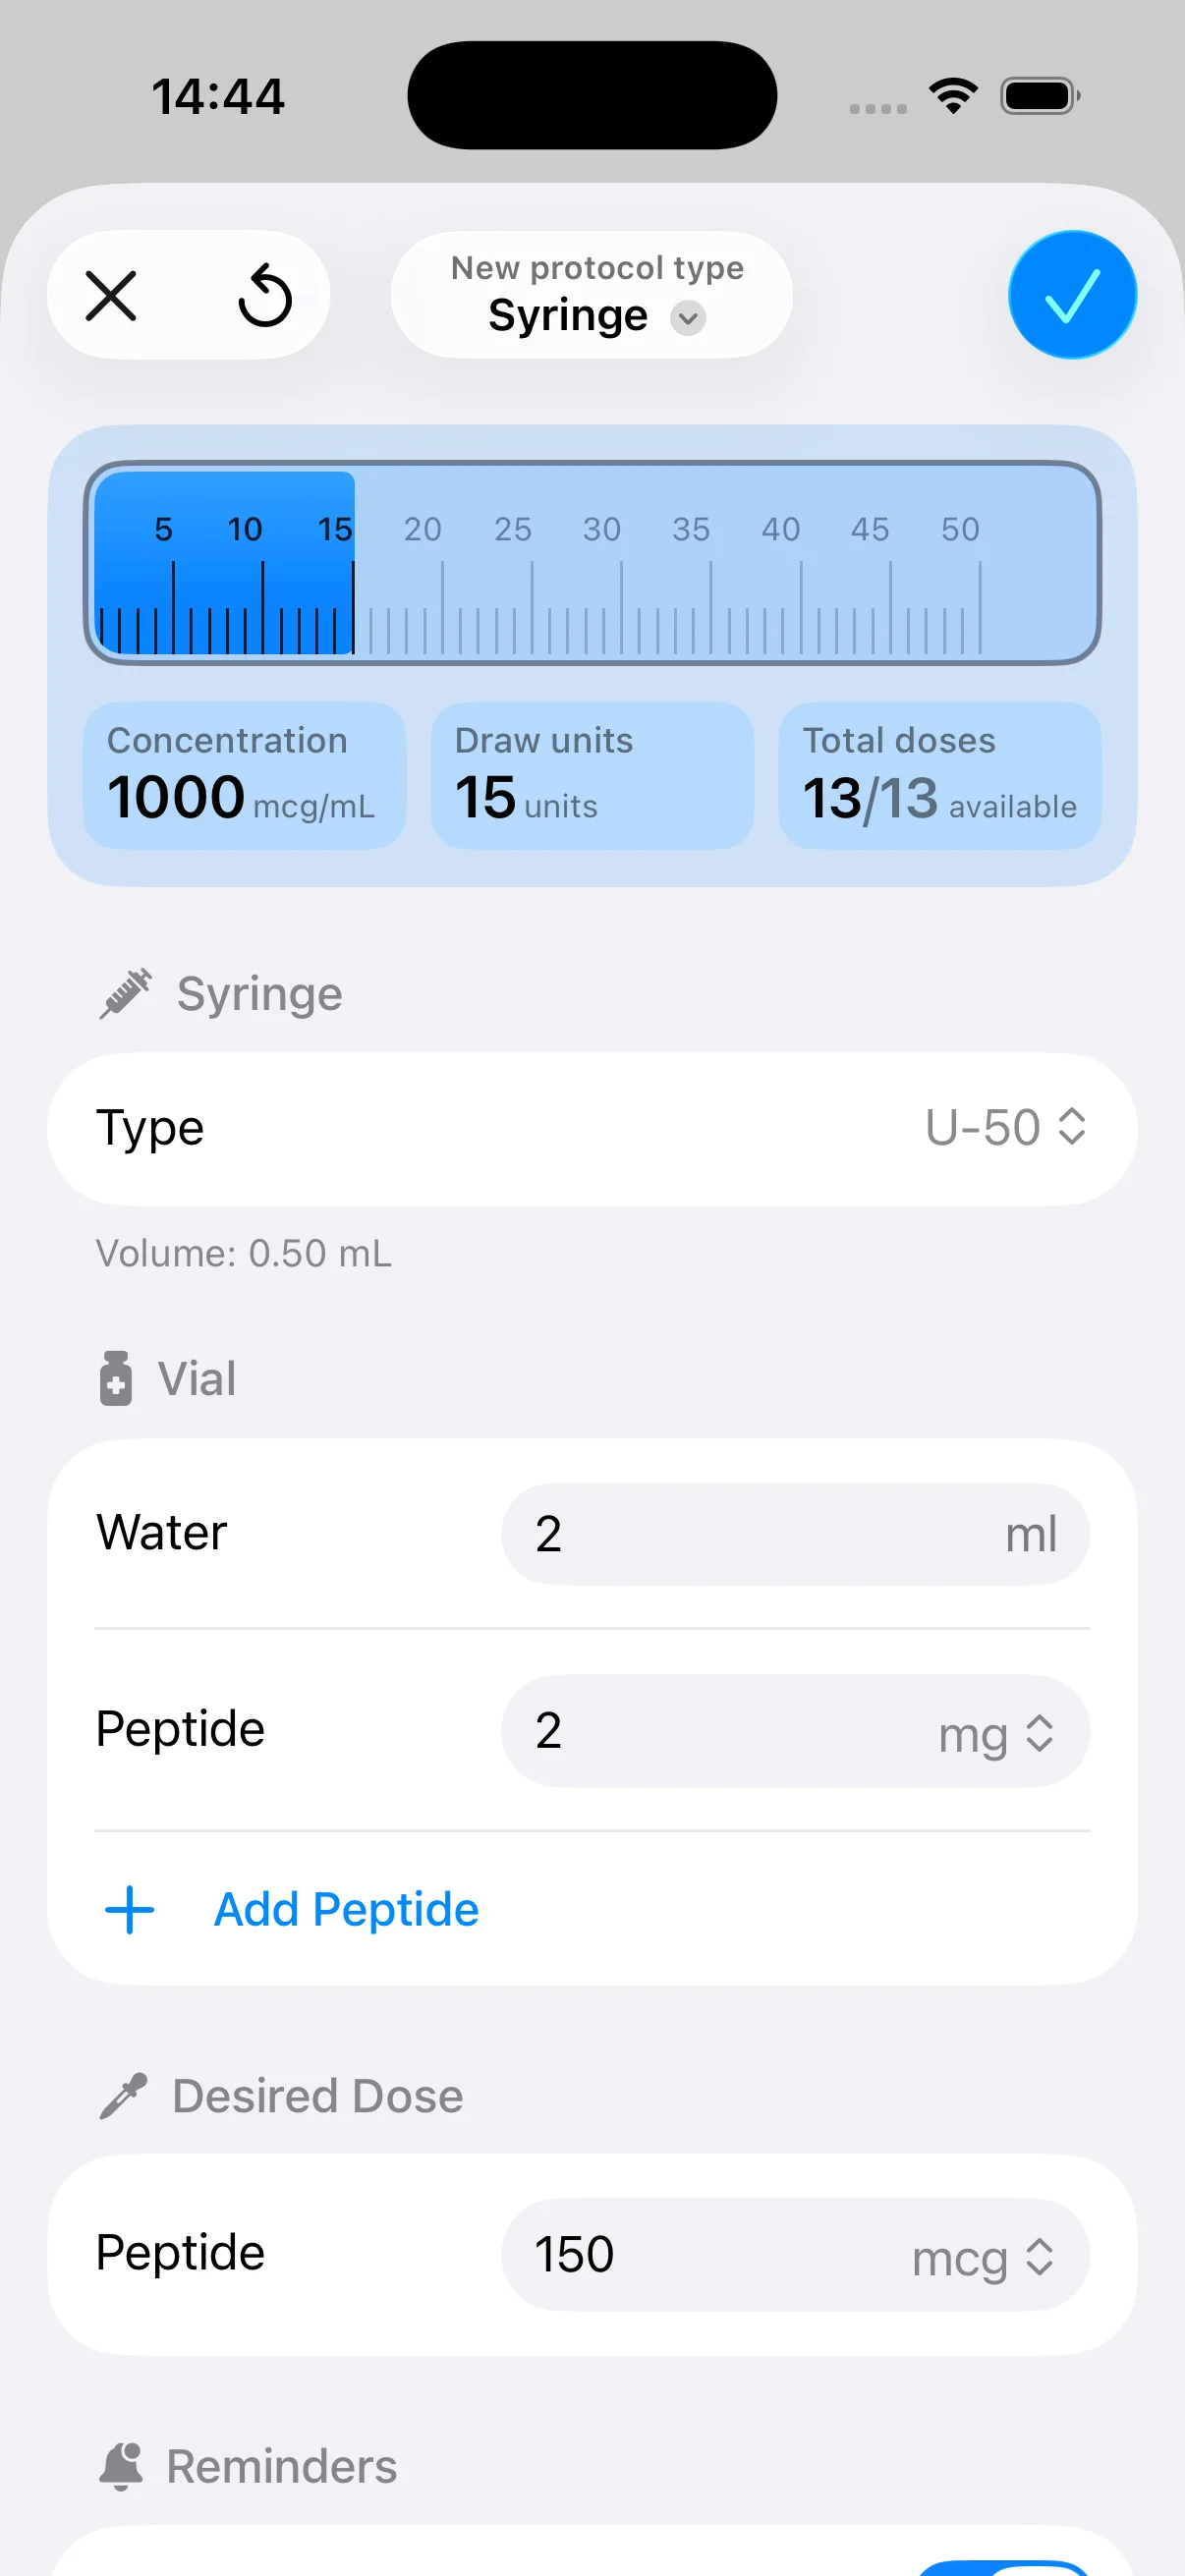
That’s the practical value of a dedicated option like PepFlow. It’s an iOS app that converts target peptide doses into usable unit measurements, supports vial and concentration setup, and helps organize recurring schedules with reminders. If you want a closer look at what features matter, this guide to choosing a peptide reconstitution calculator outlines the decision points well.
The advantage isn’t convenience alone. It’s consistency. Once your concentration is set correctly, you want the same answer every time you check it. That’s how you avoid wasting product, second-guessing the syringe, or rebuilding the same math from scratch before every dose.
If you want less guesswork and more consistency, PepFlow helps you convert vial size, solvent volume, and target dose into practical syringe measurements, then keeps your protocol organized with schedules, reminders, and dose tracking.