You’ve got a vial of freeze-dried peptide on the table, a bottle of bacteriostatic water, and a syringe in your hand. This is the moment where small mistakes matter. If your math is off, your dosing is off. If your sterile technique is sloppy, you can contaminate the vial. If you blast water straight into the powder or shake the vial like a protein drink, you can make a simple job harder than it needs to be.
When looking up how to mix peptides with bacteriostatic water, you don’t need more hype or vague rules. You need a clean process and a reason for each step. That’s how you stop second-guessing yourself.
The core idea is simple. You’re taking a fragile lyophilized powder and turning it into a measurable liquid. The job is to keep the peptide clean, dissolve it gently, and create a concentration you can dose accurately every time. Good reconstitution is part sterile technique, part basic math, and part common-sense fluid handling.
Table of Contents
- Gathering Your Essential Supplies for Safe Reconstitution
- Calculating Your Ratios for Accurate Concentration
- The Step-by-Step Reconstitution Technique
- Translating Concentration to Correct Dosage Units
- Proper Storage and Stability for Maximum Potency
- Troubleshooting Common Reconstitution Problems
- Simplifying Your Protocol with PepFlow
Gathering Your Essential Supplies for Safe Reconstitution
A bad setup usually fails in ordinary ways. The stopper gets touched after cleaning. The syringe you planned to use for dosing gets used for mixing. The vial sits open while you look for an alcohol wipe. Reconstitution is simple, but sterile reconstitution only stays simple when the workspace is prepared before the first needle puncture.

What should be on the surface
Set out the lyophilized peptide vial, bacteriostatic water, alcohol wipes, a mixing syringe, your dosing syringe, and a sharps container. Use a clean, dry surface with enough space to keep each item in its own place. Crowding leads to unnecessary handling, and unnecessary handling is how contamination starts.
Bacteriostatic water is chosen for a reason. It is sterile water with 0.9% benzyl alcohol, which helps limit microbial growth after the vial has been entered. That does not make sloppy technique safe. It gives you a margin of protection, not a free pass. For a clear primer before you start, review what bacteriostatic water is used for.
Why each tool has a different job
Each item on the table solves a different problem. Keeping those roles separate makes the process more controlled and usually more accurate.
A larger mixing syringe is easier to handle when you are drawing and transferring reconstitution fluid. An insulin syringe is better reserved for small-volume dosing after the peptide has fully dissolved. Using one syringe for both jobs often creates avoidable problems, especially if you dull the needle, lose track of sterility, or end up measuring with a tool that is awkward for the volume you need.
Keep the roles clear:
- Alcohol wipes: Clean the rubber stoppers before needle entry. A stopper can look clean and still carry residue from packaging, fingers, or the surface it touched.
- Mixing syringe: Draws the measured volume of bacteriostatic water and lets you add it with control.
- Insulin syringe: Measures small doses after reconstitution, where fine unit markings matter.
- Sharps container: Keeps used needles contained immediately, instead of leaving them on the workspace or in household trash.
One practical rule helps here. If you need to pause mid-process to find a missing item, the field was not ready.
Why sterility is mostly discipline
Contamination rarely comes from dramatic mistakes. It usually comes from casual ones. Touching a cleaned stopper. Letting a needle cap rest on the counter. Picking up and putting down the same vial three extra times because the layout was not planned.
A useful mental model is the clean path. Every item should move from sealed storage to active use with as few contact points as possible. That matters because every extra touch adds one more chance to transfer residue or microbes into a vial you may use more than once.
This is also where the physics starts to matter. A stable hand, an organized surface, and the right syringe make it easier to add water slowly against the vial wall later instead of blasting the powder directly. That protects fragile peptides from unnecessary agitation and gives you better control from the first step.
Calculating Your Ratios for Accurate Concentration
A lot of dosing mistakes start here. The vial label tells you how much peptide you have in total. Your reconstitution volume determines how concentrated that peptide becomes after you add water. Those are different numbers, and mixing them up creates bad math fast.
The fixed part is the peptide mass in the vial. A 5 mg vial still contains 5 mg whether you add 1 mL or 3 mL of bacteriostatic water. What changes is the concentration, which is the amount of peptide per milliliter.
Start with the concentration you want
Use this formula:
Volume (mL) = Peptide Amount in mg / Desired Concentration in mg/mL
That single equation keeps the rest of the protocol honest.
If a vial contains 5 mg and you want a final concentration of 2 mg/mL, divide 5 by 2. You need 2.5 mL of bacteriostatic water. If you use 2 mL instead, the peptide does not become stronger in total amount. It becomes more concentrated per milliliter, which changes every later syringe measurement.
That distinction matters in real use. A more dilute mix gives you larger draw volumes and often easier measuring on an insulin syringe. A more concentrated mix reduces injection volume, but it also makes small measuring errors matter more. For fragile material, it also helps to understand how freeze-dried peptides behave during reconstitution, because some powders dissolve cleanly while others cling to the glass or form a film that takes more patience.
One practical setup is common for 5 mg vials. Add 2 mL of bacteriostatic water and the result is 2.5 mg/mL, which is 2500 mcg/mL. That concentration is popular because the dosing math stays manageable for peptides often reconstituted in small multi-dose vials.
Example reconstitution calculations
Use the table below as a reference for the relationship between vial size, added water, and final concentration.
| Peptide in Vial (mg) | Bacteriostatic Water to Add (mL) | Final Concentration (mg/mL) | Final Concentration (mcg/mL) |
|---|---|---|---|
| 5 | 2.5 | 2 | 2000 |
| 5 | 2 | 2.5 | 2500 |
| 2 | 1 | 2 | 2000 |
| 2 | 0.5 | 4 | 4000 |
| 10 | 4 | 2.5 | 2500 |
A few patterns are worth paying attention to.
- A 2 mg vial leaves less room for sloppy measuring: Small reconstitution volumes make every extra drop count. If you are off by a little, your final concentration shifts more than it would in a larger-volume mix.
- A 5 mg vial at 2 mL is easy to work with: The concentration is straightforward, and later dose conversion is usually less awkward on a U-100 insulin syringe.
- A 10 mg vial can be set up to match that same math: Add 4 mL and you land at 2.5 mg/mL, which keeps your dosing framework consistent across vial sizes.
The practical rule is simple. Pick the concentration first. Then calculate the water volume to match it. Do not pick a random amount of water because it “looks right” in the vial.
Another point that gets missed is peptide-specific tolerance. Some products handle a broader range of reconstitution volumes without much fuss. Others are less forgiving and can dissolve slowly, cling to the vial, or look cloudy if the setup is too concentrated or too dilute for that particular material. Label instructions, manufacturer guidance, or protocol-specific directions take priority over convenience math.
The Step-by-Step Reconstitution Technique
A peptide vial can go wrong in a few seconds. The usual mistakes are simple: puncturing a wet stopper, firing water straight into the powder, or shaking the vial to hurry things along. Good technique prevents contamination, protects the peptide, and gives you a solution you can dose with confidence.

Prepare the sterile field first
Set up the area before you touch the vials. Wash your hands, clear the work surface, and place only the supplies you will use within reach. Fewer objects on the table means fewer chances to bump, contaminate, or mix up something mid-process.
Clean both vial stoppers with 70% isopropyl alcohol wipes and let them air dry fully. Do not swab and puncture right away. The alcohol needs contact time, and a wet stopper can carry residue through the needle track instead of giving you a clean entry.
If you are working with a delicate lyophilized product, this guide to how freeze-dried peptides behave during handling and mixing gives useful background on why gentle reconstitution matters.
Add the water with control
Draw the bacteriostatic water with a 3mL mixing syringe and an 18-gauge needle. Once the needle enters the peptide vial, angle it so the liquid runs down the glass wall at roughly 45 degrees rather than striking the dry peptide cake directly.
The angle and aim are important for simple physical reasons:
- The vial wall softens the force of the stream: The water sheets down the glass and reaches the powder with less impact.
- Less agitation means fewer bubbles: Bubbles make it harder to judge volume cleanly and can slow full wetting.
- Gentle wetting reduces clumps: A hard jet can compact part of the dry material against the glass or bottom of the vial.
Add the water slowly. Rushing this step is one of the easiest ways to create foam, trapped air, or a stubborn clump that tempts people to shake the vial later.
After the water is in, withdraw the needle carefully. If the vial feels pressurized, pause for a moment and keep the needle movement controlled so you do not scar the stopper with extra punctures.
The following video illustrates the correct hand position:
Dissolve the peptide without abusing it
Once the bacteriostatic water is added, give the vial time to hydrate. Swirl it gently in small circles or roll it lightly between your hands. Many peptides dissolve on their own once the dry material is evenly wetted, and forcing the process usually creates more problems than it solves.
Look for a clear, uniform solution with no visible particles stuck to the glass or floating in the liquid. Some compounds dissolve quickly. Others need a few quiet minutes, especially if the vial was mixed at a higher concentration or the peptide forms a stubborn film.
Keep the movements calm. Fast hands create bubbles, uneven wetting, and sloppy readings when you draw the final solution.
Avoid these habits:
- Shooting the water directly into the powder
- Shaking the vial to speed dissolution
- Puncturing the stopper repeatedly while adjusting your grip
- Mixing before your target concentration and written volume are in front of you
Those mistakes are common, and each one has a practical cost. Direct impact can damage the cake structure. Shaking can foam the solution. Extra stopper punctures increase contamination risk. Guessing the volume turns a sterile prep into a math problem you no longer trust.
Translating Concentration to Correct Dosage Units
A mixed vial only becomes useful when you can convert concentration into a syringe draw. At this point, people often know the mg and mcg, but freeze when they look at the unit markings on a U-100 insulin syringe.
The fix is straightforward. Work from concentration to volume, then from volume to units.

How volume becomes syringe units
A U-100 insulin syringe measures volume. It doesn’t know or care what compound is inside. Your concentration tells you how much peptide exists per milliliter, and the syringe markings tell you how much liquid you’re drawing.
The relationship is:
- Desired dose ÷ concentration = volume to draw
- Then convert that volume to the syringe marking you use
A worked example
Use the common example from earlier. A 5mg vial mixed with 2mL gives 2500mcg/mL.
If the desired dose is 1000mcg, the verified benchmark from this reconstitution article notes that 2mL added to a 5mg vial yields 0.4mL for a 1000mcg dose, with less than 5% variance in HPLC-verified labs.
That logic looks like this:
| Desired Dose | Concentration | Volume to Draw |
|---|---|---|
| 1000 mcg | 2500 mcg/mL | 0.4 mL |
If you’re dosing a smaller amount, the same method applies. Divide the target dose by the concentration. Once you have the volume, match it to your syringe markings.
Dose math shortcut: Don’t try to calculate from the syringe first. Always calculate from the vial concentration first.
This is also why many people prefer a concentration that produces practical draw volumes. If the solution is too dilute, the injection volume gets larger and less convenient. If it’s too concentrated, tiny measuring mistakes matter more.
Proper Storage and Stability for Maximum Potency
A vial can be mixed perfectly at 9 a.m. and be compromised by dinner if it is handled carelessly. Once bacteriostatic water goes in, the peptide leaves its more stable dry state and becomes much more sensitive to heat, light, contamination, and time.

Cold storage slows the chemical breakdown that gradually weakens a reconstituted peptide. It also slows bacterial growth if sterility was less than perfect during handling. Refrigeration helps, but it does not reverse contamination or rescue a vial that has been repeatedly warmed, left out, or punctured with poor technique. As noted earlier, standard handling guidance places mixed peptides in the refrigerator, not at room temperature and not in the freezer unless the product-specific instructions clearly say otherwise.
Freezing sounds protective, but it often creates new problems. Freeze-thaw cycles can stress the solution, change how it looks, and in some cases push delicate material out of solution. For routine use, a stable refrigerator temperature is the safer default.
The practical rule is simple. Treat every stopper puncture as a risk event. Even with bacteriostatic water, the preservative is there to reduce microbial growth, not to excuse sloppy handling.
Good storage habits are boring on purpose:
- Label the vial clearly: include the peptide name, reconstitution date, and concentration.
- Store it upright in the refrigerator: this reduces contact around the stopper and makes leaks or cloudiness easier to spot.
- Return it right after dosing: repeated time on the counter adds unnecessary warming.
- Check the solution before each use: it should remain clear and consistent in appearance.
- Use clean technique every time: alcohol on the stopper, sterile syringe, one careful puncture.
I also recommend choosing one fixed place in the fridge instead of moving the vial around. The back of a shelf usually stays colder and more stable than the door, which gets warmed every time it opens. Small handling habits like that make a real difference over the life of a vial.
If you want a more detailed walkthrough on refrigeration setup, labeling, and discard decisions, this guide on how to store reconstituted peptides properly covers those points in more detail.
Troubleshooting Common Reconstitution Problems
Most problems show up as one of three things. The liquid looks wrong, the powder won’t dissolve cleanly, or the injection feels harsher than expected.
The right response depends on the cause. Don’t lump every issue into “bad peptide” or “just shake it more.”
When the solution looks wrong
A properly reconstituted vial should look clear once it has fully dissolved. If it’s still cloudy after patient swirling and a reasonable wait, stop and assess before using it.
Common scenarios:
- Cloudiness right after mixing: Sometimes the peptide just needs more time to hydrate and dissolve.
- Visible particles after waiting: This can mean incomplete dissolution, clumping from rough handling, or contamination.
- Turbid liquid after storage: That’s a discard sign, not a “maybe it’s fine” sign.
The verified data notes that cloudy solutions can signal contamination and should be discarded in that case. In practice, if you can’t explain the appearance confidently, don’t use the vial.
When the solvent choice is the problem
Some issues aren’t about technique at all. They’re about compatibility.
One peptide-specific nuance that general guides often miss is NAD+. Verified guidance notes that using saline bacteriostatic water for NAD+ can buffer pH and reduce injection site irritation, and that recent vendor updates reported 70% reduced irritation with this approach in user reports, according to this NAD+ peptide guide.
That matters because people often assume burning means they mixed it wrong. Sometimes the issue is that standard bacteriostatic water isn’t the most comfortable solvent choice for a pH-sensitive peptide.
If a peptide repeatedly causes irritation despite clean technique, don’t only blame the needle or injection site. Check whether the solvent choice fits the peptide.
Other fixable mistakes include adding a different water volume than planned. If that happens, don’t guess. Recalculate the concentration from the actual amount you added, then base every dose on the corrected number.
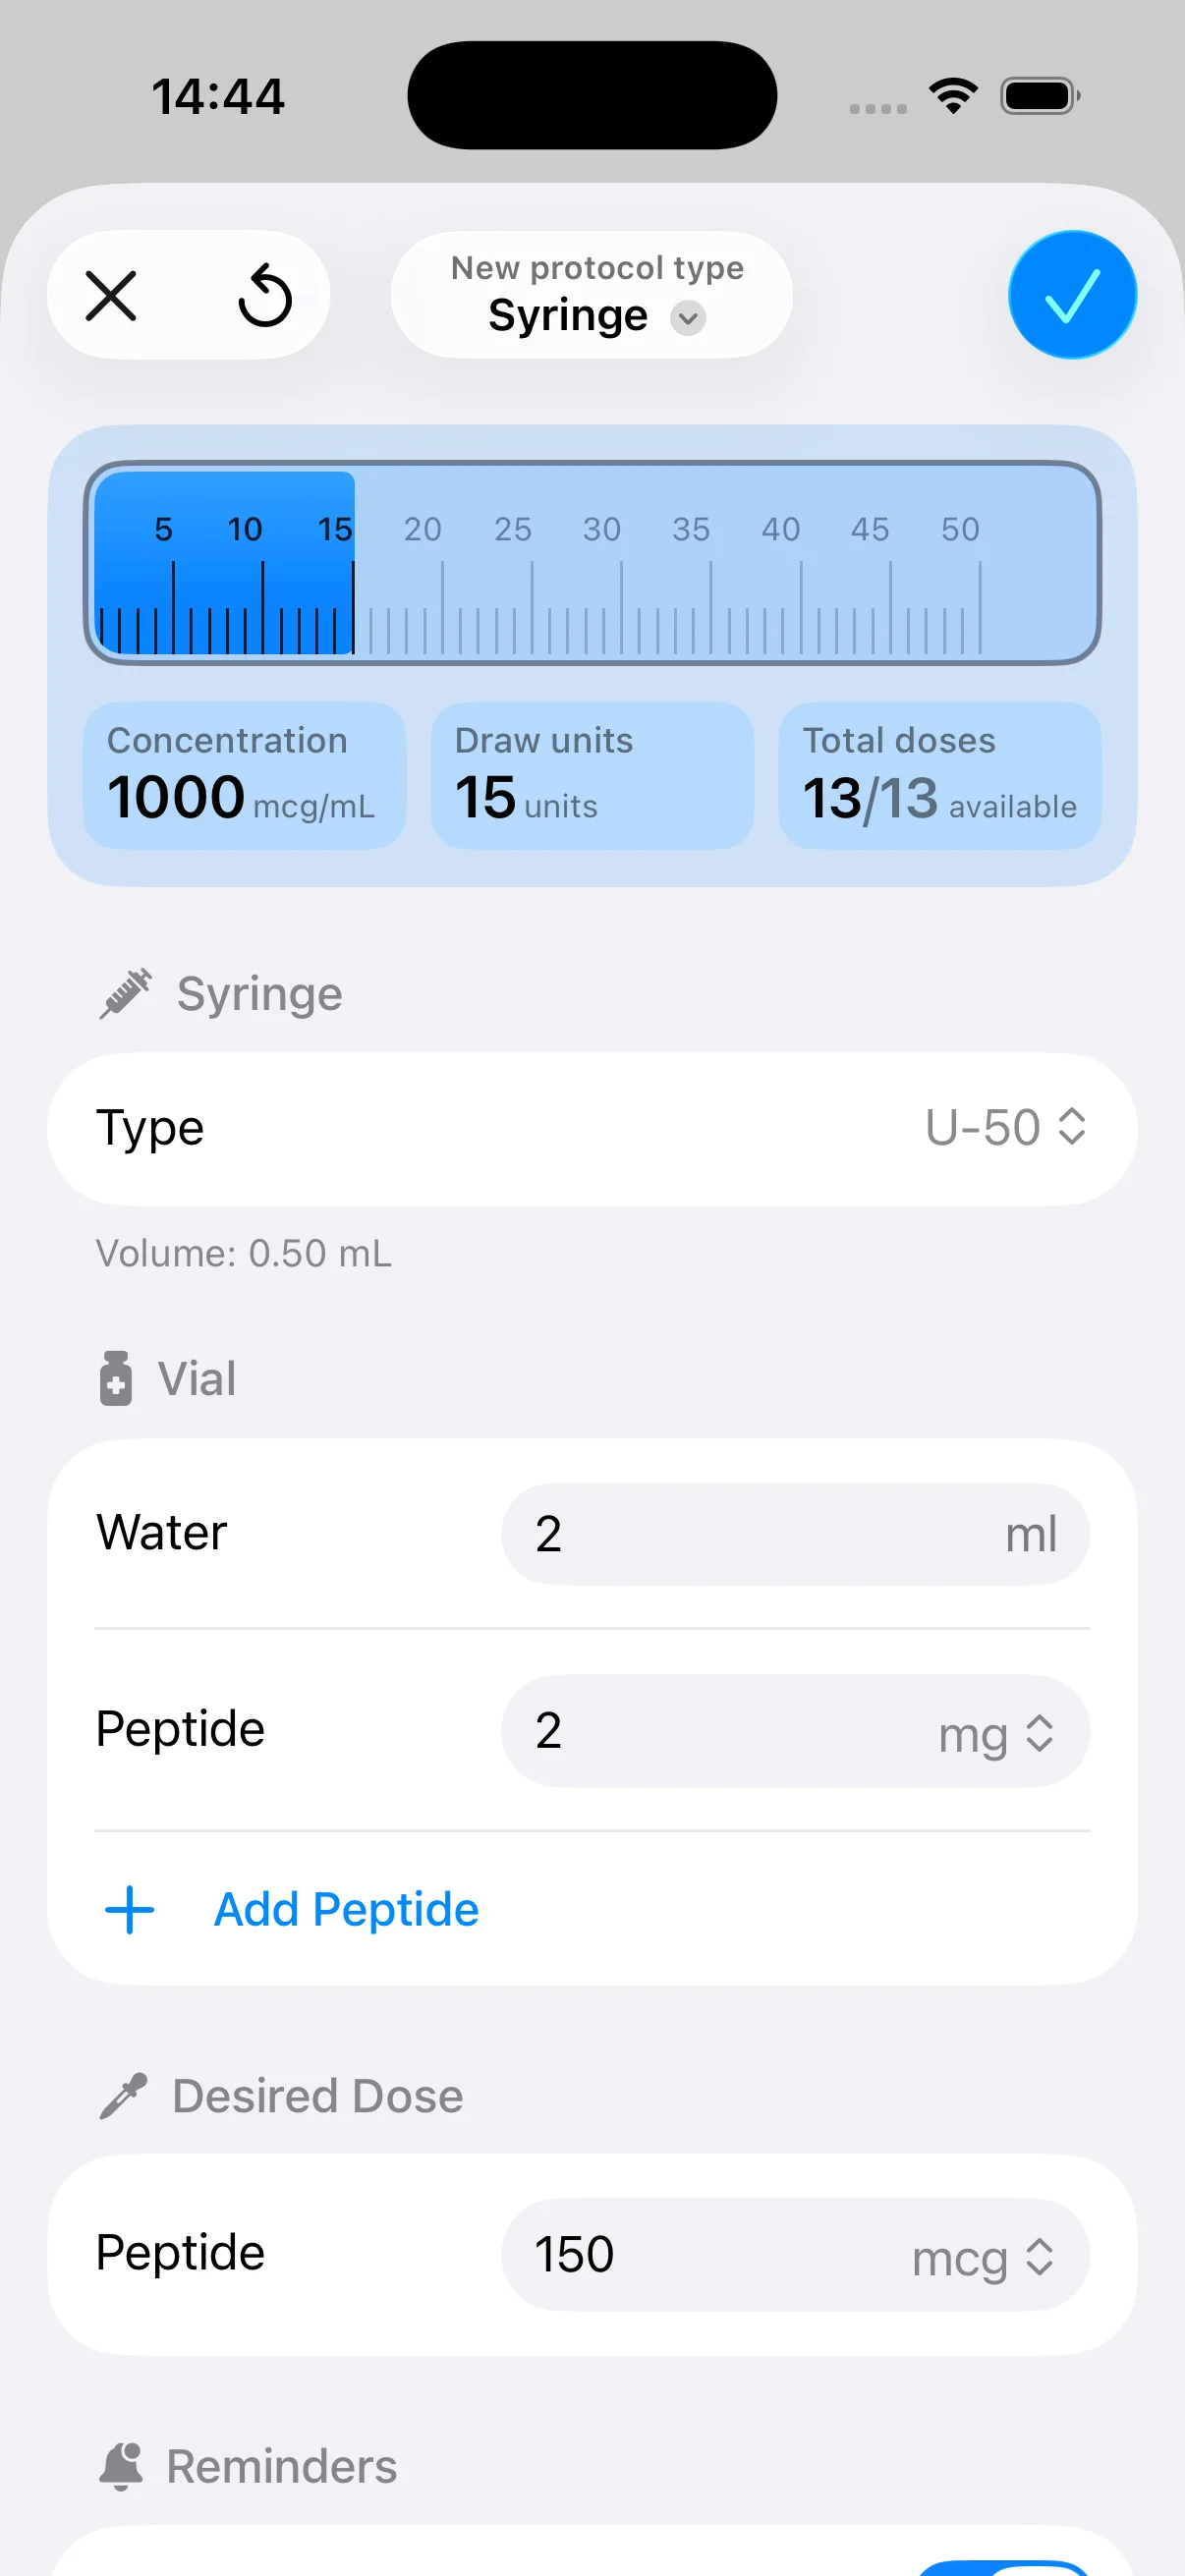
Simplifying Your Protocol with PepFlow
Manual math works. It also creates the most preventable mistakes in peptide handling.
That’s especially true when you’re juggling more than one vial size, changing concentrations, or trying to translate a microgram target into a practical syringe draw without rewriting the same calculations every time. A dosing tool can remove that repetition and give you a consistent reference point.
PepFlow is one option built for that exact job. It handles peptide dosage calculations, converts target amounts into unit measurements, and helps organize schedules, reminders, and dose logs inside one workflow. For anyone following a structured protocol, that’s useful because it reduces the odds of concentration drift, forgotten doses, and handwritten math errors.
The value isn’t that it replaces understanding. It doesn’t. You should still know why your ratio works, why the vial wall matters, and why sterile technique is essential. The value is that once you understand the process, a calculator and schedule tracker make it easier to execute the same protocol correctly every time.
If you want a simpler way to manage reconstitution math, dose conversions, and scheduled protocols, PepFlow gives you a practical calculator and tracking workflow without relying on handwritten notes.