You’ve got a dose number in front of you, a syringe in your hand, and a very reasonable question in your head: now what? That moment can feel tense, especially when the barrel lines look tiny and every mark seems important.
The good news is that learning how to read insulin syringes is a practical skill, not a talent you either have or don’t. Once you know which line matters, which part of the plunger to read, and which syringe size you’re holding, the process becomes far more predictable. If you’re using a calculator or dosing app to get a precise unit result, this is the physical step that turns that number into an actual drawn dose.
Table of Contents
- Demystifying Your Dosing Tool
- Anatomy of an Insulin Syringe
- How to Read Syringe Unit Lines Like a Pro
- Selecting the Best Syringe Size for Accuracy
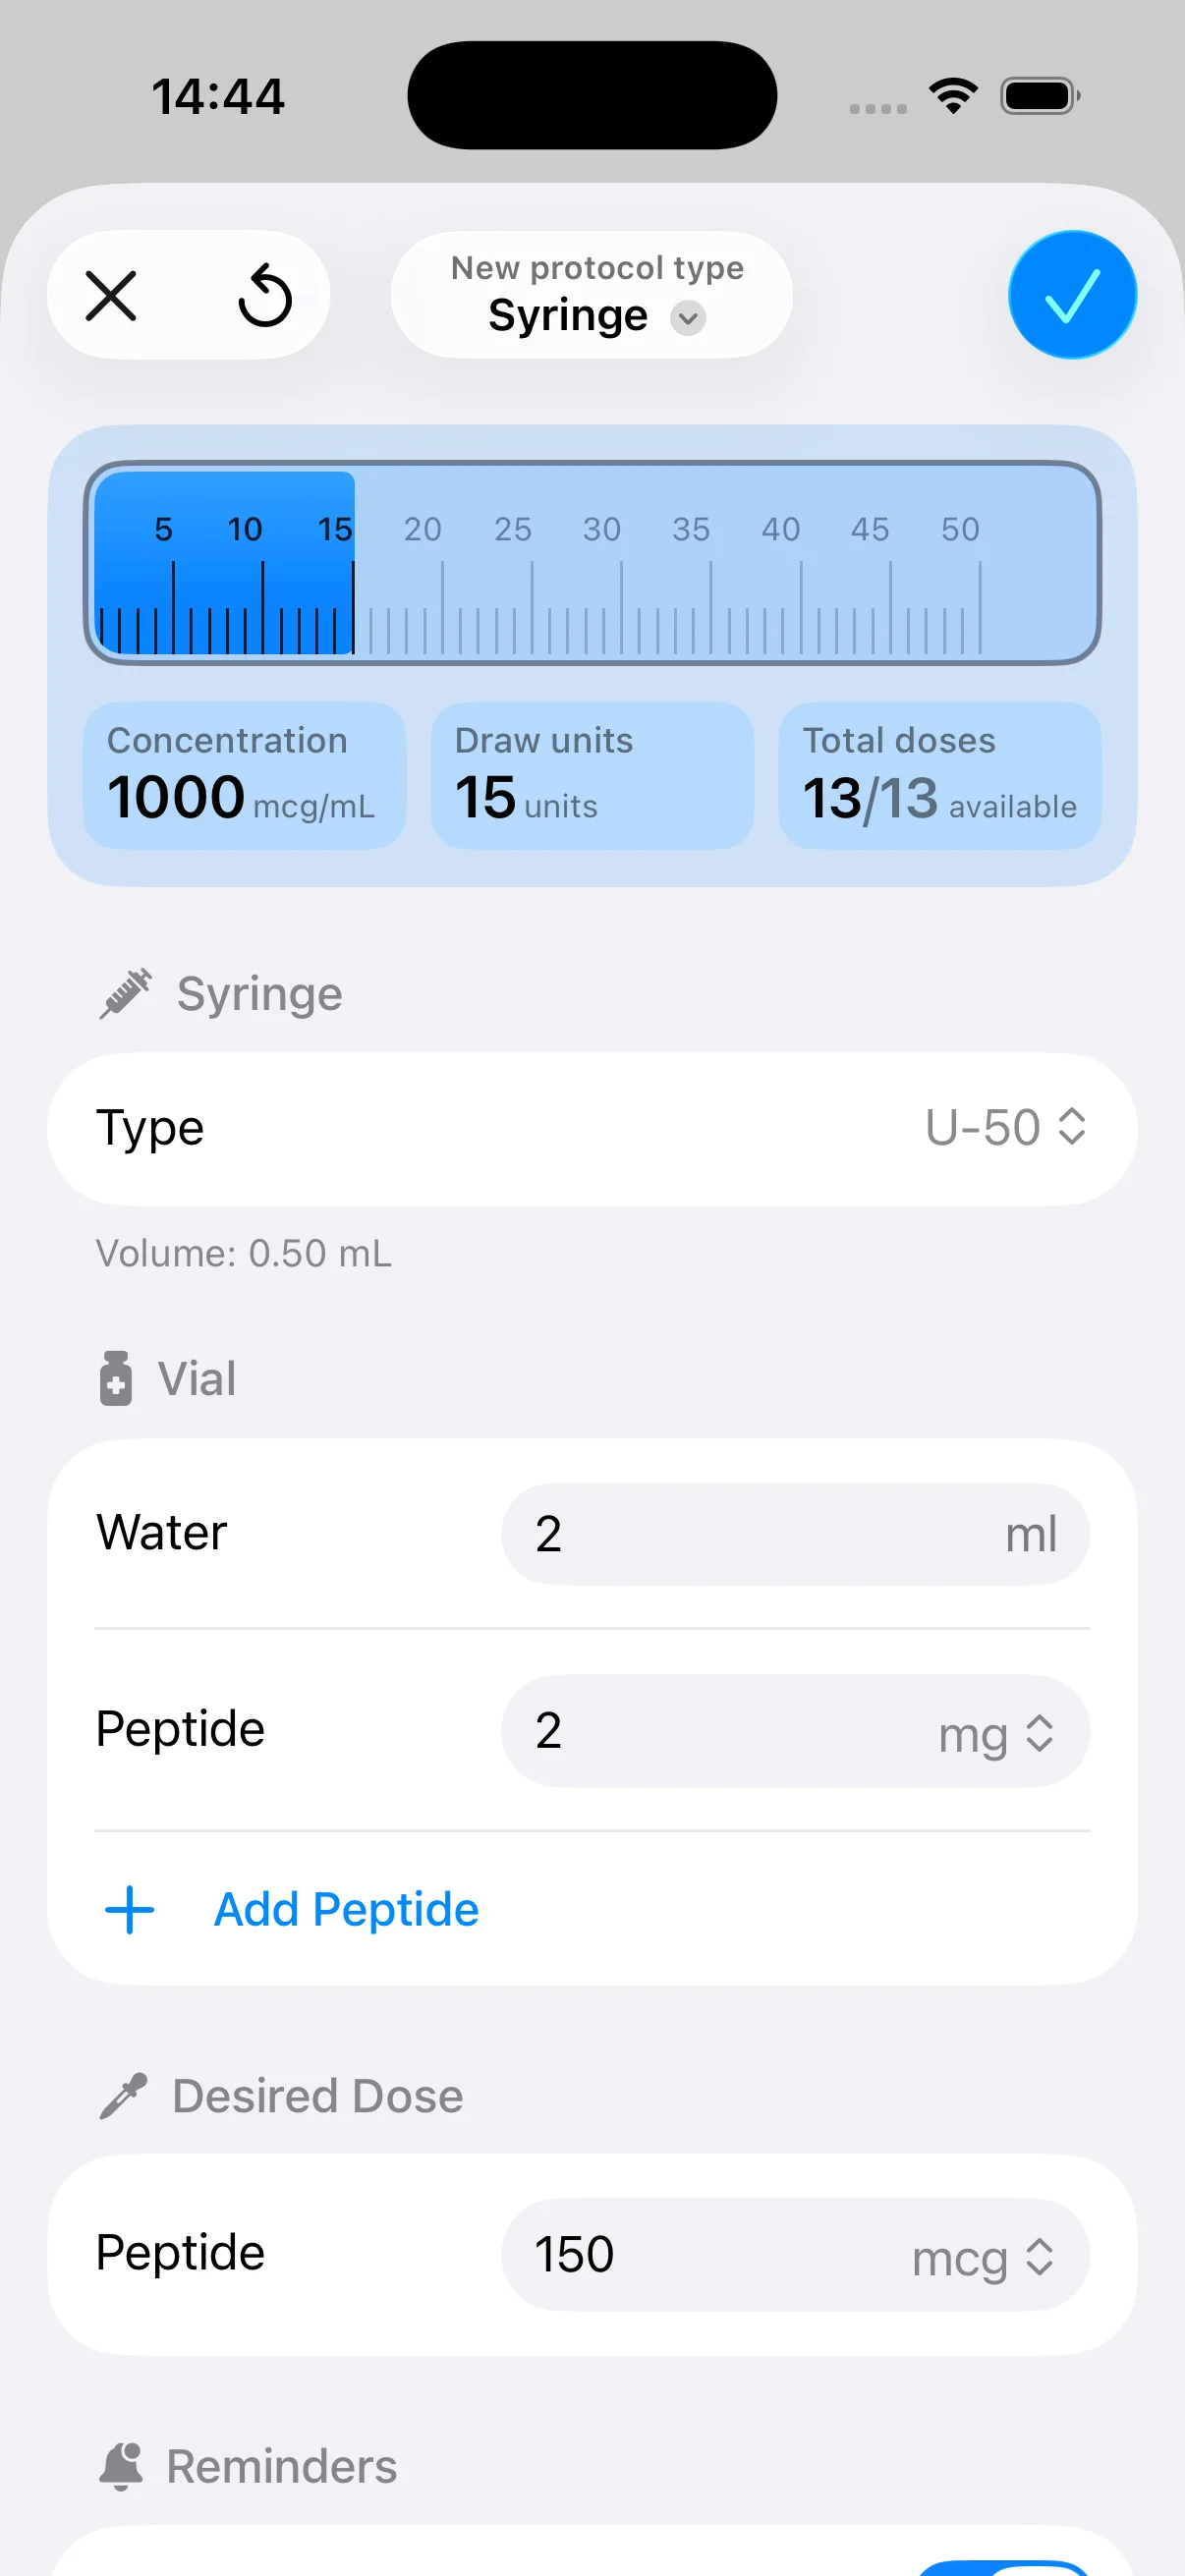
- Translating PepFlow Calculations to Your Syringe
- Common Dosing Errors and Safe Disposal
Demystifying Your Dosing Tool
Holding a new syringe for the first time can make even a calm person second-guess themselves. The markings are small, the process feels clinical, and you may worry that one small mistake means the whole dose is wrong.
That feeling is common. It doesn’t mean you’re bad at this. It usually means no one has walked you through the visual side carefully enough.
If you already used a calculator to get a unit number, the hard math is behind you. A tool such as a peptide calculator app guide can help you get to the correct unit target. The next job is more physical than mathematical: matching that unit number to the right line on the syringe.
Practical rule: Don’t try to “eyeball” a dose. Read the barrel slowly, at eye level, and use the black stopper as your reference point.
Many people also benefit from plain-language support materials outside clinic handouts. If you help a family member, or if someone helps you with injections, these helpful articles for caregivers can make the routine feel less intimidating and more manageable.
Confidence comes from repetition and a clear method. Once you understand the parts of the syringe and how the line spacing changes from one size to another, the barrel starts to make sense.
Anatomy of an Insulin Syringe
Before you can read the markings correctly, you need to know which part of the syringe is doing the measuring.
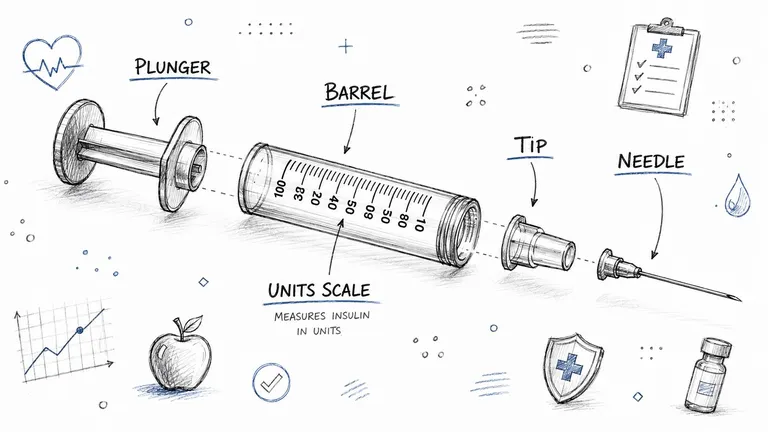
What each part does
The barrel is the clear tube that holds the liquid. On it, you’ll see the printed scale and unit lines. When people talk about “reading the syringe,” they’re really talking about reading the markings on the barrel.
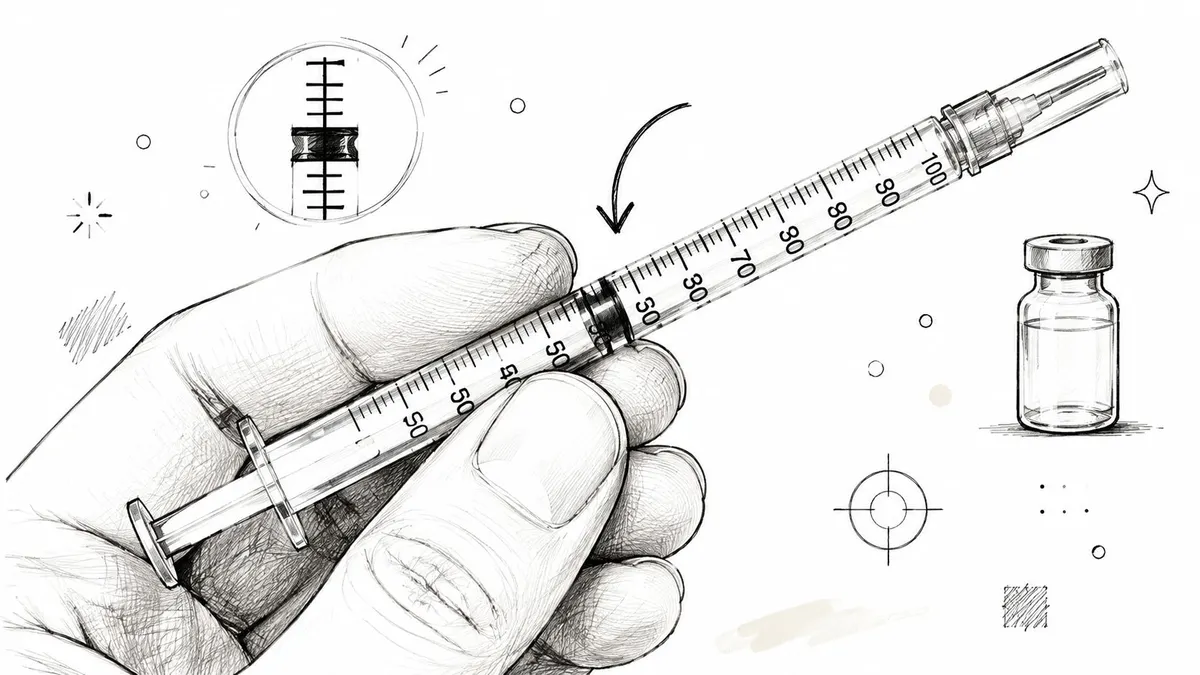
The plunger is the rod you pull back and push forward. At its tip is the black stopper, which is the part you measure against. You don’t read the dose from the thumb pad or the middle of the plunger. You read it from the top of the black stopper.
The needle is the thin metal part that enters the vial and, later, the skin. The cap covers the needle before use. Those parts matter for handling and safety, but they aren’t where the dose is read.
Units and mL are not the same thing on the barrel
A lot of confusion starts here. Insulin syringes for U-100 insulin are generally read in units, not by trying to calculate the fluid level in mL while looking at the barrel. Current guidance also notes that 0.3 mL syringes are typically marked in 1-unit or 0.5-unit intervals, 0.5 mL syringes in 1-unit intervals, and 1.0 mL syringes in 2-unit intervals. The same clinical review states that 4 mm, 5 mm, and 6 mm needles are the most recommended modern lengths, with no medical reason to use needles longer than 8 mm according to the International Scientific Advisory Board for the Third Injection Technique Workshop, as summarized by Healthline’s review of insulin syringe sizes.
That matters because the same-looking barrel can mean very different line values depending on the syringe size.
Here’s the short version:
- Barrel markings tell you where the dose sits.
- Black stopper is the reference point you line up.
- Syringe size changes how much each small line means.
- Units are what you should follow when reading a U-100 insulin syringe.
Read the syringe with the printed scale facing you directly. If you tilt it, small lines can look closer or farther than they really are.
How to Read Syringe Unit Lines Like a Pro
The most useful thing to learn is this: don’t start by counting lines. Start by figuring out which syringe size you’re holding.
Start by identifying the syringe size
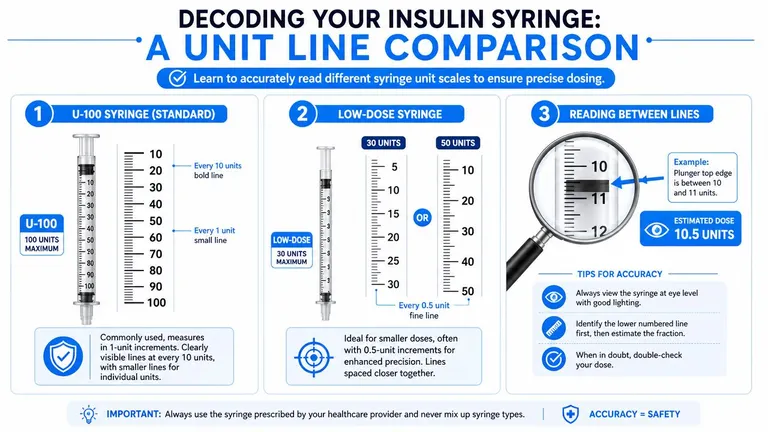
For U-100 insulin, 100 units equals 1 mL, so 1 unit equals 0.01 mL. Common syringe sizes are 0.3 mL (30 units), 0.5 mL (50 units), and 1.0 mL (100 units). On many 30-unit or 50-unit syringes, each line equals 1 unit, while on a 100-unit syringe, each line often equals 2 units. That also means 25 units = 0.25 mL and 50 units = 0.50 mL, as explained in this guide to reading a U-100 insulin syringe.
That single fact prevents a lot of errors. If you mistake a 100-unit syringe for a 30-unit syringe, you can misread the lines by whole units.
For a practical walkthrough of injection setup after calculating a dose, this peptide injection guide can help connect the measurement step to the rest of the routine.
A quick scale guide
| Syringe Capacity (mL) | Syringe Capacity (Units) | Typical Value of Each Line |
|---|---|---|
| 0.3 mL | 30 units | 1 unit or 0.5 unit |
| 0.5 mL | 50 units | 1 unit |
| 1.0 mL | 100 units | 2 units |
The visual differences matter more than people expect. A lower-capacity syringe gives you more room to see small changes. A larger syringe compresses more dose range into the same barrel length.
Here’s a short visual explainer if you learn better by watching:
How to spot your dose line
On a 30-unit syringe, finding 12 units is usually straightforward. You find the numbered reference marks, then count the small unit lines until the top edge of the black stopper sits at the twelfth unit mark.
On a 50-unit syringe, 25 units often lands at a very readable midpoint because each small line is usually 1 unit. Many people find this size easiest for moderate doses.
On a 100-unit syringe, slow down. If each small line is 2 units, then the line after 20 is 22, then 24, then 26. If your prescribed dose is an odd number and your syringe only shows 2-unit increments, don’t guess.
Watch for this: The bigger the syringe, the easier it is to misread a small dose if you assume every tiny line means the same thing across all barrel sizes.
Selecting the Best Syringe Size for Accuracy
A syringe can be technically large enough for a dose and still be the wrong choice for reading it clearly.
Why smaller syringes help
If your dose is modest, a smaller barrel gives your eyes more space to work with. The lines are easier to separate mentally, and the plunger position is easier to judge. That’s why a low dose often feels much more manageable on a smaller syringe than on a full-size one.
Think about measuring a short distance with a ruler that has big, widely spaced marks versus one with a cramped scale. You can still measure with either, but one gives you more confidence.
For U-100 insulin syringes, the scale is read in units rather than mL, and the syringe size should match the prescribed dose: 0.3 mL for up to 30 units, 0.5 mL for up to 50 units, and 1 mL for up to 100 units. The dose is read by aligning the top of the plunger or black stopper with the correct unit mark, according to HealthHub’s insulin injection technique guidance.
A simple selection rule
Use the smallest syringe that can comfortably hold your full dose.
That rule helps because:
- Lower doses look clearer on a smaller barrel.
- Fine adjustments are easier when the scale isn’t compressed.
- You’re less likely to miscount when the unit spacing is more readable.
A dose near the middle of a 30-unit syringe is usually easier to read than that same dose sitting low on a 100-unit syringe. If you’ve already calculated an exact unit target on your phone, this is the part that helps you honor that precision in real life.
Translating PepFlow Calculations to Your Syringe
The number on your screen now becomes an action in your hand.
A real example with 14 units
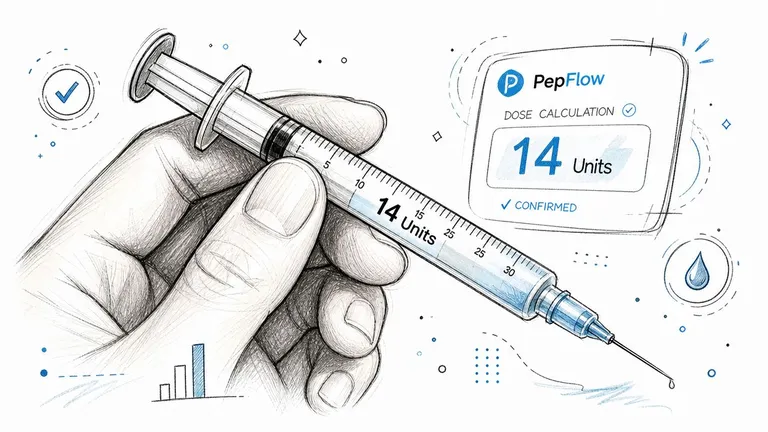
Say your calculator gives you 14 units. That answer is useful, but only if you can place the stopper at the correct line.
The first decision is the syringe itself. For a dose like 14 units, a small-capacity syringe is usually easier to read than a larger one. Once you have the correct barrel, find the nearest numbered reference mark, then count forward carefully until you reach the 14-unit line.
If you use an app workflow that converts dose math into syringe units, the point is to reduce translation errors. PepFlow’s mcg-to-mL conversion article is one example of that bridge between calculation and measurement. It helps you get to a unit result. Your job after that is visual confirmation on the barrel.
Some readers come to this topic while learning broader injection routines alongside medication research. If that’s your situation, this overview of semaglutide treatments for weight loss gives useful context about real-world treatment discussions and injection-based care.
What your hands are doing during the draw
Hold the syringe where you can see the scale straight on. Pull back gradually until the top flat edge of the black stopper lines up with the 14-unit mark. Not above it. Not below it.
Then stop and check again.
A good rhythm looks like this:
- Find the target number on the barrel.
- Draw slowly until the stopper reaches that line.
- Bring the syringe to eye level and verify alignment.
- Correct gently if you overshoot.
If the stopper edge looks split between two positions because you’re viewing it at an angle, adjust your eye position first. Don’t adjust the dose based on a tilted view.
That small pause is where many dosing mistakes are prevented.
Common Dosing Errors and Safe Disposal
Most syringe problems aren’t dramatic. They’re small, ordinary mistakes that happen when someone rushes, guesses, or reads the wrong part of the barrel.
The mistakes people make most often
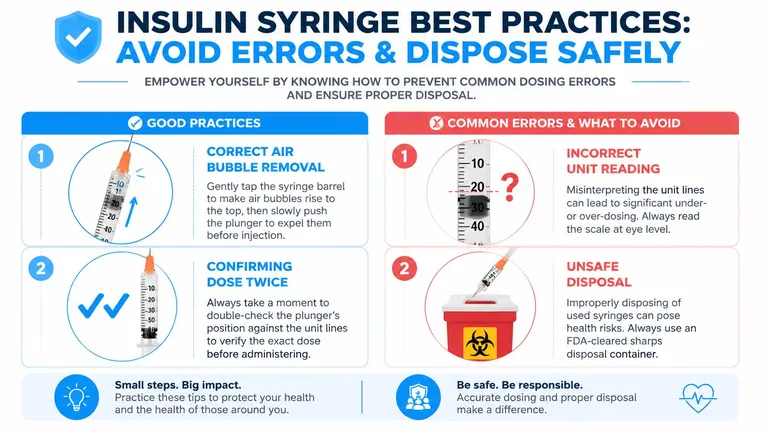
A high-reliability loading method is to first inject air into the vial, then invert the vial, then pull the plunger to the exact dose line. Common pitfalls include air bubbles, misreading the unit scale, and using the wrong syringe capacity for the dose, as described in MedlinePlus instructions for preparing an insulin dose.
Those pitfalls deserve plain-language fixes:
-
Air bubbles in the barrel
Tap the barrel so the bubbles rise, then gently push them out before your final dose check. Bubbles can make the drawn amount less exact. -
Reading the wrong line value
This happens most often when someone assumes all syringes have the same spacing. Read the barrel based on that syringe’s own scale, not the one you used yesterday. -
Checking the wrong part of the stopper
Use the top edge of the black stopper as the measuring point. -
Rushing the second look
Always verify the dose one more time before injection.
If you want another plain-English injection reference for technique and safety habits, this guide on how to inject Mounjaro safely is a helpful companion read.
What to do with a used syringe
Once the dose is given, the job isn’t finished until the syringe is disposed of safely.
Use an FDA-cleared sharps disposal container for used syringes. Don’t leave them loose on a counter, in a bathroom bin, or mixed with regular trash. Don’t reuse a syringe if your clinician or product instructions say it is single-use. A used needle can become harder to handle cleanly and safely.
A safe finish to the routine should be automatic:
- Recap only if your care instructions specifically require it and you can do it safely
- Place the used syringe directly into a sharps container
- Store the sharps container in a secure location
- Follow your local disposal rules when the container is ready for disposal
Safe disposal is part of accurate dosing practice. A careful routine includes both the draw and what happens afterward.
If you want help turning dose calculations into clear syringe-unit targets before you draw, PepFlow is a lightweight option for planning, converting, and tracking structured dosing routines. It can help reduce manual math so you can focus on reading the syringe carefully and following the same process every time.