You’ve got the vial, the BAC water, a fresh insulin syringe, and five browser tabs open because every guide says something slightly different. One says 45 degrees. Another says 90. One tells you to inject near the abdomen, another says the thigh is easier, and none of them really show you how to turn all of that into a routine you can repeat without second-guessing yourself.
That’s where many individuals get stuck. Not on motivation, but on workflow.
A good peptide injection guide isn’t just about how to push fluid through a needle. It’s about building a clean, repeatable system for mixing, calculating, injecting, rotating sites, storing vials, and logging doses so small mistakes don’t stack into bigger ones later. That matters because peptides are sensitive compounds, and subcutaneous delivery only works well when the details are handled well.
Table of Contents
- The Foundations of Safe and Effective Peptide Use
- Preparing Your Peptides and Workspace
- Calculating Your Exact Peptide Dose Accurately
- Mastering the Subcutaneous Injection Technique
- Scheduling Cycles and Logging Doses with PepFlow
- Safety Protocols and Troubleshooting Common Issues
The Foundations of Safe and Effective Peptide Use
You can spot the sessions that go wrong before the needle ever touches skin. The vial comes out first. The math gets done from memory. The last injection site is a guess. By the time someone notices the problem, they have no clean way to tell whether the issue came from the compound, the dose, the timing, or their own process.
That is the fundamental starting point with peptides. Safe, repeatable use depends less on confidence and more on control. Peptides are sensitive compounds, and small errors in preparation, storage, reconstitution, dose measurement, or scheduling can create inconsistent results that look like the peptide “isn’t working” when the protocol itself is the weak point.
Precision beats intensity
Self-experimenters often spend too much time chasing the perfect peptide and too little time building a repeatable workflow. In practice, the people who stay on track usually do a few simple things well every time. They prepare the same way, calculate the same way, inject the same way, and record the same details after each dose.
Practical rule: Treat each dose like a medication procedure, not a supplement ritual.
I’ve found that this shift changes everything. Once people stop improvising, they make fewer expensive mistakes. They waste fewer vials, misread fewer syringe units, and have a much easier time judging whether a protocol is helping, doing nothing, or causing side effects.
Consistency also protects you from false conclusions. If you change dose volume, injection timing, site rotation, and reconstitution habits all at once, you create noise. Good peptide use removes noise first.
Respect the method before the molecule
The interest usually starts with body composition, recovery, longevity, or injury support. Fine. But none of those goals excuse sloppy handling. Clear vial labels, clean technique, fresh needles, accurate calculations, and a written log are what make a peptide protocol usable for more than a few days.
That is why this guide goes beyond basic injection instructions. A single tutorial can show you where to place the needle. It cannot fix the more common failures, which are usually bad prep habits, dose confusion, and missed scheduling. A complete workflow does more. It gives you a system you can repeat under normal life conditions, even when you are tired, busy, or running more than one compound.
If you need a quick primer on peptide form and handling before reconstitution, this overview of freeze-dried peptides and how they are typically used gives useful context. If you want broader context on where peptide therapy fits in a wellness setting, Blue Haven RX peptide therapy insights offer a useful high-level overview.
The practical standard stays the same. Know what is in the vial. Know how it was prepared. Know your exact dose. Know when you took it. Tools like PepFlow help with the parts self-learners miss most often, especially calculation checks and scheduling, but the tool only works if the method is disciplined.
Preparing Your Peptides and Workspace
The fastest way to create avoidable problems is to start gathering supplies after you’ve already opened the vial. Set everything out first. A clean setup lowers contamination risk, keeps your calculations from getting mixed up, and makes the injection itself much less stressful.

What to set out before you start
Use a stable, clean surface with good lighting. Then lay out only what you need for that session.
- Peptide vial: Check the label carefully so you’re not mixing the wrong compound.
- Bacteriostatic water: Keep it separate from anything else in your kit so you don’t grab the wrong diluent.
- Fresh syringe for reconstitution and injection: Many people use fine-gauge insulin syringes in the 0.3 to 1 mL range for subcutaneous delivery, based on DK Dermal’s injection guidance.
- Alcohol swabs: You’ll need them for vial tops and the injection site.
- Sharps container: Put it within arm’s reach before you inject.
- Dose notes or app entry: Don’t rely on memory once you start running more than one vial or schedule.
One simple habit helps a lot. Keep your supplies in a dedicated tray or pouch, and reset it after every use. That prevents the common mess of half-used swabs, mismatched syringes, and unlabeled vials floating around your fridge.
How to reconstitute without ruining the vial
Lyophilized peptides are fragile enough that rough handling can work against you. Reconstitution should feel controlled and uneventful.
Start by washing your hands and cleaning the tops of both vials with alcohol. Let them dry fully. Draw your chosen amount of BAC water, inject it slowly into the peptide vial, and direct the stream against the inner glass rather than blasting the powder directly.
Then gently roll the vial. Don’t shake it.
For a deeper walkthrough on powder handling and storage basics, the freeze-dried peptide guide is useful background reading.
If a prep routine feels rushed, it usually is. Slow hands make fewer mistakes.
A few handling rules are worth keeping strict:
| Step | What works | What doesn’t |
|---|---|---|
| Vial prep | Clean stopper and let it dry | Swabbing and immediately puncturing |
| Water addition | Slow injection along vial wall | Forceful spray onto powder puck |
| Mixing | Gentle rolling | Shaking or whipping foam |
| Setup | One clear workspace | Multitasking across clutter |
People often underestimate how much mental friction matters. If your tools are scattered and your process changes every time, your chance of making a dose error goes up. A clean workspace isn’t cosmetic. It’s part of dose accuracy.
Calculating Your Exact Peptide Dose Accurately
A common point of anxiety for new users is the moment they have to convert a vial label into a syringe draw. The usual problem is not the injection itself. It is the chain of small calculations that sits between a vial marked in milligrams and a syringe marked in units.

Get this step right and the rest of the workflow becomes repeatable. Get it wrong and every log entry, schedule reminder, and injection after that is built on a bad number.
The core math that matters
Dose calculation comes down to two values:
- The concentration in the vial after reconstitution
- The volume needed for your target dose
Start with concentration. Convert the peptide amount into micrograms if needed, then divide by the amount of bacteriostatic water added.
A practical example:
- 5 mg in the vial
- 2 mL BAC water added
Since 5 mg = 5,000 mcg, the concentration is:
- 5,000 mcg ÷ 2 mL = 2,500 mcg/mL
Once that number is written down, every future draw from that vial is easier.
A practical syringe example
Say the target dose is 250 mcg from that same vial.
Use the concentration you just calculated:
- 250 mcg ÷ 2,500 mcg/mL = 0.1 mL
On a 1 mL insulin syringe, 0.1 mL = 10 units.
That is the full sequence. Vial strength, water added, concentration, final draw. People who stay consistent with that order make fewer mistakes than those who jump straight to syringe units and try to work backward.
I still recommend learning the manual math even if you use an app. It helps you catch the two errors that cause the most trouble in practice: a missed decimal and a unit mix-up between mg and mcg. For a structured walkthrough, this peptide reconstitution calculator guide shows how to set up the conversion clearly and repeat it the same way each time.
Where self-learners usually slip
The math itself is simple. The failures usually come from inconsistency.
- Mixing up mg and mcg: Protocols are often written in micrograms, while vial labels are usually in milligrams.
- Forgetting how much water was added: The same peptide can produce very different concentrations depending on reconstitution volume.
- Treating syringe units like dose units: Syringe markings show volume only.
- Changing your reconstitution style between vials: If one vial gets 1 mL and the next gets 2 mL, the same unit mark no longer means the same dose.
This is why I push people to use a written system, not memory. Label the vial with the reconstitution date, total water added, and final concentration. Then log the intended dose in both mcg and mL or syringe units. That extra line of writing takes seconds and prevents expensive mistakes later.
One more practical point. If injection discomfort makes someone rush the draw or second-guess the process, prep can get sloppy. For people who are sensitive to repeated injections, lidocaine cream for pain relief can reduce hesitation, but it should never replace accurate measuring and a calm setup.
Mastering the Subcutaneous Injection Technique
You can do everything right on the dosing side and still get poor results from bad mechanics. I see that a lot with self-learners. The dose is accurate, but the injection is rushed, the site rotation is random, and each shot feels slightly different. That makes side effects harder to interpret and habits harder to repeat.

Subcutaneous technique should feel predictable. The goal is to place the peptide into the fatty layer under the skin with as little tissue irritation as possible. Common sites include the lower abdomen, upper outer thigh, back of the arm, and upper glute area. The best option is the one you can reach comfortably, pinch cleanly, and rotate without guessing.
Choosing the right site and angle
Body composition changes the mechanics. Generic advice like “just use 45 or 90 degrees” leaves out the part that actually matters. How much subcutaneous tissue can you control at that site?
Use tissue depth as your guide:
- Lean build with a thin skin fold: A shallower angle usually gives better control and lowers the chance of going too deep.
- More subcutaneous fat or a very short insulin needle: A 90 degree insertion is often appropriate.
- Abdomen feels tender or overused: Switch to the thigh or another rotation site before irritation builds.
- Poor visibility or awkward reach: Skip the site. If you have to twist or rush, technique suffers.
Pinch the skin gently but firmly. You want a stable fold of fat, not a hard grab that makes the injection more painful.
The injection itself
Once the syringe is loaded, keep the sequence the same every time. Consistency is what turns injection technique into a usable workflow instead of a one-off guess.
- Wash your hands and clean the site with alcohol.
- Let the alcohol dry fully. Wet alcohol stings.
- Pinch a fold of skin if needed for your body type and needle length.
- Insert the needle in one smooth motion at the angle that fits the site.
- Press the plunger slowly and steadily.
- Wait a second after the plunger is fully depressed, then withdraw the needle smoothly.
- Apply light pressure with clean gauze if needed.
- Do not rub the site.
A lot of irritation comes from speed. Fast insertion after hesitation, aggressive plunger pressure, and rubbing the area afterward create problems that people wrongly blame on the peptide itself.
If you want less guesswork between calculation and administration, pair your measured dose with a saved volume entry in a peptide dose calculator and injection planning tool. That helps keep the number you calculated tied to the amount you inject.
If repeated injections make you tense before the needle even touches the skin, lidocaine cream for pain relief can help reduce surface discomfort. It does not fix sloppy technique, but it can make it easier to stay calm and deliberate.
A visual walkthrough helps if you’re trying to clean up your mechanics:
Slow, repeatable injections usually feel better and leave fewer surprises afterward.
What works and what doesn’t
| Situation | Better approach | Poor approach |
|---|---|---|
| Cold peptide from the fridge | Let it warm for a few minutes first | Inject it immediately |
| Unsure about site choice | Use a spot you can pinch and see clearly | Force an awkward angle |
| Burning during injection | Reduce plunger speed | Push harder to finish faster |
| Mild bleeding after withdrawal | Gentle pressure with gauze | Rubbing the site |
| Needle handling | Use a fresh sterile needle each time | Reusing a needle |
The trade-off is simple. Slower, cleaner technique takes a little more time up front, but it gives you more reliable injections, fewer irritated sites, and cleaner feedback on how the protocol is going. That is how you build a repeatable system instead of relying on memory and luck.
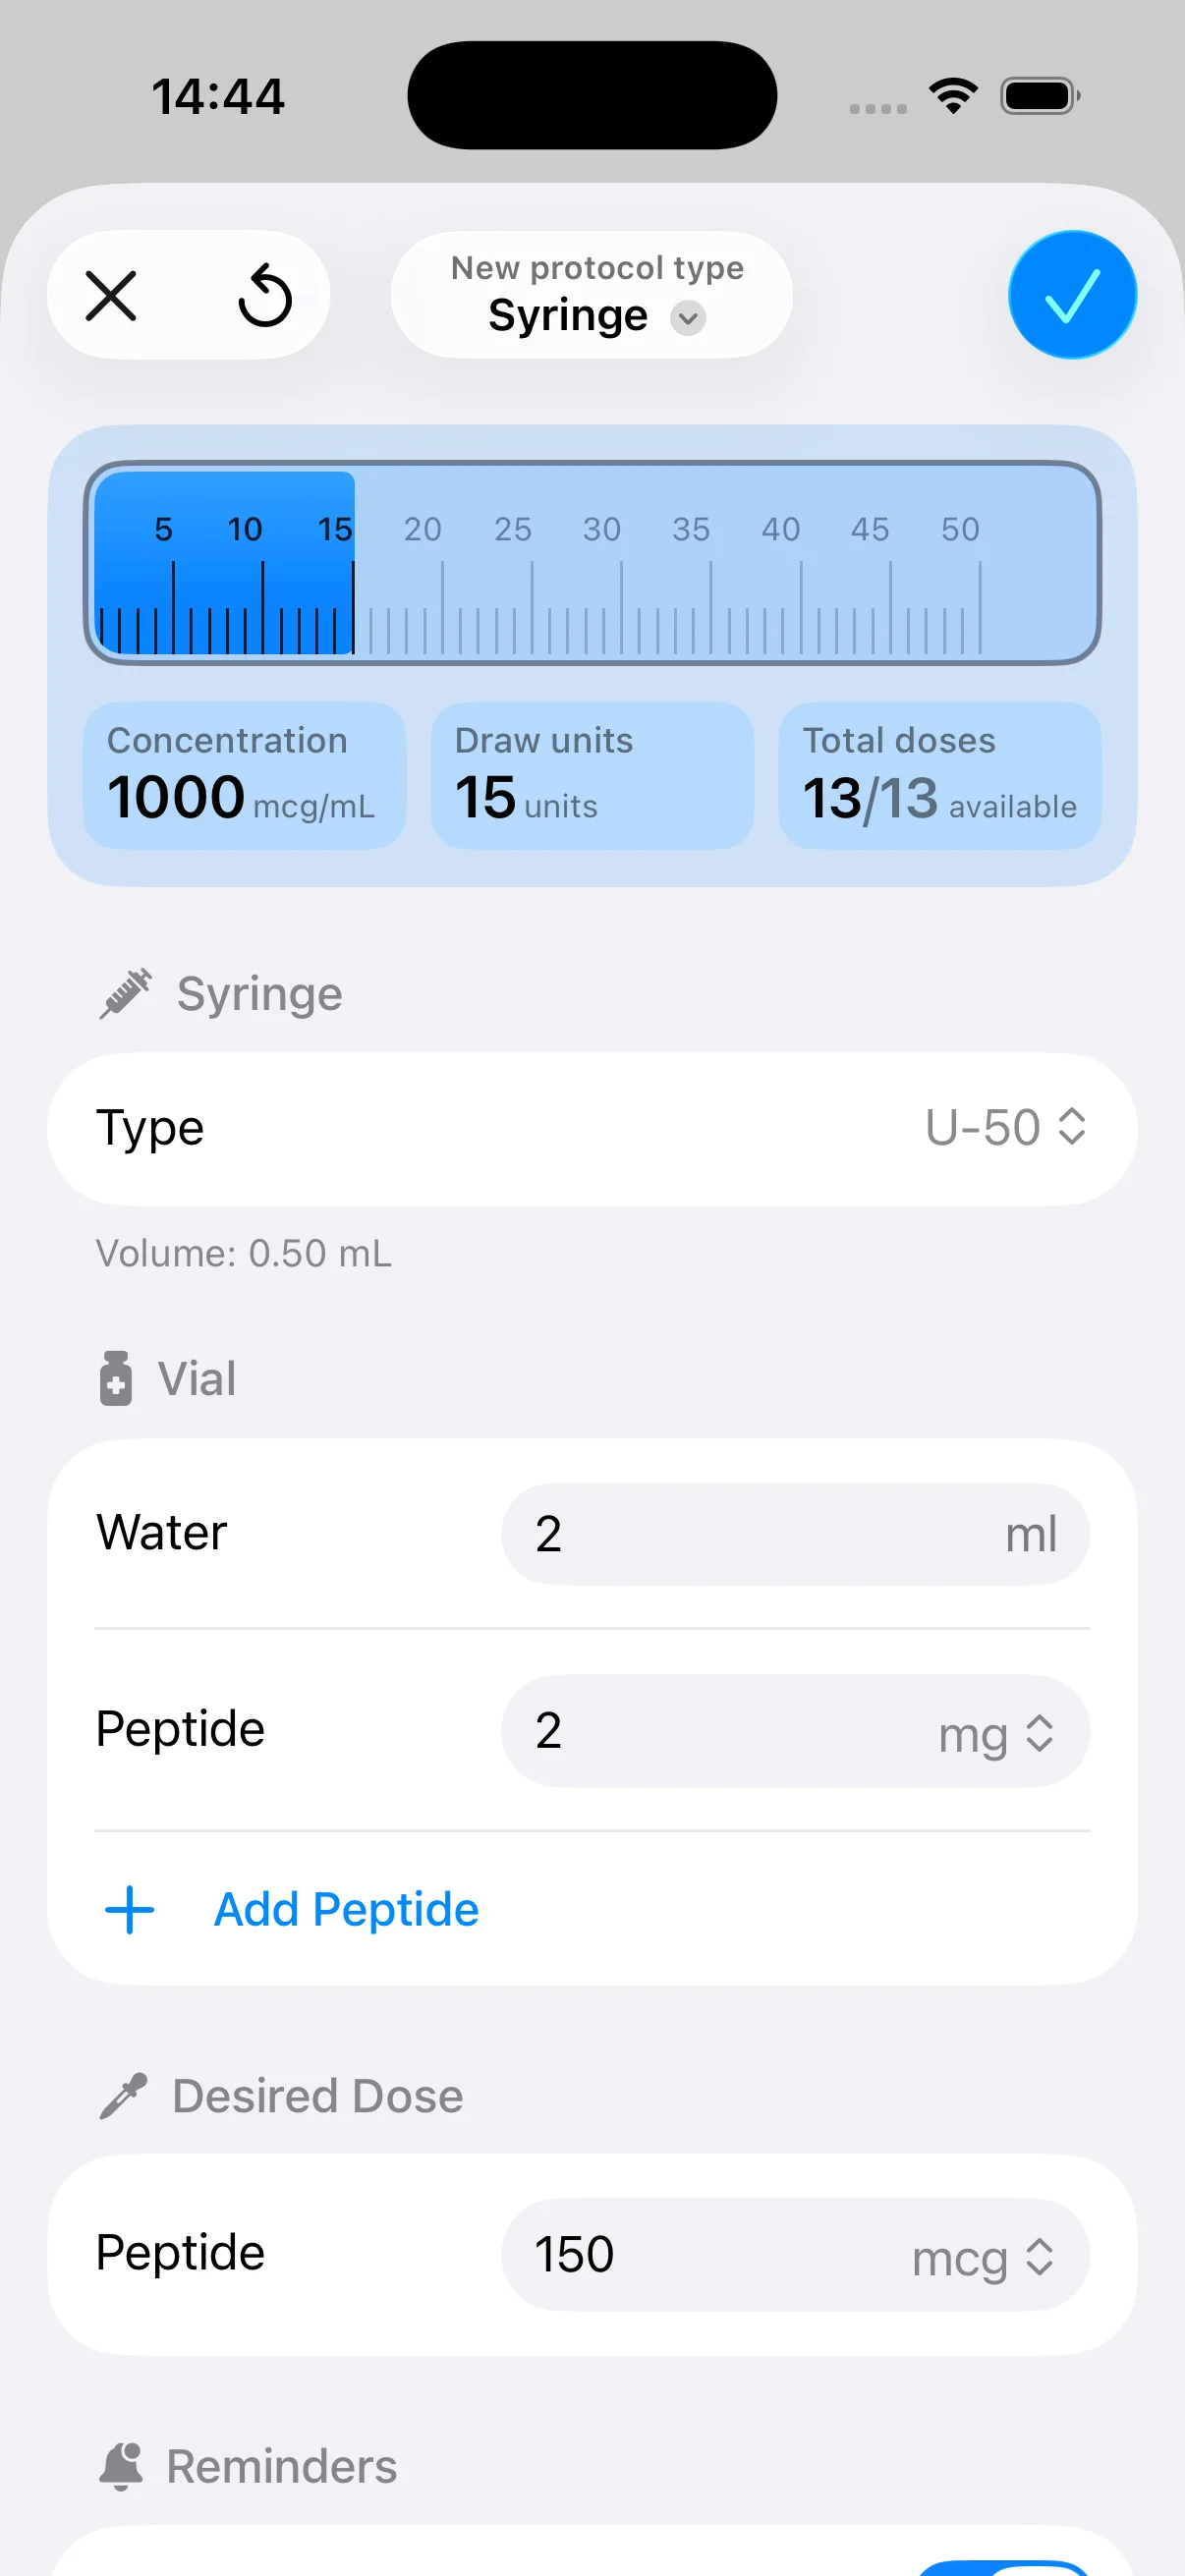
Scheduling Cycles and Logging Doses with PepFlow
A protocol usually starts falling apart on day 8, not day 1. The injection itself goes fine, then a travel day shifts the timing, one dose gets skipped, the next site is chosen from memory, and by the end of the week the log is already incomplete. That is how people lose control of a peptide plan without noticing it.
Good results come from repeatable workflow, not isolated good injections. Scheduling, site rotation, and dose records need to live in one place you will use.
![]()
Why scheduling matters more than people expect
Peptide plans break down in predictable ways. Daily compounds get taken at inconsistent times. Cycled compounds drift into continuous use. Off-days disappear because nobody wrote them down clearly in the first place.
For some protocols, consistency does more than keep you organized. It helps you evaluate whether the peptide is working, whether side effects line up with dose timing, and whether the cycle structure still makes sense. If your record is sloppy, your feedback is sloppy too.
Intermittent schedules can also serve a practical purpose for compounds that are commonly run in cycles. The exact pattern depends on the peptide and the prescriber’s instructions, but the operating rule stays the same. Set the schedule before the cycle starts, then follow the plan instead of improvising midweek.
What to log every single time
A useful dose log is boring. That is the point. It should answer the same questions every time, with no guesswork later.
Track these fields:
- Date and time
- Peptide name
- Dose taken
- Injection site
- Lot or vial concentration if you use more than one
- Any reaction or unusual symptom
- Cycle status, such as on-day, off-day, pause, or restart
That level of detail prevents expensive mistakes. I have seen people blame a peptide for nausea, irritation, or poor response when the actual problem was inconsistent timing, accidental site overuse, or a quiet dosing error that would have been obvious in a clean log.
Site tracking matters for comfort and tissue quality over longer runs. Johns Hopkins Arthritis Center’s subcutaneous injection guidance explains why rotating injection locations helps reduce local irritation and avoid overusing the same tissue.
Using PepFlow as the control panel
Paper logs work until life gets busy. Then entries get skipped, reminders disappear, and cycle changes stay in your head instead of in your system.
A better setup is one that handles the math and the schedule together. PepFlow’s peptide calculator and scheduling tool lets you calculate doses, map out cycle timing, set reminders, and keep a usable history of what was taken and when. That matters because self-learners usually fail at the handoff points. Reconstitution gets done, but the concentration is logged in one place, the dose in another, and the schedule nowhere.
Use the app like a checklist, not a diary. Enter the vial details correctly. Build the cycle before the first dose. Log each injection right after it happens, while the information is still exact.
Reliable protocols come from accurate records repeated over time.
A simple rotation rule keeps the process clean. Move at least an inch from the last site. Alternate sides. Retire the spot you always want to reuse just because it is easy to reach. Convenience creates patterns, and patterns create overused tissue if you do not track them.
Safety Protocols and Troubleshooting Common Issues
A lot of people assume safety means “use a sterile needle and you’re done.” That’s too narrow. Real safety in peptide use comes from what you do after the exciting part is over: storing the vial correctly, recognizing when a solution shouldn’t be used, and responding calmly when you miss a dose or get a mild site reaction.
Storage and missed dose rules
Reconstituted peptides need stable cold storage. They should be refrigerated at 2 to 8°C for no more than 4 to 6 weeks, and cloudy vials should be discarded. Freeze-thaw cycles can degrade potency by 20% to 40%, according to Extension Health’s peptide storage guide.
That means a few habits are worth locking in:
- Label the mix date: If you don’t know when you mixed it, you can’t manage storage confidently.
- Keep the vial in a consistent fridge location: Don’t let it bounce around in a door shelf if you can avoid it.
- Watch the solution visually: Clear today and cloudy next week is a real change, not something to ignore.
If you miss a dose, don’t double the next one. The same source notes that doubling up can create a 2 to 3 times peak overload and raise the risk of side effects like nausea. Skip it, document it, and resume the schedule correctly.
When to stop using a vial
Some issues are minor. A little redness can happen. Slight stinging can happen. A small temporary lump can happen. What matters is the pattern.
Stop and reassess if you notice:
- Repeated irritation at the same site: That usually points to poor rotation or rough technique.
- Cloudiness in the vial: Treat that as a discard sign.
- Unexpected pain on every injection: Review temperature, speed, needle freshness, and site choice.
- Confusion about concentration: If you can’t confirm the reconstitution details, don’t guess.
This is the part many self-learners resist. They want the protocol to continue because they’ve already invested time and effort. But stopping a questionable vial or pausing a sloppy routine is often the smartest move you can make.
This guide is informational only and isn’t medical advice. Peptides can affect recovery, metabolism, appetite, hormones, and other systems in ways that depend on the compound and the person using it. If you’re unsure about the peptide, the dose, the schedule, or a reaction you’re having, talk to a qualified clinician before continuing.
If you want a simpler way to handle the repetitive parts of a peptide routine, PepFlow helps with dose calculation, vial setup, protocol scheduling, reminders, and dose history so you can spend less time rechecking math and more time following a consistent process.