You’re standing at the bench with a peptide vial, an insulin syringe, and a calculator app open on three devices. The vial says 5 mg, the protocol calls for a dose in micrograms, and every calculator seems to produce a different syringe mark. Before you draw anything, pause. The risk isn’t usually advanced chemistry. It’s a misplaced unit, an extra zero, or a syringe scale read as milliliters instead of units.
To measure peptides reliably, answer three questions in order: how much peptide is in the vial, how much diluent will be added, and what volume matches the prescribed or validated dose. This guide follows that order, then adds the checks that catch a tenfold or hundredfold mistake before liquid reaches the syringe. For a broader concentration walkthrough, see this guide to calculating final peptide concentration.
Table of Contents
- The Vial on the Counter and the Math That Matters
- Understanding the Units Behind Every Peptide Dose
- Reconstituting a Peptide Vial the Right Way
- Reading the Syringe and Drawing the Correct Volume
- Error-Proofing Your Dose Before You Inject
- What Changes About Your Measurement After Day One
- Putting the Workflow on Autopilot With PepFlow
The Vial on the Counter and the Math That Matters
The vial is only the starting point. A label showing 5 mg tells you the total peptide mass, not the concentration you’ll measure after reconstitution. Concentration depends on the amount of liquid added, so the same vial can produce different syringe volumes under different protocols.
Write the three inputs on paper before opening the vial:
- Vial amount: the total peptide mass, such as 5 mg.
- Diluent volume: the amount of bacteriostatic water or other approved diluent added, such as 2 mL.
- Target dose: the amount required by the protocol, expressed in the same unit you’ll use for the calculation, commonly micrograms.
That order matters because each step feeds the next. First convert milligrams to micrograms. Then divide the total micrograms by the liquid volume to find micrograms per milliliter. Finally, divide the target dose by that concentration to find the milliliters to draw.
Bench habit: Write the concentration on the vial label immediately after reconstitution. Don’t rely on a calculator history or memory when the vial returns to the refrigerator.
The syringe adds another layer. A U-100 insulin syringe expresses volume in units, and those marks aren’t interchangeable with micrograms or milligrams. You’re converting between mass and volume first, then converting volume to the syringe scale. If the vial label, dilution volume, or dose is uncertain, stop and verify it with the responsible clinician or laboratory protocol rather than guessing.
Understanding the Units Behind Every Peptide Dose
The unit ladder is simple once each unit has one job:
- Milligrams, or mg, describe a larger mass.
- Micrograms, or µg or mcg, describe a smaller mass.
- Milliliters, or mL, describe liquid volume.
- Insulin syringe units, often called IU on the barrel, describe volume markings on a U-100 syringe. They aren’t a measure of peptide mass.
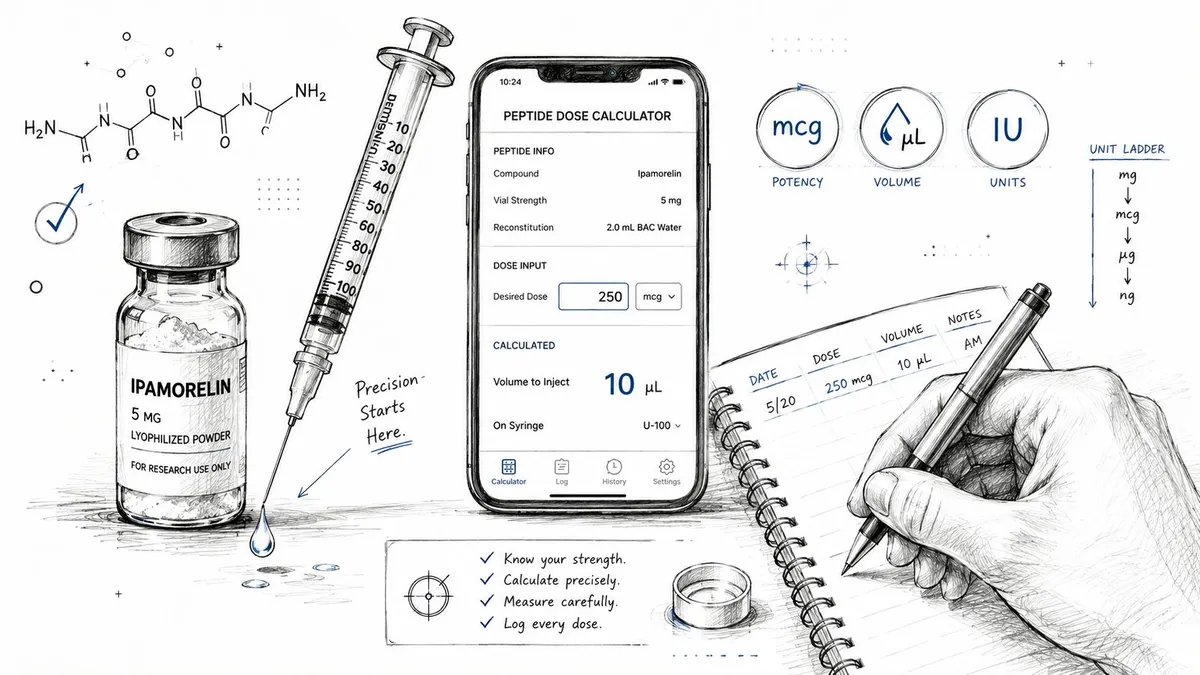
For a 5 mg vial, first convert the vial mass to micrograms. Since one milligram contains one thousand micrograms, the vial contains 5,000 mcg. If you add 2 mL of diluent, the concentration is:
5,000 mcg ÷ 2 mL = 2,500 mcg/mL
A target of 250 mcg then requires:
250 mcg ÷ 2,500 mcg/mL = 0.1 mL
On a U-100 syringe, 1 mL equals 100 units, so 0.1 mL corresponds to 10 units. The complete chain is therefore 250 mcg, 0.1 mL, 10 syringe units. The units change, but the amount of peptide represented by the draw doesn’t.
A second dilution proves the method
Suppose the same 5 mg vial is reconstituted with 1 mL instead. The concentration becomes 5,000 mcg/mL. A 250 mcg target would require 0.05 mL, which corresponds to 5 units on a U-100 syringe.
| Diluent volume | Concentration | 250 mcg dose in mL | 250 mcg dose in syringe units |
|---|---|---|---|
| 1 mL | 5,000 mcg/mL | 0.05 mL | 5 units |
| 2 mL | 2,500 mcg/mL | 0.1 mL | 10 units |
The shortcut worth memorizing is:
Syringe units = target dose in mcg × 100 ÷ concentration in mcg/mL
For the 2 mL example, that is 250 × 100 ÷ 2,500 = 10 units. You can also use a dedicated mcg-to-syringe-unit conversion guide, but still check that the entered vial mass and diluent volume match the physical vial.
Reconstituting a Peptide Vial the Right Way
Good measurement starts before the powder becomes liquid. Prepare a clean, uncluttered surface, alcohol swabs, the correct diluent, and a syringe large enough to hold the required reconstitution volume. Let the vial reach room temperature according to the applicable protocol, and inspect the stopper and vial before use.
Wipe the rubber stopper and allow it to dry. Draw the specified bacteriostatic water volume into the syringe, checking the barrel at eye level. Keep the needle sterile, and don’t touch the needle or the cleaned stopper.
Add the diluent slowly
Insert the needle through the stopper and direct the liquid toward the inside glass wall of the vial. Inject slowly rather than aiming at the dry powder cake. A forceful stream can create foam, making the powder harder to inspect and potentially causing liquid to cling to the stopper or vial walls.
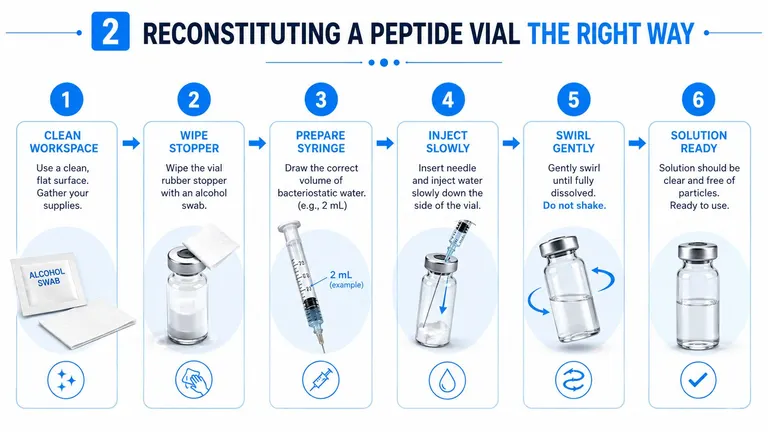
Don’t shake the vial. Shaking introduces bubbles and can stress sensitive materials. Set it down and use a gentle swirl or slow roll until the lyophilized cake dissolves. If the protocol gives a specific mixing instruction, follow that instruction instead of substituting a general technique.
Inspect before storage
The finished solution should match the appearance specified by the product or laboratory protocol. As a basic visual screen, look for a clear solution, no unexpected visible particles, and an intact stopper. A cloudy solution, unusual color, particles, damaged vial, or uncertainty about sterility is a reason to stop and seek qualified guidance.
Once the solution is acceptable, write the reconstitution date, diluent volume, resulting concentration, and vial identifier on the label. Store it only under the conditions required for that peptide and protocol. Reconstitution changes the handling requirements, so don’t assume that every peptide has the same storage or usable period.
Reading the Syringe and Drawing the Correct Volume
A syringe is a measuring instrument, not just a container. The barrel holds the liquid, the plunger creates the seal that moves it, and the printed scale tells you the volume. On common U-100 insulin syringes, a 1 mL barrel corresponds to 100 units, while smaller barrels hold less total volume and can make low draws easier to read.
A 0.5 mL syringe has a 50-unit capacity, and a 0.3 mL syringe has a 30-unit capacity. The correct choice depends on the calculated draw and the graduations on the specific syringe. Don’t assume every manufacturer prints identical increments.
Match the syringe to the volume
A 25-unit draw can fit on either a 50-unit or 100-unit syringe. The smaller barrel may make the plunger position easier to see because the same target occupies more of the available scale, but the printed markings remain the final authority. For very small volumes, choose a syringe whose graduations allow the protocol’s required volume to be measured without guessing between lines.
Pull air into the syringe only as required by the applicable technique, wipe the vial stopper, and insert the needle without contaminating it. Draw slightly beyond the target only if your validated technique accounts for dead space, then remove bubbles and return the plunger to the exact mark. Fixed-needle syringes can retain a small amount of liquid in the needle and hub, so don’t invent a compensation amount. Follow the syringe manufacturer’s instructions or the protocol that established the dose.
Hold the syringe at eye level. Read the leading edge of the plunger stopper, not the top of the plunger handle, and align it with the intended mark. Tap bubbles gently toward the top, expel them according to the approved procedure, and recheck the mark.
Before uncapping or removing the needle, verify:
- Vial identity: The peptide and concentration match the written calculation.
- Unit scale: You’re reading U-100 units, not treating the number as milliliters.
- Plunger position: The stopper edge sits on the intended line at eye level.
- Bubble status: No air pocket changes the measured liquid column.
- Technique: Any dead-space adjustment follows a documented protocol.
For more detail on barrel markings and plunger alignment, use this guide to reading insulin syringes.
Error-Proofing Your Dose Before You Inject
The most dangerous arithmetic mistake is treating mg, mcg, mL, and syringe units as interchangeable. They measure different things. Mass describes how much peptide exists, volume describes how much liquid carries it, and syringe units describe a calibrated barrel scale.
Use the worked example as a challenge. A 5 mg vial contains 5,000 mcg. Reconstituted with 2 mL, it contains 2,500 mcg/mL. A 250 mcg target is 0.1 mL, which is 10 units on a U-100 syringe. If your calculator produces 100 units for that same input, don’t draw it. Re-enter every field.
Run the reverse calculation
The reverse check is powerful because it starts with the mark you’re about to use. If your planned draw is 10 units on a U-100 syringe, convert it back:
10 units ÷ 100 = 0.1 mL
Then multiply by the concentration:
0.1 mL × 2,500 mcg/mL = 250 mcg
The result should match the target. A mismatch usually points to a wrong vial mass, incorrect diluent volume, a mg-to-mcg conversion error, or a syringe-scale mistake.
Stop signal: A result above 1 mL or above 100 units deserves an immediate re-check of the vial amount and diluent entry. Those results may be valid for some preparations, but they’re also where a tenfold or hundredfold unit slip can hide.
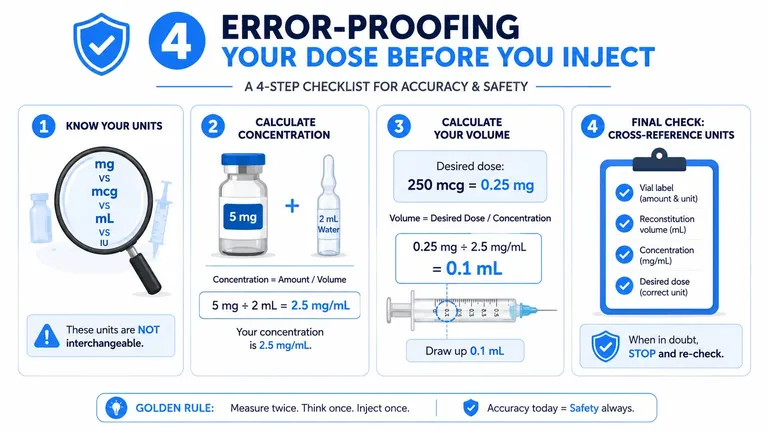
Before the needle comes out of its package, complete a short verification sequence:
- Read the vial label aloud.
- Confirm the peptide mass and diluent volume.
- Convert the concentration into mcg/mL.
- Convert the target into mL and syringe units.
- Reverse-calculate the syringe mark back into mcg.
- Record the calculation with the vial date and lot information.
If another trained person is available, have them repeat the final dose and unit mark back to you. This isn’t about distrust. It’s a way to catch a decimal error while the syringe is still empty.
What Changes About Your Measurement After Day One
A vial that has been sitting in the refrigerator for weeks may look unchanged, but your original concentration assumption still depends on the vial’s handling history. Storage temperature, stopper condition, evaporation, spills, repeated access, and the peptide’s validated stability data all matter.
Bacteriostatic water is commonly stored at 2 to 8 degrees Celsius under applicable product instructions, while many research-peptide protocols describe a usable stability window of 14 to 30 days. Those figures aren’t universal guarantees. The peptide, formulation, container, sterility conditions, and validated laboratory data determine what remains acceptable.
Why the assumed concentration can drift
Small losses of liquid through evaporation can leave less volume carrying the same dissolved mass, which raises the effective concentration. Liquid can also remain on the stopper or be lost during repeated withdrawals. Condensation may make the vial or syringe harder to inspect, while repeated punctures increase contamination risk even if the peptide itself remains chemically stable.
After a pause in a dosing schedule, don’t automatically treat the original calculation as newly verified. Check the reconstitution date, storage record, number of withdrawals, appearance, stopper condition, and the applicable stability window.
For bulk stock, weighing the container may help a qualified laboratory assess whether material was lost, but that isn’t a reliable home substitute for validated concentration testing. Individual vials should be checked against laboratory data when concentration matters and the preparation falls outside its validated handling conditions.
Mark the date directly on the vial. Log each withdrawal, note unusual spills or stopper wetness, and recalculate when the schedule changes or the vial exceeds its validated window. If sterility or appearance is uncertain, don’t try to rescue the vial with more math. Ask a qualified professional whether it should be discarded.
Putting the Workflow on Autopilot With PepFlow
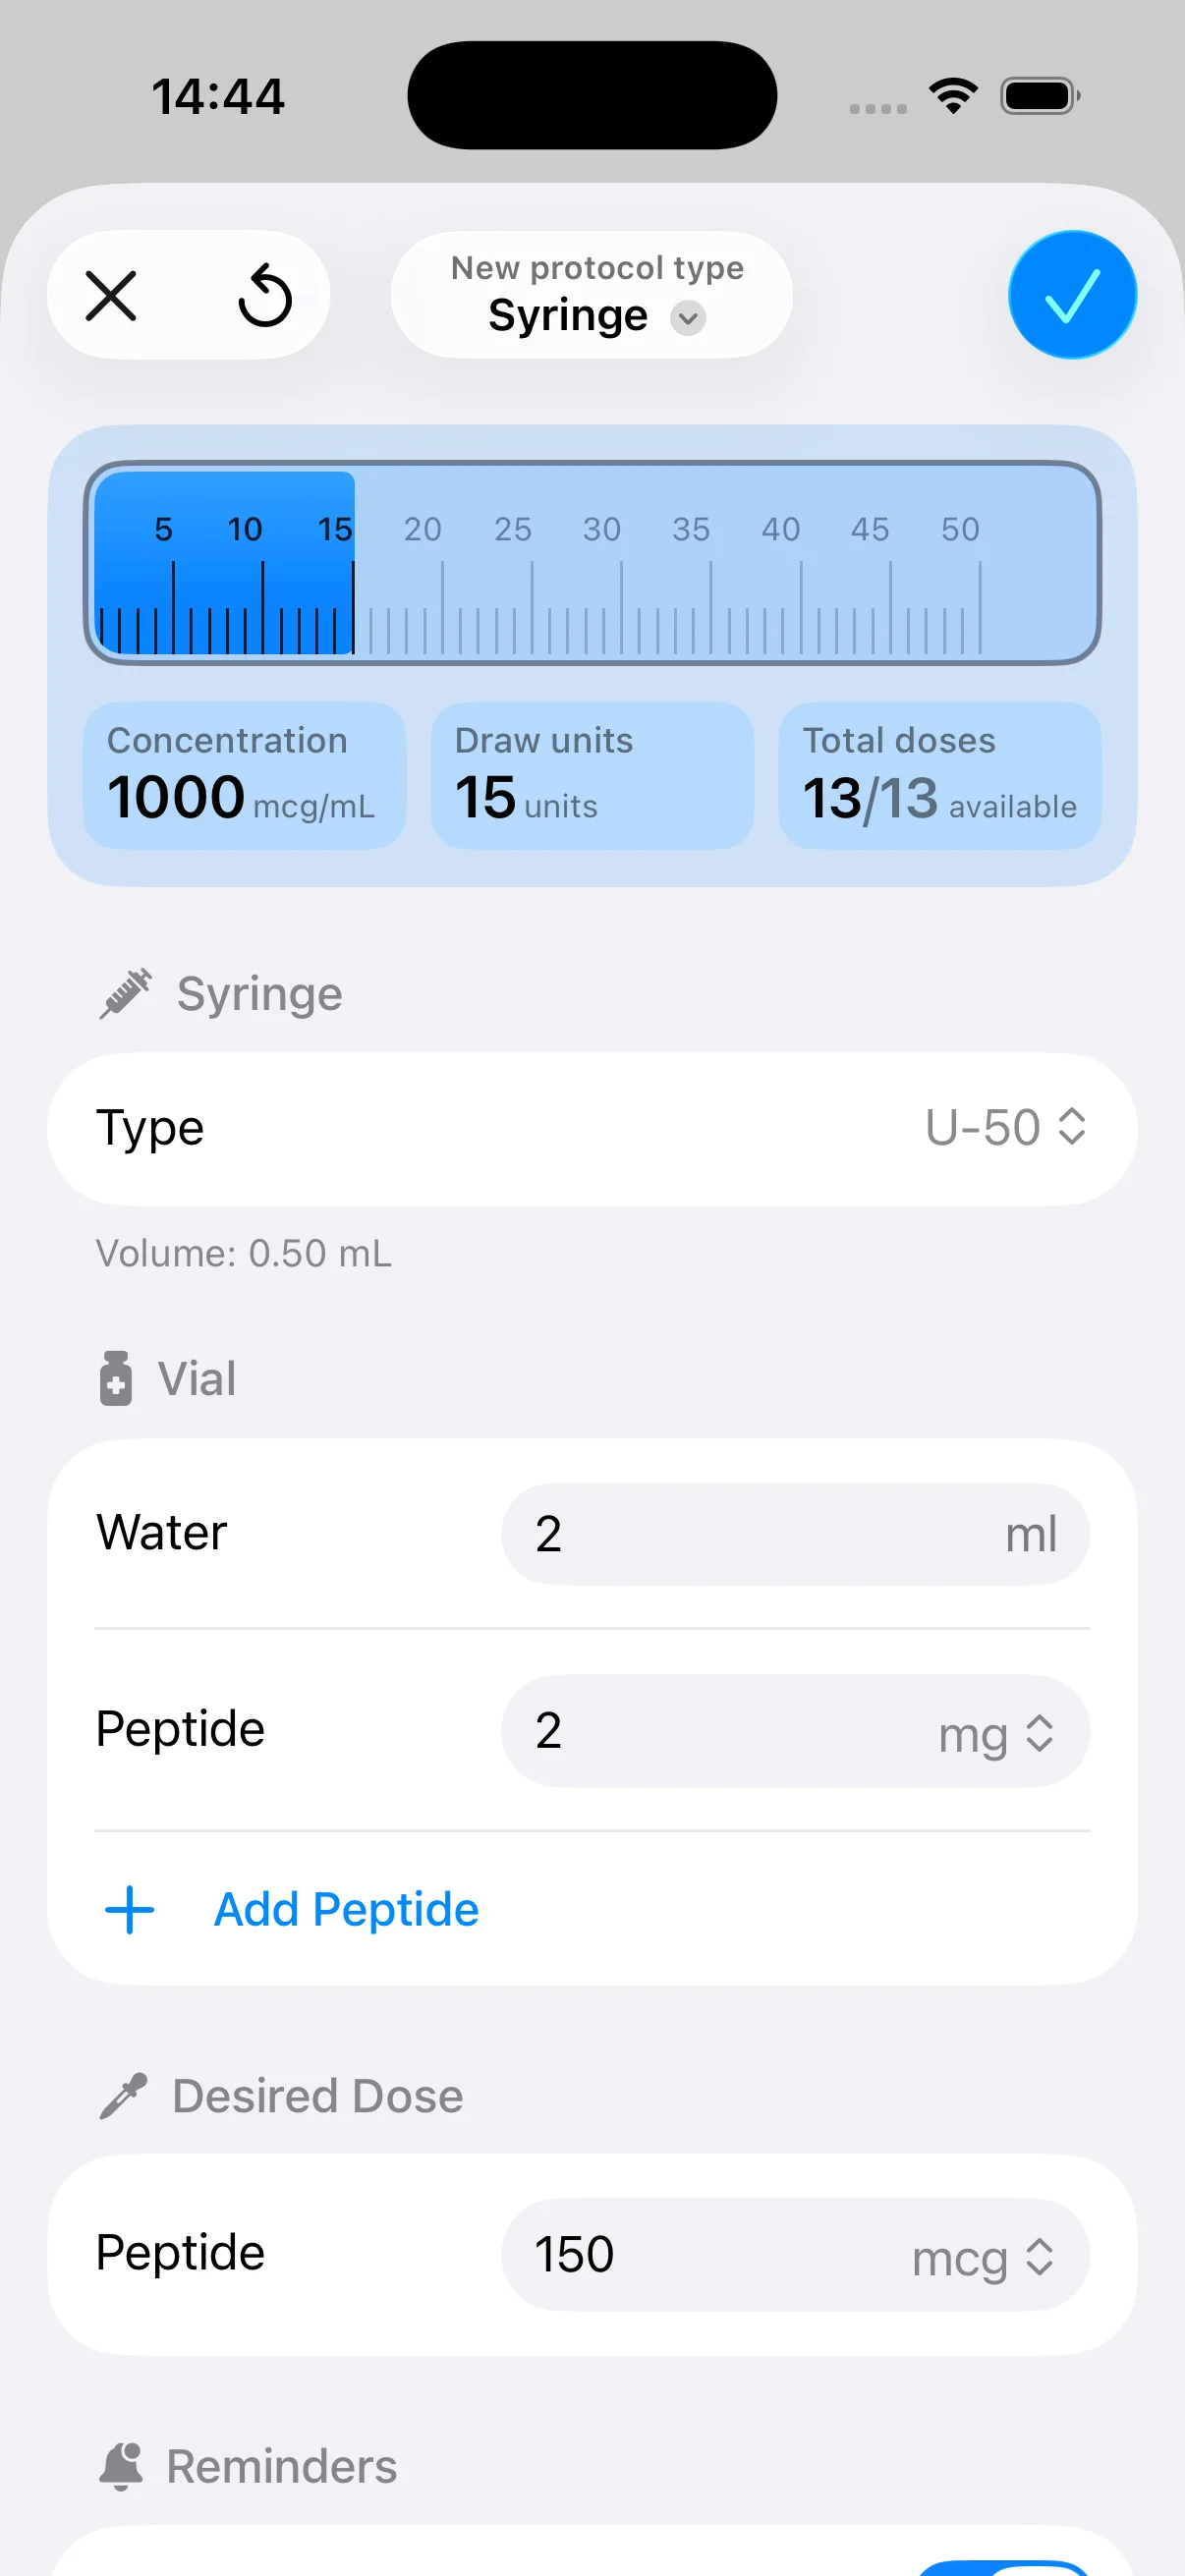
A repeatable workflow removes most opportunities for mental arithmetic. Start with the physical vial and record the label before reconstitution. Enter the vial amount and diluent volume into your calculation system, convert the resulting concentration into both mg/mL and mcg/mL, and write the result on the vial or accompanying record.
The dose calculation should then move in one direction: target micrograms to milliliters, followed by milliliters to the selected syringe scale. A tool can also help compare the result across 30-unit, 50-unit, and 100-unit syringes, provided you verify the syringe type and scale before drawing. The tenfold and hundredfold checks still belong to the user. Software can flag suspicious entries, but it can’t know whether you typed the vial label correctly.
PepFlow lets users configure a vial, record the diluent volume, calculate concentration, convert a target dose into syringe units, and log reconstitutions with dates and lot information. Its scheduling features can track cycled protocols, pauses, reminders, and logged doses, creating a running record rather than leaving each draw to memory. That supports organization, but it doesn’t replace professional medical advice, sterile technique, product validation, or a clinician’s instructions.
Manual work compared with a logged workflow
| Manual approach | Logged approach |
|---|---|
| Recalculate concentration from notes | Store vial amount and diluent volume together |
| Convert mcg to mL, then units by hand | Display the calculated draw in the selected syringe scale |
| Reconstruct past withdrawals from memory | Keep dose history and dates in one record |
| Notice an implausible result after drawing | Review the unit check before the syringe is prepared |
| Estimate remaining material informally | Maintain a running estimate from recorded pulls |
The app doesn’t change the peptide or make an uncertain product safe. It gives the measurement process a consistent place for inputs, checks, dates, and records. That’s the useful distinction: automation reduces repeated math, while verification protects against incorrect inputs and unsuitable handling.
Use PepFlow to record each vial’s amount, diluent volume, concentration, syringe scale, and dose history in one workflow. Visit PepFlow before your next reconstitution so you can check the unit conversion, flag an implausible draw, and keep the schedule tied to a clear record.