You’ve got the vial in front of you, the powder looks harmless, and the part that feels weirdly high-stakes is adding the water. That instinct is right. With AOD 9604, the mixing step is where people either preserve a clean, usable solution or ruin the vial before the first injection.
Most guides tell you what to do. Fewer explain why each move matters. That missing context is what causes rushed injections, bad dilution math, contamination, and the classic mistake of treating a peptide vial like a bottle of preworkout. If you want to know how to reconstitute aod 9604 without guessing, you need sterile technique, calm hands, and a concentration you can dose accurately.
Table of Contents
- Why Proper AOD 9604 Reconstitution Is Critical
- Gathering Your Essential Reconstitution Supplies
- The Step-by-Step AOD 9604 Reconstitution Process
- Calculating Your Dose Dilution Math Made Easy
- Safe Storage and Handling After Mixing
- Troubleshooting Common Reconstitution Issues
- AOD 9604 FAQs and Important Disclaimers
Why Proper AOD 9604 Reconstitution Is Critical
You can do everything right at injection time and still ruin the dose in the mixing step.
AOD 9604 is supplied as a lyophilized powder for a reason. Dry storage helps protect the peptide until use. Once you add diluent, the way you handle the vial determines its stability, sterility, and how reliably you can measure each dose afterward.
With AOD 9604, the margin for sloppy technique is smaller than is often assumed. This peptide is used because people want controlled, repeatable dosing. If the powder is stressed during mixing, if the vial is contaminated, or if the final concentration forces awkward micro-volumes, the problem is no longer theoretical. You have a vial you cannot trust.
Small handling errors create big downstream problems
Three mistakes cause most of the trouble. Injecting the diluent too fast can create foam and unnecessary agitation. Weak sterile technique raises contamination risk. Poor dilution planning leaves you trying to pull tiny amounts that are easy to misread on an insulin syringe.
Each one creates a different failure point. The result is the same. Inconsistent dosing, wasted peptide, or both.
Practical rule: Reconstitution is part of the dose, not a separate prep task.
Precision protects peptide quality and dosing accuracy
Every step has a clear job, and skipping the reason behind the step is how people make preventable mistakes.
- Room temperature handling reduces condensation and helps the powder dissolve more predictably.
- Slow injection along the vial wall limits turbulence that can stress the peptide.
- A clear final solution gives you a basic visual check that dissolution is complete.
- A concentration you can measure cleanly makes repeat dosing more accurate and less frustrating.
The diluent choice matters too. If you are using a multi-dose vial, bacteriostatic water for repeated peptide use is the standard option because it better fits repeated access after mixing.
The math matters just as much as the sterile technique. I have seen more dosing errors come from casual dilution choices than from the syringe itself. A clean reconstitution process protects the peptide. Clean concentration math protects the user. That is also why a calculator like PepFlow is worth using. It removes the mental arithmetic that leads to mismatched units, awkward draw volumes, and expensive avoidable errors.
Gathering Your Essential Reconstitution Supplies
Don’t start by popping caps. Start by staging your workspace. A clean, organized setup lowers the odds of contamination and keeps you from improvising halfway through.

What to have on the table
You need the peptide vial, bacteriostatic water, a sterile syringe for reconstitution, alcohol prep pads, your dosing syringe, and a sharps container. If you like tight process control, keep a label or piece of medical tape nearby so you can mark the vial as soon as you’re done.
A clean flat surface matters too. Kitchen counters work if they’re freshly cleaned and you’re not juggling other items around the vial.
Why bacteriostatic water is the standard choice
For multi-use peptide vials, bacteriostatic water is the common choice because it’s intended for repeated access after mixing. That makes it more practical than plain sterile water for an ongoing protocol. If you want a plain-language breakdown of the difference, this overview of what bacteriostatic water is used for is worth reading.
The important point is simple. Use the correct diluent from the start so you’re not compromising storage and repeat withdrawals later.
Use different syringes for different jobs
A common mistake is trying to use one syringe for everything. That usually creates avoidable frustration.
| Tool | Best use | Why it matters |
|---|---|---|
| Larger sterile syringe | Drawing and transferring diluent | Easier control during reconstitution |
| U-100 insulin syringe | Measuring the actual dose | Better precision for microgram dosing |
| Alcohol pads | Swabbing vial stoppers and prep area | Reduces contamination risk |
Clean gear is only half the job. The other half is having the right gear for the exact task.
Pre-flight checklist before you touch the vial
- Check the powder: It should look dry and intact.
- Inspect the diluent: If the water looks off, don’t use it.
- Wash your hands: Basic, but many avoidable problems originate here.
- Lay out everything first: Don’t open sterile items and then go searching for tape or a pen.
That prep work feels minor. It isn’t. It’s what makes the actual mixing step smooth instead of sloppy.
The Step-by-Step AOD 9604 Reconstitution Process
AOD 9604 is easy to mix badly when you rush it. The usual failure points are simple: too much force on the powder, sloppy sterile technique, or a concentration that makes later dosing harder than it needs to be.
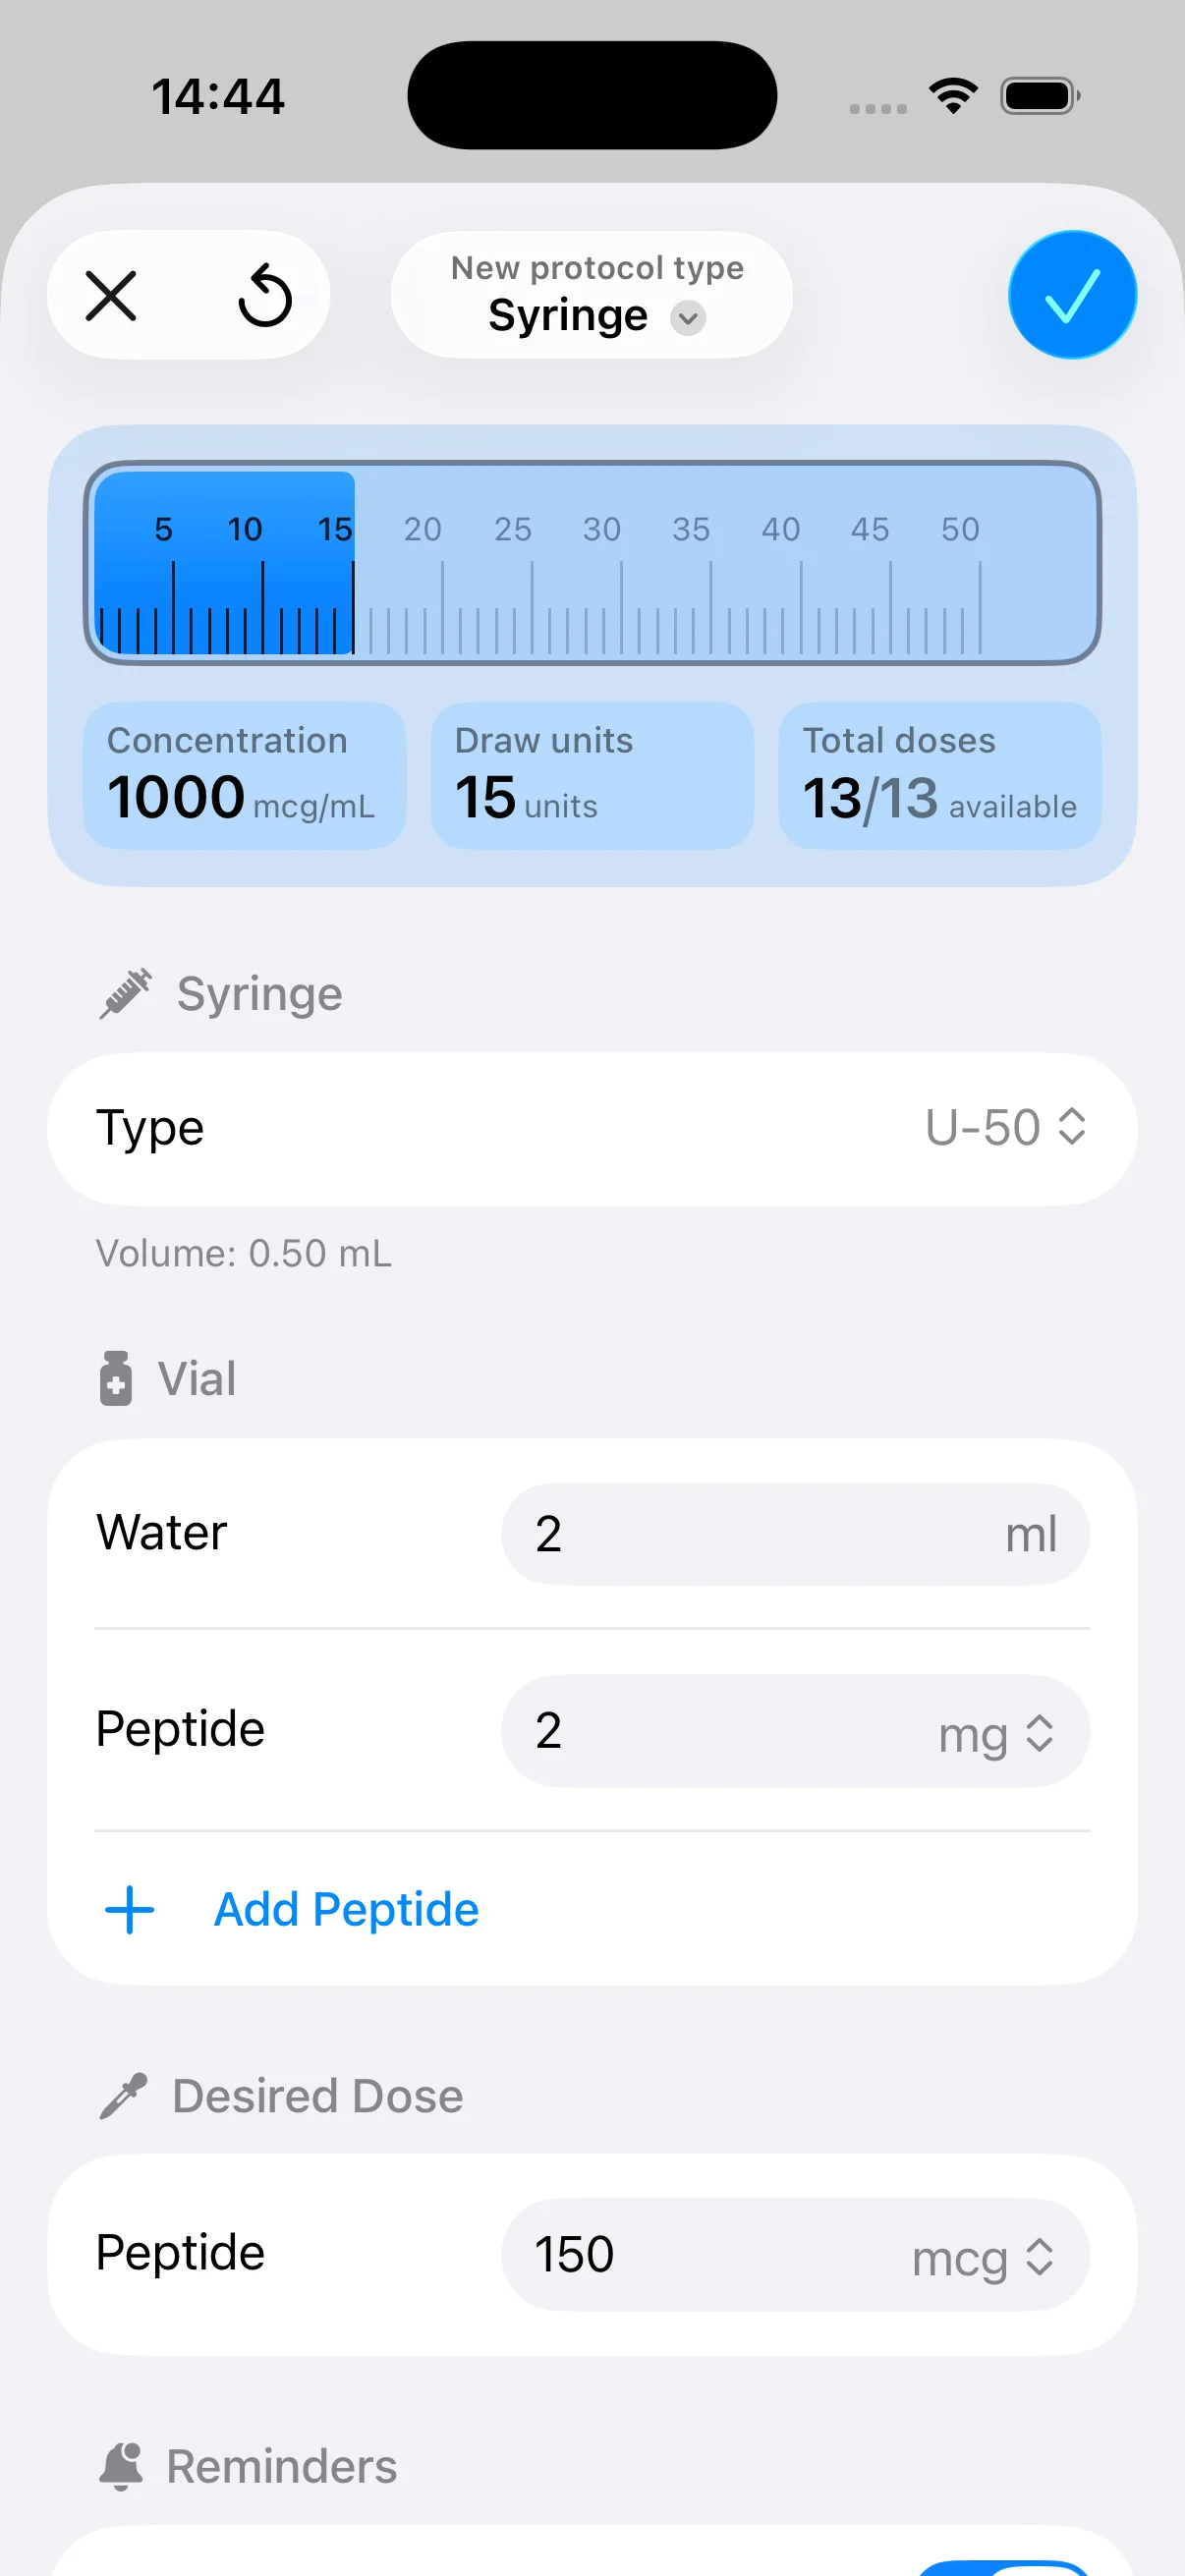
For many users, a practical starting setup is 2 mL of bacteriostatic water added to a 5 mg vial. That gives a concentration of 2.5 mg/mL, or 2,500 mcg/mL. It is popular for a reason. The math stays clean on a U-100 insulin syringe, and cleaner math means fewer dosing mistakes. If you want a broader reference before choosing your final concentration, review these peptide reconstitution guidelines.

Bring the vial and diluent to room temperature
Cold liquid hitting lyophilized peptide can make the dissolve slower and rougher than it needs to be. Let the peptide vial and the bacteriostatic water sit until they reach room temperature.
Then prep the vial tops correctly. Remove the plastic caps, swab both rubber stoppers with alcohol, and let the alcohol dry before the needle goes in. Wet alcohol does not improve sterility. It just adds avoidable residue to the stopper.
A clean working sequence looks like this:
- Wash your hands
- Wipe down the prep surface
- Swab both vial stoppers
- Open the syringe only when everything is ready
- Keep the needle and stopper untouched after prep
The goal is not perfection for its own sake. The goal is reducing contamination risk before the peptide is mixed and stored for repeated access.
Add the diluent slowly and on purpose
Draw up your planned amount of bacteriostatic water. For the standard setup above, that is 2 mL.
Insert the needle into the peptide vial and direct the liquid down the inside wall of the glass, not straight into the powder puck. Slow flow matters here. A hard stream can foam the solution or physically disturb the peptide more than necessary. You are trying to hydrate the powder gently, not blast it apart.
That one habit improves consistency.
A short visual helps if you prefer to watch the hand movements before doing them yourself.
Dissolve it gently, then inspect what you made
Once all the diluent is in the vial, let it settle for a moment. Then swirl or roll it gently until the powder fully dissolves. Do not shake it. Shaking introduces bubbles and makes it harder to tell whether the solution is clear.
What you want to see is a clear, colorless solution. If the vial stays cloudy, shows floating particles, or looks wrong in any way, stop there and reassess before using it.
Use this check:
- Clear and colorless: acceptable
- Cloudy solution: do not use until you identify the cause
- Visible particles: discard
- Foam from rough handling: let it settle, then inspect again carefully
- No label after mixing: fix it immediately
Label the vial before it leaves the workspace
Write down the concentration and the date mixed right away. Do it before the vial goes into storage.
This is one of those habits that saves trouble later. It prevents mix-ups between compounds, helps you track usable storage time, and makes dose calculation faster when you return to the vial. It also pairs well with a dosing calculator like PepFlow, because the software is only as good as the concentration you entered. Clean reconstitution and correct labeling are what make the later math trustworthy.
Calculating Your Dose Dilution Math Made Easy
Dosing mistakes usually happen at 6 a.m., with a half-read vial label and a syringe in hand. The weak point is rarely the peptide. It is the conversion step between what is in the vial, what you want in micrograms, and what you pull in syringe units.
The math is simple if the setup is clean.
Use one formula and stick to it
Every dose calculation comes back to the same relationship:
Desired dose ÷ concentration = volume to draw
Then convert that volume into syringe units. On a U-100 insulin syringe, 1 mL = 100 units.
That gives you a repeatable workflow:
- Convert the vial concentration into mcg/mL
- Divide your target dose by that concentration
- Convert the final mL amount into syringe units
If you skip one of those steps mentally, errors show up fast.
A real dosing example
Say your reconstituted vial concentration is 2,500 mcg/mL and your target dose is 300 mcg.
The math looks like this:
| Step | Value |
|---|---|
| Concentration | 2,500 mcg/mL |
| Desired dose | 300 mcg |
| Calculation | 300 ÷ 2,500 = 0.12 mL |
| U-100 conversion | 0.12 mL = 12 units |
That means you would draw 12 units on a U-100 insulin syringe.
Clean concentration makes clean dosing. If the vial was mixed carefully and labeled correctly, the calculation becomes routine instead of risky.
Why manual math fails in practice
Manual math breaks down in predictable ways:
- mg vs mcg confusion: A small unit mistake creates a large dose error
- mL vs units confusion: The syringe is marked in units, but the calculation often starts in mL
- Wrong remembered dilution: A vial mixed with one volume of diluent gets mistaken for another
- Bad labeling habits: Correct math on the wrong concentration is still the wrong dose
These are process failures, not intelligence failures. The fix is building a system that removes guesswork.
A dedicated peptide dosage calculator for vial concentration and syringe units helps with that. To ensure consistency, some users prefer a dedicated peptide calculator over doing fresh conversions on paper each time. The practical value is error control. Enter the peptide amount, the diluent volume, and the target dose once, then use the same output each time you draw.
Choose a dilution you can measure accurately
A mathematically correct dilution is not always the easiest one to use. That trade-off matters.
If your setup leaves you drawing tiny slivers on the syringe, day-to-day accuracy gets worse, especially with cold hands, poor lighting, or a rushed routine. A slightly more dilute vial can make each draw easier to read and easier to repeat. The goal is not just theoretical precision. The goal is repeatable precision.
That is why the reconstitution step and the dosing step are tied together. The amount of diluent you add determines how forgiving the syringe measurements will be for the rest of the vial’s life.
Safe Storage and Handling After Mixing
You mix a vial carefully, get the math right, then leave it on the counter for an hour while the day gets busy. That is how good technique gets undermined after the fact. Once AOD 9604 is in solution, storage and handling start affecting what you draw from the vial.

What good storage looks like
Keep reconstituted AOD 9604 refrigerated at 2 to 8 °C (35.6 to 46.4 °F), protect it from light, and label it the day you mix it. A practical use window is often about 4 weeks, as noted earlier. The exact clock matters less than consistency. A vial stored cold, kept clean, and handled briefly during each draw is easier to trust than one that has been warmed, moved around, and left exposed repeatedly.
Store it in the main body of the fridge, not the door. The door swings through bigger temperature changes, and those small fluctuations add up over repeated use.
Good storage is simple:
- Return it to the fridge right after use: Less time at room temperature means less avoidable stress on the solution
- Keep it out of direct light: Use the box or place it in a darker section of the fridge
- Label the vial clearly: Include compound name, concentration, and reconstitution date
- Keep the routine stable: One storage spot, one labeling format, one handling process
That last point saves more mistakes than people expect. In peptide handling, consistency is a safety tool.
How to pull repeat doses cleanly
Every stopper puncture is a contamination opportunity. Clean technique keeps a usable vial usable.
Swab the rubber stopper before each draw and let the alcohol dry before inserting the needle. Use a new sterile syringe each time. Put the vial back in the fridge as soon as the dose is drawn instead of letting it sit out while you do something else.
If you keep more than one vial in rotation, make mix-ups hard to make. Similar clear liquids in similar vials are a bad setup. I prefer labels that can be read at a glance without picking the vial up. Name, concentration, and date should be obvious.
A vial that is stored well should look the same, draw the same, and inspire the same confidence on the last dose as it did on the first.
Watch for changes you did not see on day one. Cloudiness, particles, discoloration, or an unusual feel during the draw are reasons to stop and reassess. Potency drift is one problem. Sterility concerns are the bigger one.
Troubleshooting Common Reconstitution Issues
You finish mixing, hold the vial to the light, and something looks off. That is the moment to slow down. Troubleshooting is not about saving a vial at all costs. It is about deciding whether the solution is still trustworthy enough to use.

Cloudy solution or visible particles
A properly reconstituted AOD 9604 vial should look clear and uniform. If you see haze, floating specks, or anything settled that does not disappear with a gentle swirl, treat that as a failed mix.
The usual causes are incomplete dissolution, poor sterile technique, or rough handling during the mix. The practical response is simple. Do not inject a vial you are already second-guessing. Replacing one vial costs less than dealing with contamination risk or unreliable dosing.
Foam or bubbles after mixing
Foam usually comes from pushing the diluent in too fast or hitting the powder directly with too much force. Small surface bubbles are not always a disaster, but heavy foaming is a sign the peptide was handled too aggressively.
Let the vial rest for a few minutes, then check it again. If the bubbles clear and the solution becomes fully transparent, you may have avoided a loss. If the vial stays frothy, cloudy, or uneven, stop there. In practice, this is one of the easiest mistakes to prevent. Slow injection down the glass keeps the peptide under less stress and gives you a cleaner final solution.
This is also where math errors tend to pile on top of handling errors. If you end up remaking a vial, recalculate the concentration instead of relying on memory. PepFlow helps remove that guesswork, which matters even more after a failed first attempt.
Gelled powder or stubborn clumps
Clumping usually starts at the moment the diluent hits the powder. If the stream is too forceful, the lyophilized cake can compact into a sticky mass that resists dissolving. Shaking harder rarely fixes it. It usually makes the vial rougher, bubblier, and less reliable.
Use this response guide:
- A few small clumps: Let the vial sit briefly, then swirl gently until the solution clears
- Soft material stuck to the side or bottom: Give it time before touching it again. Many partial mixes resolve with patience
- Thick gel or compact mass: Do not shake or jab at it with repeated force
- Cloudiness plus clumping: Assume the vial is compromised and discard it
The trade-off here is patience versus salvage. Waiting a few extra minutes can save a good vial. Forcing a bad mix usually turns a recoverable mistake into a wasted one.
Good reconstitution looks boring. Clear vial, clean math, no surprises. That is the standard.
AOD 9604 FAQs and Important Disclaimers
Can you mix AOD 9604 with other compounds in the same vial
Keep them separate.
Mixing compounds in one vial makes the concentration harder to verify, changes your injection volume math, and gives you no clean way to trace a problem if irritation or instability shows up later. In practice, separate vials save time because troubleshooting stays simple.
What time of day do people usually use it
Many users place it in a once-daily subcutaneous routine, often earlier in the day and sometimes while fasted. The exact schedule matters less than consistency and accurate dosing.
The bigger risk is not timing. It is assuming a protocol from a forum applies to your vial strength, dilution, and personal response without checking the math first.
How long will one vial last
That depends on three numbers: total peptide in the vial, how much bacteriostatic water you added, and your intended dose per injection.
Once those are set, the answer is simple. Convert the vial total into micrograms, divide by your planned dose, and confirm what that translates to in syringe units. This is one of the easiest places to make an expensive mistake by relying on memory or rough estimates. PepFlow helps reduce that error by calculating the concentration and syringe draw from your actual setup.
What should the finished vial look like
A properly mixed vial should look clear and colorless.
Do not use it if you see cloudiness, floating material, unusual discoloration, or persistent foam that does not settle. Those signs can point to handling error, contamination, or a compromised product.
Is this medical advice
No. This guide is educational and does not replace medical care.
AOD 9604 should be used only with input from a qualified healthcare professional who can evaluate whether it fits your situation, review contraindications, and help you monitor for adverse effects. Product quality matters too. Clean technique and correct reconstitution cannot fix a peptide that was poorly manufactured, damaged in transit, or stored improperly before it reached you.
PepFlow helps remove one common failure point after reconstitution, the dosing math. If you want a simple way to convert vial strength and dilution into exact syringe units, organize cycled protocols, and stay on schedule with reminders, take a look at PepFlow.