You have the vial in one hand, bacteriostatic water on the table, and a syringe ready to go. This is the point where people either slow down and do it cleanly, or rush and create problems that show up later as cloudy solution, dosing confusion, or a vial they no longer trust.
Learning how to reconstitute semaglutide is not difficult. It is exact. The powder is fragile, the math matters, and sterile technique matters as much as the amount you inject into the vial. Small handling mistakes can turn a simple process into an unreliable one.
Done properly, reconstitution gives you a clear, consistent solution that is easier to dose and easier to track. Done poorly, it introduces uncertainty at every step after that.
Table of Contents
Why Proper Reconstitution is Essential
A vial of lyophilized semaglutide can make the process look deceptively simple. Add water, swirl, and move on. In practice, that mindset causes most of the trouble.
Reconstitution is a handling procedure, not just a mixing task. You are trying to do three things at once. Preserve the peptide, keep the vial sterile, and create a concentration you can dose accurately without second-guessing every draw.
What the process is protecting
If you inject diluent aggressively or shake the vial, you are not saving time. You are increasing the chance of damaging the material you are trying to preserve. The physical handling matters because semaglutide is not something you want to treat like a standard liquid medication.
The same goes for sterility. Once the vial is mixed, every future dose depends on the cleanliness of this first setup. Sloppy prep does not stay isolated to one moment. It follows the vial through its whole usable life.
Practical rule: If you would not trust the setup for a careful lab procedure, do not trust it for peptide reconstitution.
Precision prevents downstream errors
Many individuals worry about the needle part first. The primary challenge starts with concentration and tracking. If you do not know exactly how much diluent went in, or you label the vial poorly, the confusion does not show up until you try to pull a dose days later.
That is why experienced users treat reconstitution as the foundation of the whole protocol. The clearest workflow is the safest one:
-
Clean setup first: Reduce avoidable contamination risk before the vial is opened.
-
Controlled mixing second: Protect the powder from rough handling.
-
Reliable labeling last: Make later dosing simple and unambiguous.
A careful reconstitution routine also does something important psychologically. It removes guesswork. Once the vial is mixed correctly, you stop wondering whether the concentration is right, whether the powder dissolved, or whether the next draw will be consistent.
Your Essential Toolkit for Sterile Semaglutide Mixing
Before you touch either vial, build the workspace. Missing one item tends to create rushed substitutions, and rushed substitutions are where technique breaks down.

A good setup is simple, but each item has a job.
What you need on the table
-
Lyophilized semaglutide vial: This is the freeze-dried powder you are reconstituting. Check the vial strength printed on the label before doing any math.
-
Bacteriostatic water: This is the standard choice for multi-use handling because it supports longer post-mix use than sterile water in practical routines.
-
Sterile syringe for mixing: A 3 mL sterile syringe with a 29 to 31G needle is part of the verified methodology for controlled reconstitution and precision handling.
-
Alcohol swabs: Use them on vial stoppers and on the work surface where needed.
-
Optional vial adapter: Helpful if you want cleaner, more repeatable draws.
-
Insulin syringes for dosing: These make small-volume measurement more manageable once the vial is mixed.
-
Sharps container: Do not improvise disposal.
-
Label or tape and marker: Write the concentration and the reconstitution date immediately after mixing.
Why bacteriostatic water is usually the better choice
One of the most common points of confusion is the diluent itself. People treat bacteriostatic water and sterile water as interchangeable. They are not identical once you think about storage and repeat access.
The background guidance used in peptide handling favors bacteriostatic water for reconstituted multi-dose use. If you want a cleaner routine and fewer expiration headaches, that choice simplifies things.
For readers who want a planning tool for protocols and dose organization, PepFlow is built around vial configuration, scheduling, and routine tracking. The app is not a substitute for sterile technique, but it supports the parts people often lose track of once the vial is mixed.
Set the environment before the needle moves
The room does not need to look like a cleanroom. It does need to be controlled.
Use this checklist:
-
Clear the surface: Remove clutter so nothing brushes the vial, cap, or syringe.
-
Sanitize your hands: Wash thoroughly before handling supplies.
-
Let the vial sit briefly: The verified protocol notes allowing the vial to reach room temperature before mixing to improve dissolution behavior.
-
Lay out supplies in order: Vial, diluent, syringe, swabs, label, sharps container.
Key takeaway: Good reconstitution starts before the plunger moves. If the setup is calm and organized, the actual mixing is much easier to do correctly.
The Step-by-Step Guide to Reconstituting Semaglutide
A common failure point looks small at first. The powder dissolves, the vial looks fine, and the user assumes the job is done. In practice, the mistakes that matter usually happen during the transfer. Too much force on the plunger, a sloppy angle into the vial, or rough mixing can turn a simple procedure into an avoidable problem.

Once the workspace is ready, the goal is simple. Add the planned amount of diluent without contaminating the vial or stressing the peptide.
Draw the diluent accurately
Pull the exact volume of bacteriostatic water you already selected for your target concentration. Stay deliberate here. Reconstitution errors often start before the water ever reaches the semaglutide vial.
If you are using a fresh diluent vial, pressure can resist the draw. Injecting a matching amount of air into the bacteriostatic water vial before withdrawing the liquid usually makes the pull smoother and easier to control. Keep the syringe markings at eye level and confirm the final volume before you move on.
If you have not settled on a mixing ratio yet, a peptide dosage calculator for reconstitution planning can help you set the volume first so you are not doing math mid-procedure.
Add the diluent gently
Insert the needle into the semaglutide vial and direct the stream against the inner glass wall, not straight into the powder bed.
That technique matters. A slow run down the vial wall is gentler, reduces foaming, and gives the powder time to hydrate evenly. Fast injection feels efficient, but it creates turbulence you do not need.
Once all diluent is in the vial, remove the needle and keep the vial upright.
Tip: If bubbles or foam appear, leave the vial alone for a moment. Do not shake to clear it.
Dissolve the powder without shaking
Mix with light swirling or a slow roll between your fingers. The target is complete dissolution with as little mechanical stress as possible.
Some vials clear quickly. Others need a little time. Let the powder dissolve at its own pace rather than trying to force the process with flicking, shaking, or repeated hard rotations. Experienced peptide users usually get in trouble when they try to speed up this part.
A practical endpoint is a solution that looks uniform and free of visible residue.
Here is a practical video reference for the handling flow:
Check the vial before you label it
Before the vial goes into storage, inspect it under good light.
Use this quick check:
-
Solution clarity: The liquid should appear clear and evenly mixed.
-
No visible particles: If you still see powder or flecks, give it more time with gentle swirling.
-
No aggressive remixing: Shaking does not solve an incomplete dissolve. It usually makes inspection harder.
-
Label right away: Record the concentration and reconstitution date immediately so the vial is usable later without guesswork.
This last check is where a disciplined process pays off. Good technique during mixing protects the vial. Good labeling protects every dose that follows. PepFlow is particularly useful after this point because the common failure shifts from handling to math, scheduling, and keeping the concentration tied to the correct dose plan.
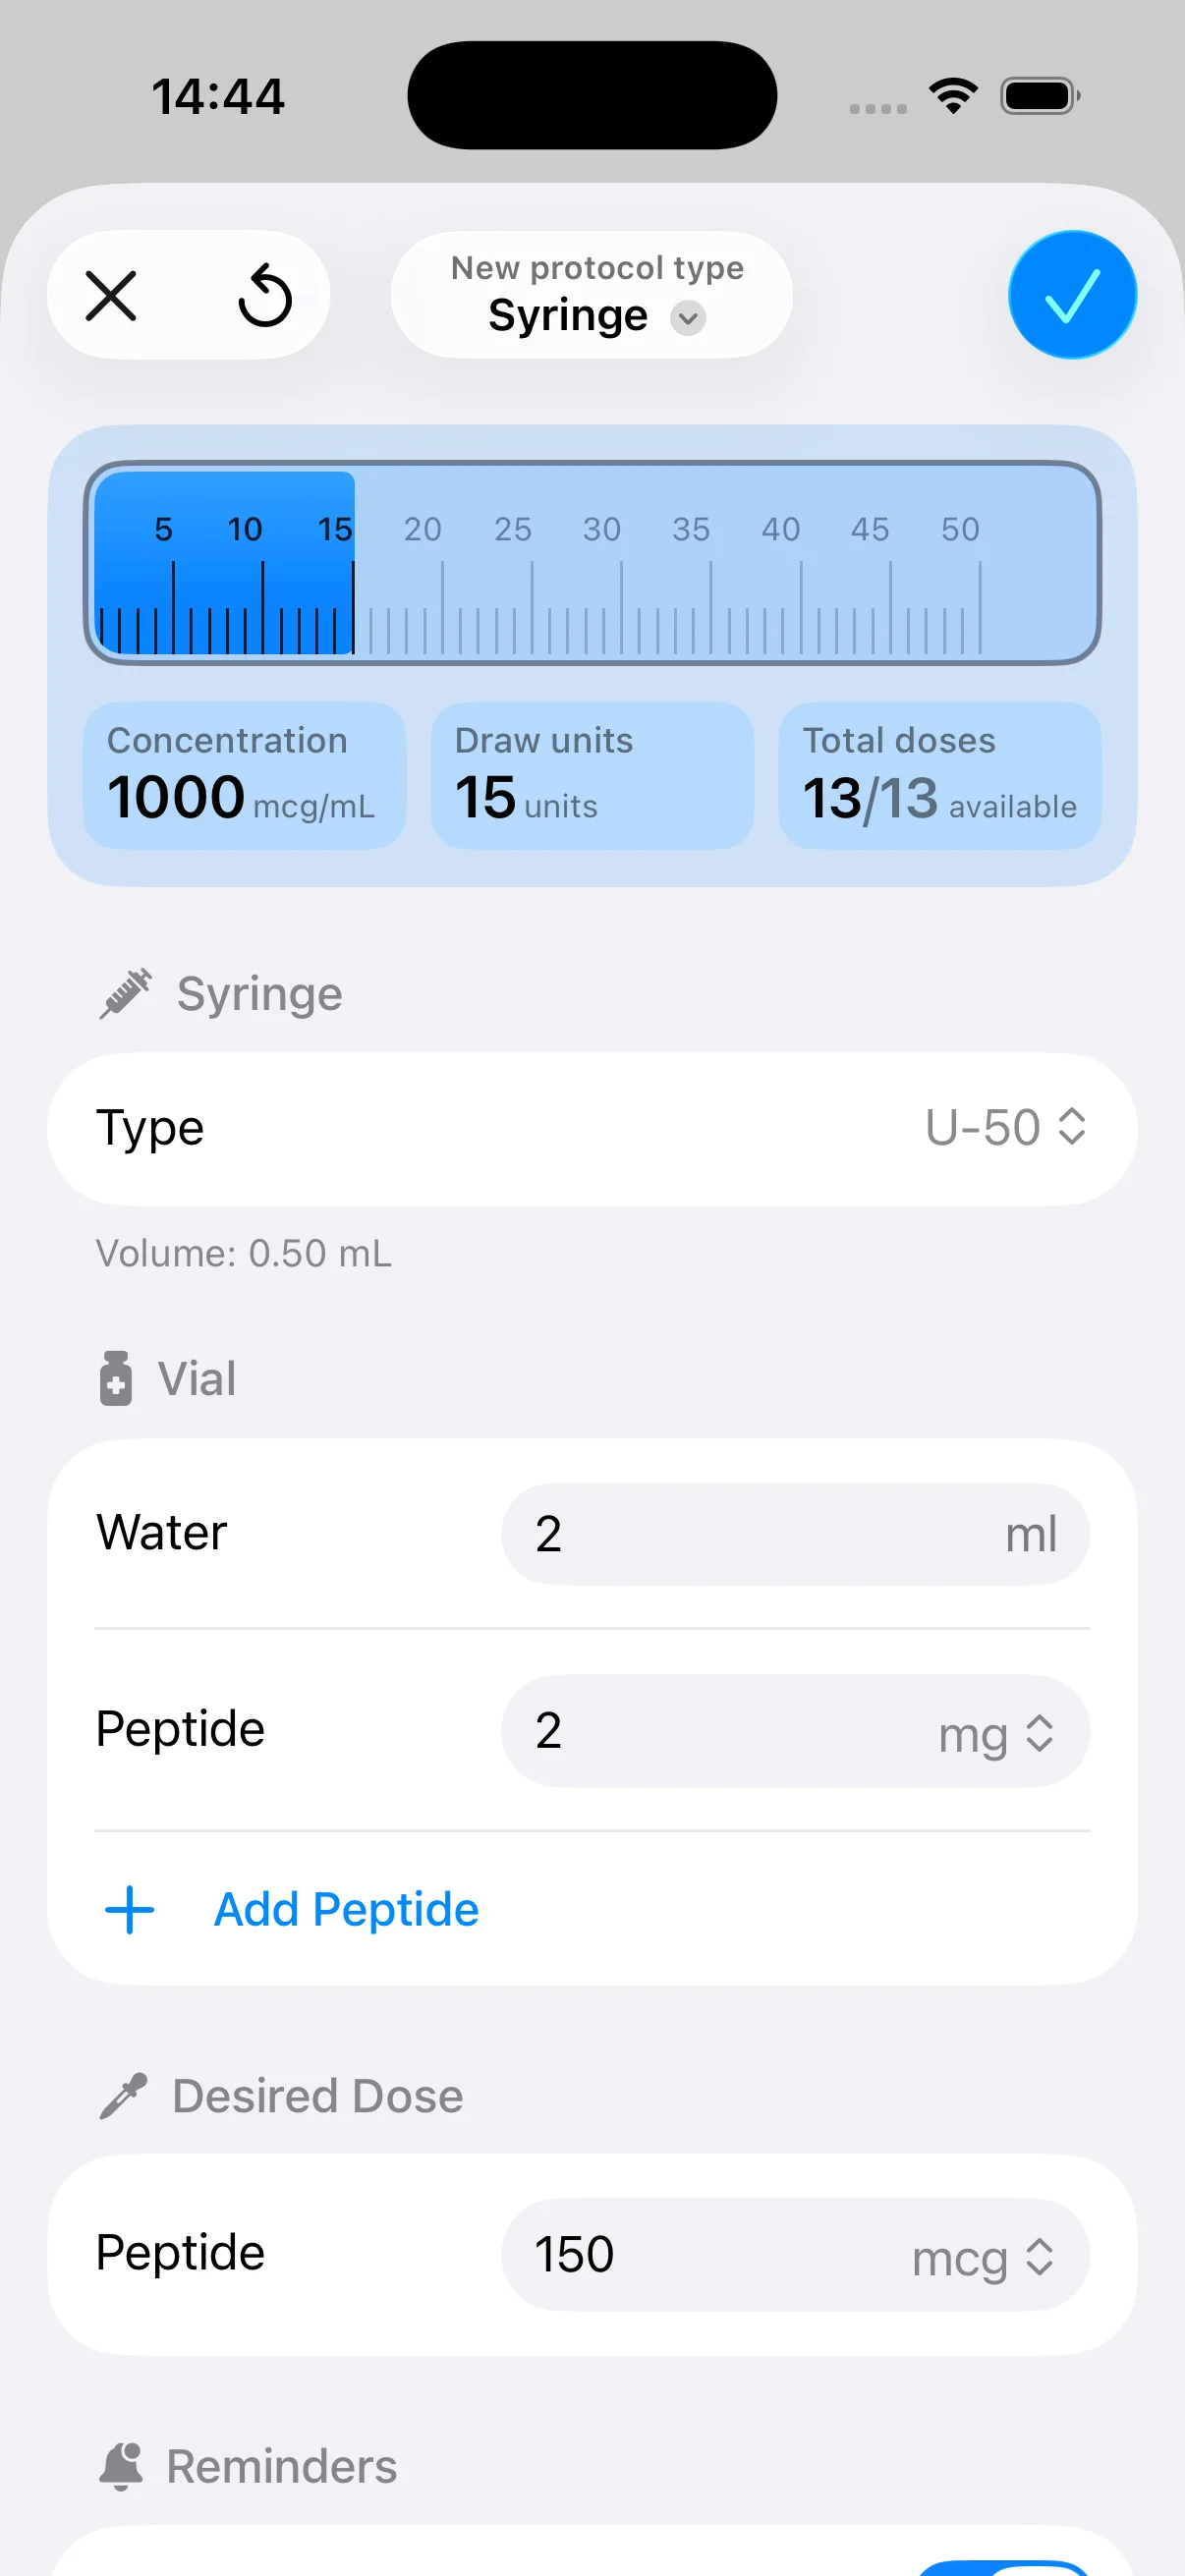
Calculating Concentrations and Doses with Confidence
A vial can be mixed perfectly and still be used incorrectly if the concentration is off by a simple conversion error. In practice, that is the failure point I see most often. The sterile work is done, the powder is dissolved, and then someone trusts memory instead of checking the numbers.
Start with one calculation and write it down clearly.
Concentration = total milligrams in the vial ÷ total milliliters of diluent added
If a 5 mg vial receives 2 mL of bacteriostatic water, the final concentration is 2.5 mg/mL.
Dose volume comes next. Semaglutide doses are often discussed in micrograms, so the unit conversion has to stay explicit:
-
1 mg = 1000 mcg
-
2.5 mg/mL = 2500 mcg/mL
-
0.1 mL of a 2.5 mg/mL solution = 250 mcg
-
On a U-100 insulin syringe, 0.1 mL = 10 units
That gives you a usable reference point without forcing you to redo the math at every draw.
Example Semaglutide Concentration Calculations
| Vial Size | Bac Water Added | Final Concentration | Volume for 250mcg Dose |
|---|---|---|---|
| 5mg | 2mL | 2.5mg/mL | 0.1mL |
| 10mg | 4mL | 2.5mg/mL | 0.1mL |
| 5mg | 5mL | 1mg/mL | 0.25mL |
Those examples illustrate the trade-off. A dilution that produces a clean, easy-to-read syringe volume usually reduces handling errors. A technically correct mix that leads to awkward draw volumes invites mistakes later.
Manual math fails in predictable ways. Users misremember how much diluent went into the vial, convert mg to mcg too quickly, or read syringe units as if they were the same thing as milliliters. The arithmetic is simple. The workflow is not.
That is why I recommend using a purpose-built tool once the vial is reconstituted and labeled. A calculator designed for peptides keeps vial strength, reconstitution volume, target dose, and syringe units tied to the same record. It removes the most common source of error, which is not sterile technique. It is dose math done from memory. The PepFlow peptide dosage calculator guide is a practical starting point if you want a cleaner system for both calculations and dose scheduling.
Use one final rule. The number on the vial label, the number in your calculator, and the number you draw into the syringe should all match the same concentration record. If any one of those three is unclear, stop and recalculate before using the vial.
Storing and Handling Your Reconstituted Vial
A freshly mixed vial can still be ruined by poor storage. Reconstitution is not the finish line. Storage determines whether the solution stays usable and predictable through the rest of its life.

The priority is simple. Keep it cold, keep it clean, and stop handling it more than necessary.
Refrigeration is not optional
Compounded semaglutide vials show 25% faster degradation at room temperature versus refrigerated storage. After reconstitution with bacteriostatic water, vials are stable for approximately 28 days when stored at 2-8°C, as a lack of proper refrigeration can lead to a 20-30% potency loss according to stability assays, based on this storage and handling reference.
That gives you the practical rule. Store the vial in the refrigerator and treat room temperature exposure as brief, not routine.
What good storage looks like day to day
The most reliable storage habits are boring. That is a good thing.
-
Return it to the refrigerator after use: Do not leave it out on a counter between tasks.
-
Label clearly: Include the concentration and the date it was mixed.
-
Protect the stopper: Swab before each access.
-
Keep handling minimal: Repeated warming, moving, and touching adds risk without adding value.
The verified data also notes that bacteriostatic water contains benzyl alcohol, a preservative tied to strong bacterial growth suppression during refrigerated storage. That preservative support is one reason multi-dose handling is more workable when the vial is mixed and stored correctly.
Watch temperature and time together
People often focus on the calendar. Time matters, but temperature and time work together. A vial that lives in the correct refrigeration range is a different situation from a vial that spends repeated stretches warm and then gets put back.
The same verified material also points out that warming the vial briefly before a draw can reduce viscosity and make drawing easier. That is a handling choice, not a storage plan. Letting the vial sit briefly before a dose is not the same as storing it at room temperature.
Storage rule to remember: Cold storage preserves your margin for error. Warm storage shrinks it.
If the solution looks off, stop using assumptions as quality control. A vial should remain visually clear and properly tracked. If you cannot verify what it is, when it was mixed, or how it was stored, that vial has already become unreliable.
Common Reconstitution Mistakes and How to Avoid Them
The biggest myth in peptide handling is that mistakes are obvious. Many are not. The vial may look usable even after the process was sloppy.
The most common failures come from people trying to move too quickly or “eyeball” small details that should be measured.
Mistake one is treating the vial too roughly
Shaking feels harmless because it is common with other medications. With semaglutide, it is the wrong instinct.
The verified reporting states that user errors during reconstitution, such as shaking the vial or introducing contaminants, are linked to a 35% rate of inefficacy reported in online forums. Bubbles in the syringe, a common error affecting 25% of self-administrations, can cause a dosing variance of 15-20%, according to this reconstitution and dosing discussion.
That is why “close enough” handling is not close enough.
The avoidable errors that show up most often
-
Shaking instead of swirling: This is the classic mistake. Gentle rolling is the correct response.
-
Injecting diluent straight into the powder: Aimed flow down the vial wall is the cleaner method.
-
Ignoring bubbles in the syringe: Small air pockets can distort a small-volume dose.
-
Poor sterile technique: Touching the wrong surfaces or skipping alcohol prep creates contamination risk.
-
Over-diluting the vial: Dilute solutions can make micro-dosing less practical and easier to misread.
What to do instead
When the process starts to go off track, people react by doing more. More motion, more tapping, more handling. The better move is less.
Use this correction logic:
-
If the solution is slow to dissolve, wait and swirl gently.
-
If you see bubbles in the syringe, pause and clear them before measuring the final volume.
-
If the vial top or needle sterility is questionable, replace the supply rather than rationalize it.
Practical mindset: Treat every uncertain step as a sign to reset, not a sign to push through.
A careful user is not someone who never makes a mistake. It is someone who notices a bad setup early and refuses to build the next step on top of it.
Frequently Asked Questions About Reconstituting Semaglutide
What should the final solution look like
It should look clear and particle-free. If you see visible powder, give it time and use gentle swirling rather than force.
Is it normal for the vial to feel pressurized or vacuum-sealed
Yes. Pressure differences are part of vial handling. Controlled air management is often used during drawing to make transfers smoother and more predictable.
Can I preload syringes for the week
A cleaner routine is to keep the solution in the labeled vial and draw each dose carefully when needed. Preloading adds extra handling and another place where tracking can get messy.
What if I used sterile water instead of bacteriostatic water
The practical difference is storage flexibility. Sterile water is less forgiving for multi-week handling, while bacteriostatic water is the standard choice when the vial will be accessed repeatedly.
Should I warm the vial before drawing a dose
Briefly letting it come closer to room temperature before drawing can make the liquid easier to pull into the syringe. That is different from storing it warm.
What if I want more protocol guidance
If you are comparing routines, scheduling approaches, or general peptide workflow topics, the articles at PepFlow’s blog are a useful reference point.
PepFlow helps remove the part of peptide use that trips people up most often: the math and the schedule. If you want a clean way to convert vial concentration into practical syringe units, organize protocol timing, and keep dosing consistent without doing repeated manual calculations, take a look at PepFlow.